Eclipse maven创建spring mvc project
来源:互联网 发布:php怎么做直播网站 编辑:程序博客网 时间:2024/06/12 00:12
参考:http://www.programcreek.com/2014/02/spring-mvc-helloworld-using-maven-in-eclipse/
Spring MVC HelloWorld Using Maven in Eclipse
Java developers often rely on examples to learn Spring framework. Simple examples are often a key learning resource. There are many Spring MVC HelloWorld applications. However, most of them are outdated (do not integrate Maven, use old version of Spring, etc) or not complete (missing key steps or file hierarchy view). Therefore can not lead to a perfectly working Hello World. In this article, I will show steps for creating a Spring MVC HelloWorld application using Maven in Eclipse. All files's content and locations are illustrated.
Prerequisite
- Windows 7, Java 7, Eclipse Kepler Java EE
- Tomcat 7 (How to install Tomcat 7 on Eclipse)
Step 1: Create a Maven Project
Create a Maven project by following the following steps:


Select "webapp".
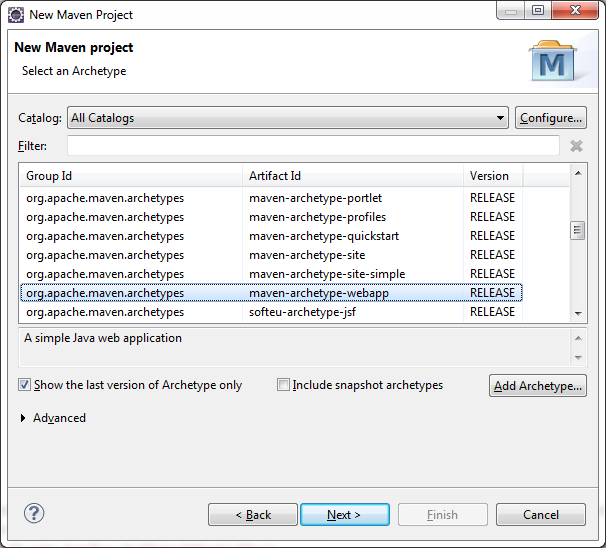

GroupId identifies the project uniquely across all projects, so we need to enforce a naming schema. ArtifactId is the name of the jar without version. For more information about each field, check out the official page about maven naming convention. (You can do this later. It makes more sense, when you complete the project first.)
After the Maven project is created, the project in the Navigator view should look like the following:

As shown above, there is an error marked with red. If you open index.jsp file, you can see the error message:
The superclass "javax.servlet.http.HttpServlet" was not found on the Java Build Path
To fix the problem, right click on project -> Properties -> Java Build Path -> Add Library...-> Server Runtime -> Apache Tomcat -> Finish.
Step 2: Configure Spring
To make a Spring web application, we need to configure several xml files. First of all, we need to add Spring dependencies. Edit the automatically generated pom.xml file to be the following:
pom.xml
<project xmlns="http://maven.apache.org/POM/4.0.0" xmlns:xsi="http://www.w3.org/2001/XMLSchema-instance"xsi:schemaLocation="http://maven.apache.org/POM/4.0.0 http://maven.apache.org/maven-v4_0_0.xsd"><modelVersion>4.0.0</modelVersion><groupId>com.programcreek</groupId><artifactId>HelloWorld</artifactId><packaging>war</packaging><version>0.0.1-SNAPSHOT</version><name>HelloWorld Maven Webapp</name><url>http://maven.apache.org</url> <properties><spring.version>4.0.1.RELEASE</spring.version></properties><dependencies><dependency><groupId>junit</groupId><artifactId>junit</artifactId><version>3.8.1</version><scope>test</scope></dependency><!-- Spring dependencies --><dependency><groupId>org.springframework</groupId><artifactId>spring-core</artifactId><version>${spring.version}</version></dependency> <dependency><groupId>org.springframework</groupId><artifactId>spring-web</artifactId><version>${spring.version}</version></dependency> <dependency><groupId>org.springframework</groupId><artifactId>spring-webmvc</artifactId><version>${spring.version}</version></dependency> </dependencies> <build><finalName>HelloWorld</finalName></build></project>Edit the default web.xml:
<?xml version="1.0" encoding="UTF-8"?><web-app xmlns:xsi="http://www.w3.org/2001/XMLSchema-instance" xmlns="http://java.sun.com/xml/ns/javaee" xsi:schemaLocation="http://java.sun.com/xml/ns/javaee http://java.sun.com/xml/ns/javaee/web-app_3_0.xsd" id="WebApp_ID" version="3.0"> <display-name>Archetype Created Web Application</display-name> <servlet><servlet-name>dispatcher</servlet-name><servlet-class>org.springframework.web.servlet.DispatcherServlet</servlet-class><load-on-startup>1</load-on-startup></servlet> <servlet-mapping><servlet-name>dispatcher</servlet-name><url-pattern>/</url-pattern></servlet-mapping> <context-param><param-name>contextConfigLocation</param-name><param-value>/WEB-INF/dispatcher-servlet.xml</param-value></context-param> <listener><listener-class>org.springframework.web.context.ContextLoaderListener</listener-class></listener></web-app>
Create an xml file "dispatcher-servlet.xml" under the same directory of web.xml.
<span style="font-size:18px;"><beans xmlns="http://www.springframework.org/schema/beans"xmlns:context="http://www.springframework.org/schema/context"xmlns:xsi="http://www.w3.org/2001/XMLSchema-instance"xsi:schemaLocation="http://www.springframework.org/schema/beanshttp://www.springframework.org/schema/beans/spring-beans-3.0.xsdhttp://www.springframework.org/schema/contexthttp://www.springframework.org/schema/context/spring-context-3.0.xsd"> <context:component-scan base-package="com.programcreek.helloworld.controller" /> <beanclass="org.springframework.web.servlet.view.InternalResourceViewResolver"><property name="prefix"><value>/WEB-INF/views/</value></property><property name="suffix"><value>.jsp</value></property></bean></beans></span>In the above xml file,
base-package specifies the package of the controllers. prefix specifies the directory of views, and it is set to be /WEB-INF/views/, which means views directory should be created under WEB-INF. suffix specifies the file extension of views. For example, given a view "helloworld", the view will be located as /WEB-INF/views/helloworld.jsp. You can figure this out later in Step 3.Step 3: Create Spring Controller and View
Create the HelloWorldController under src/main/java/ directory.
HelloWorldController.java
package com.programcreek.helloworld.controller; import org.springframework.stereotype.Controller;import org.springframework.ui.Model;import org.springframework.web.bind.annotation.RequestMapping;import org.springframework.web.bind.annotation.RequestParam;import org.springframework.web.servlet.ModelAndView; @Controllerpublic class HelloWorldController {String message = "Welcome to Spring MVC!"; @RequestMapping("/hello")public ModelAndView showMessage(@RequestParam(value = "name", required = false, defaultValue = "World") String name) {System.out.println("in controller"); ModelAndView mv = new ModelAndView("helloworld");mv.addObject("message", message);mv.addObject("name", name);return mv;}}In the code above, @RequestMapping annotation maps web requests onto specific handler classes and/or handler methods, in this case, showMessage(). It provides a consistent style between Servlet and Portlet environments, with the semantics adapting to the concrete environment.
RequestParam indicates that a method parameter should be bound to a web request parameter. In this case, we also make it not required and give it a default value.
new ModelAndView("helloworld") determines that helloworld is the target view.
index.jsp
<%@ page language="java" contentType="text/html; charset=ISO-8859-1" pageEncoding="ISO-8859-1"%><!DOCTYPE html PUBLIC "-//W3C//DTD HTML 4.01 Transitional//EN" "http://www.w3.org/TR/html4/loose.dtd"><html><head><meta http-equiv="Content-Type" content="text/html; charset=ISO-8859-1"><title>Spring 4 MVC - HelloWorld Index Page</title></head><body> <center><h2>Hello World</h2><h3><a href="hello?name=Eric">Click Here</a></h3></center></body></html>
Create the helloworld.jsp file under /WEB-INF/views/ directory.
helloworld.jsp
<%@ page language="java" contentType="text/html; charset=ISO-8859-1" pageEncoding="ISO-8859-1"%><!DOCTYPE html PUBLIC "-//W3C//DTD HTML 4.01 Transitional//EN" "http://www.w3.org/TR/html4/loose.dtd"><html><head><meta http-equiv="Content-Type" content="text/html; charset=ISO-8859-1"><title>Spring 4 MVC -HelloWorld</title></head><body><center><h2>Hello World</h2><h2>${message} ${name}</h2></center></body></html>${variable} will be converted to the value of the variable.
Final Navigator view of the project:
Step 4: Run on Server
Right click the project and select Run As --> Run on Server.


- Eclipse maven创建spring mvc project
- eclipse maven创建web project
- eclipse创建maven web project
- Eclipse创建Maven Web Project
- eclipse下创建maven spring MVC 项目全步骤
- 基于Maven在Eclipse中创建&配置spring mvc
- Eclipse上创建一个Maven+Spring MVC的HelloWord项目
- Eclipse创建Maven Project和Maven Module
- Eclipse创建Maven Project跟Maven Module
- Eclipse创建Maven Project和Maven Module
- Eclipse创建Maven Project跟Maven Module
- Eclipse创建Maven Project跟Maven Module
- maven spring mvc project的配置
- Spring MVC(一)----eclipse通过Maven创建一个Spring MVC项目
- Create Spring MVC dynamic web project with Maven and make it support Eclipse IDE
- Maven 创建 Spring MVC 项目
- spring mvc maven工程创建
- Eclipse 使用maven创建Dynamic Web Project
- 关于启用 HTTPS 的一些经验分享
- 不能在本机启动SQL Server服务错误代码126
- Mesh网格编程(三) 正12面体
- MyEclipse2014中打开项目在文件浏览器中的位置的方法
- 这里有一份面筋请查收(二)
- Eclipse maven创建spring mvc project
- 了解cocoatouch框架
- Linux 802.1Q VLAN网络报文收发分析
- 常用PHP扩展下载
- 关于打包linker command failed with exit code 1 的问题
- Linux下部署php多版本共存
- 宏、const、static、extern、用法与使用场景
- 在一个已知的字符串中找最长单词
- php上传中文文件名出现乱码