STL系列:十个系列
来源:互联网 发布:金星脱口秀 知乎 编辑:程序博客网 时间:2024/06/10 13:07
STL系列之一 deque双向队列
分类: STL 他山之石 2011-11-08 09:52 7949人阅读 评论(8)收藏 举报deque双向队列是一种双向开口的连续线性空间,可以高效的在头尾两端插入和删除元素,deque在接口上和vector非常相似,下面列出deque的常用成员函数:

deque的实现比较复杂,内部会维护一个map(注意!不是STL中的map容器)即一小块连续的空间,该空间中每个元素都是指针,指向另一段(较大的)区域,这个区域称为缓冲区,缓冲区用来保存deque中的数据。因此deque在随机访问和遍历数据会比vector慢。具体的deque实现可以参考《STL源码剖析》,当然此书中使用的SGI STL与VS2008所使用的PJ STL的实现方法还是有区别的。下面给出了deque的结构图:
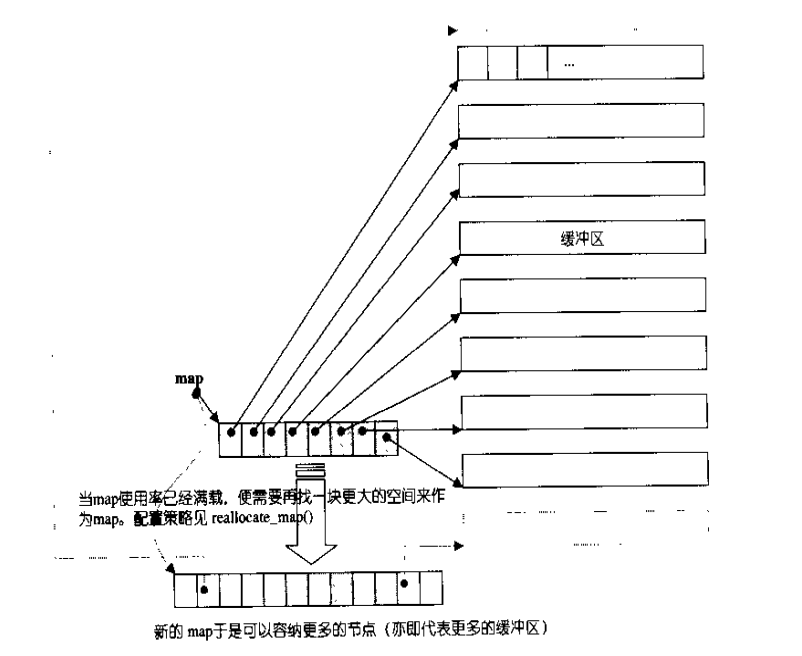
由于篇幅问题,deque的实现细节就不再深入了,下面给出deque的使用范例:
- //双向队列 deque
- //by MoreWindows http://blog.csdn.net/morewindows
- #include <deque>
- #include <cstdio>
- #include <algorithm>
- using namespace std;
- int main()
- {
- deque<int> ideq(20); //Create a deque ideq with 20 elements of default value 0
- deque<int>::iterator pos;
- int i;
-
- //使用assign()赋值 assign在计算机中就是赋值的意思
- for (i = 0; i < 20; ++i)
- ideq[i] = i;
-
- //输出deque
- printf("输出deque中数据:\n");
- for (i = 0; i < 20; ++i)
- printf("%d ", ideq[i]);
- putchar('\n');
-
- //在头尾加入新数据
- printf("\n在头尾加入新数据...\n");
- ideq.push_back(100);
- ideq.push_front(i);
-
- //输出deque
- printf("\n输出deque中数据:\n");
- for (pos = ideq.begin(); pos != ideq.end(); pos++)
- printf("%d ", *pos);
- putchar('\n');
-
- //查找
- const int FINDNUMBER = 19;
- printf("\n查找%d\n", FINDNUMBER);
- pos = find(ideq.begin(), ideq.end(), FINDNUMBER);
- if (pos != ideq.end())
- printf("find %d success\n", *pos);
- else
- printf("find failed\n");
-
- //在头尾删除数据
- printf("\n在头尾删除数据...\n");
- ideq.pop_back();
- ideq.pop_front();
-
- //输出deque
- printf("\n输出deque中数据:\n");
- for (pos = ideq.begin(); pos != ideq.end(); pos++)
- printf("%d ", *pos);
- putchar('\n');
- return 0;
- }
运行结果如下:
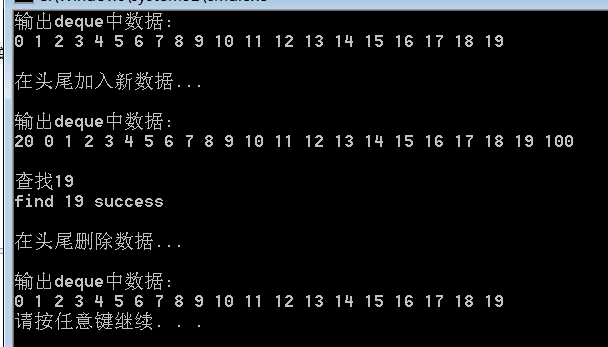
另外要注意一点。对于deque和vector来说,尽量少用erase(pos)和erase(beg,end)。因为这在中间删除数据后会导致后面的数据向前移动,从而使效率低下。
STL系列之二 stack栈
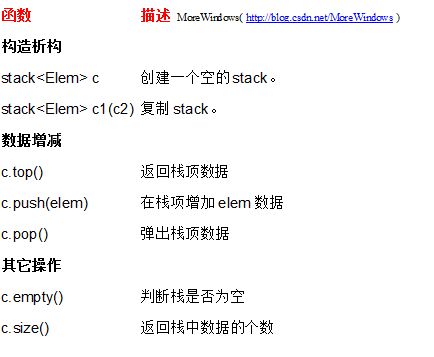
分类: STL 他山之石 2011-11-09 09:03 4131人阅读 评论(4)收藏 举报栈(statck)这种数据结构在计算机中是相当出名的。栈中的数据是先进后出的(First In Last Out, FILO)。栈只有一个出口,允许新增元素(只能在栈顶上增加)、移出元素(只能移出栈顶元素)、取得栈顶元素等操作。在STL中,栈是以别的容器作为底部结构,再将接口改变,使之符合栈的特性就可以了。因此实现非常的方便。下面就给出栈的函数列表和VS2008中栈的源代码,在STL中栈一共就5个常用操作函数(top()、push()、pop()、 size()、empty() ),很好记的。
VS2008中栈的源代码
友情提示:初次阅读时请注意其实现思想,不要在细节上浪费过多的时间。
- //VS2008中 stack的定义 MoreWindows整理(http://blog.csdn.net/MoreWindows)
- template<class _Ty, class _Container = deque<_Ty> >
- class stack
- { // LIFO queue implemented with a container
- public:
- typedef _Container container_type;
- typedef typename _Container::value_type value_type;
- typedef typename _Container::size_type size_type;
- typedef typename _Container::reference reference;
- typedef typename _Container::const_reference const_reference;
-
- stack() : c()
- { // construct with empty container
- }
-
- explicit stack(const _Container& _Cont) : c(_Cont)
- { // construct by copying specified container
- }
-
- bool empty() const
- { // test if stack is empty
- return (c.empty());
- }
-
- size_type size() const
- { // test length of stack
- return (c.size());
- }
-
- reference top()
- { // return last element of mutable stack
- return (c.back());
- }
-
- const_reference top() const
- { // return last element of nonmutable stack
- return (c.back());
- }
-
- void push(const value_type& _Val)
- { // insert element at end
- c.push_back(_Val);
- }
-
- void pop()
- { // erase last element
- c.pop_back();
- }
-
- const _Container& _Get_container() const
- { // get reference to container
- return (c);
- }
-
- protected:
- _Container c; // the underlying container
- };
可以看出,由于栈只是进一步封装别的数据结构,并提供自己的接口,所以代码非常简洁,如果不指定容器,默认是用deque来作为其底层数据结构的(对deque不是很了解?可以参阅《STL系列之一 deque双向队列》)。下面给出栈的使用范例:
- //栈 stack支持 empty() size() top() push() pop()
- // by MoreWindows(http://blog.csdn.net/MoreWindows)
- #include <stack>
- #include <vector>
- #include <list>
- #include <cstdio>
- using namespace std;
- int main()
- {
- //可以使用list或vector作为栈的容器,默认是使用deque的。
- stack<int, list<int>> a;
- stack<int, vector<int>> b;
- int i;
-
- //压入数据
- for (i = 0; i < 10; i++)
- {
- a.push(i);
- b.push(i);
- }
-
- //栈的大小
- printf("%d %d\n", a.size(), b.size());
-
- //取栈项数据并将数据弹出栈
- while (!a.empty())
- {
- printf("%d ", a.top());
- a.pop();
- }
- putchar('\n');
-
- while (!b.empty())
- {
- printf("%d ", b.top());
- b.pop();
- }
- putchar('\n');
- return 0;
- }
转载请标明出处,原文地址:http://blog.csdn.net/morewindows/article/details/6950881
STL系列之三 queue 单向队列
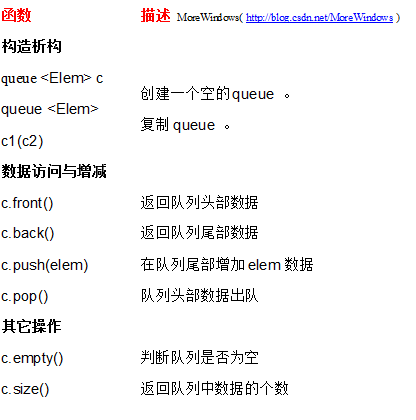
分类: STL 他山之石 2011-11-09 09:20 3895人阅读 评论(1)收藏 举报queue单向队列与栈有点类似,一个是在同一端存取数据,另一个是在一端存入数据,另一端取出数据。单向队列中的数据是先进先出(First In First Out,FIFO)。在STL中,单向队列也是以别的容器作为底部结构,再将接口改变,使之符合单向队列的特性就可以了。因此实现也是非常方便的。下面就给出单向队列的函数列表和VS2008中单向队列的源代码。单向队列一共6个常用函数(front()、back()、push()、pop()、empty()、size()),与栈的常用函数较为相似。
VS2008中queue单向队列的源代码
友情提示:初次阅读时请注意其实现思想,不要在细节上浪费过多的时间。
- <span style="font-size:18px;">//VS2008中 queue的定义 MoreWindows整理(http://blog.csdn.net/MoreWindows)
- template<class _Ty, class _Container = deque<_Ty> >
- class queue
- { // FIFO queue implemented with a container
- public:
- typedef _Container container_type;
- typedef typename _Container::value_type value_type;
- typedef typename _Container::size_type size_type;
- typedef typename _Container::reference reference;
- typedef typename _Container::const_reference const_reference;
-
- queue() : c()
- { // construct with empty container
- }
-
- explicit queue(const _Container& _Cont) : c(_Cont)
- { // construct by copying specified container
- }
-
- bool empty() const
- { // test if queue is empty
- return (c.empty());
- }
-
- size_type size() const
- { // return length of queue
- return (c.size());
- }
-
- reference front()
- { // return first element of mutable queue
- return (c.front());
- }
-
- const_reference front() const
- { // return first element of nonmutable queue
- return (c.front());
- }
-
- reference back()
- { // return last element of mutable queue
- return (c.back());
- }
-
- const_reference back() const
- { // return last element of nonmutable queue
- return (c.back());
- }
-
- void push(const value_type& _Val)
- { // insert element at beginning
- c.push_back(_Val);
- }
-
- void pop()
- { // erase element at end
- c.pop_front();
- }
-
- const _Container& _Get_container() const
- { // get reference to container
- return (c);
- }
-
- protected:
- _Container c; // the underlying container
- };</span>
可以看出,由于栈只是进一步封装别的数据结构,并提供自己的接口,所以代码非常简洁,如果不指定容器,默认是用deque来作为其底层数据结构的(对deque不是很了解?可以参阅《STL系列之一deque双向队列》)。下面给出单向队列的使用范例:
- //单向队列 queue支持 empty() size() front() back() push() pop()
- //By MoreWindows(http://blog.csdn.net/MoreWindows)
- #include <queue>
- #include <vector>
- #include <list>
- #include <cstdio>
- using namespace std;
-
- int main()
- {
- //可以使用list作为单向队列的容器,默认是使用deque的。
- queue<int, list<int>> a;
- queue<int> b;
- int i;
-
- //压入数据
- for (i = 0; i < 10; i++)
- {
- a.push(i);
- b.push(i);
- }
-
- //单向队列的大小
- printf("%d %d\n", a.size(), b.size());
-
- //队列头和队列尾
- printf("%d %d\n", a.front(), a.back());
- printf("%d %d\n", b.front(), b.back());
-
- //取单向队列项数据并将数据移出单向队列
- while (!a.empty())
- {
- printf("%d ", a.front());
- a.pop();
- }
- putchar('\n');
-
- while (!b.empty())
- {
- printf("%d ", b.front());
- b.pop();
- }
- putchar('\n');
- return 0;
- }
STL系列之四 heap 堆
分类: STL 他山之石 2011-11-14 09:16 4591人阅读 评论(9)收藏 举报下面再介绍STL中与堆相关的4个函数——建立堆make_heap(),在堆中添加数据push_heap(),在堆中删除数据pop_heap()和堆排序sort_heap():
头文件 #include <algorithm>
下面的_First与_Last为可以随机访问的迭代器(指针),_Comp为比较函数(仿函数),其规则——如果函数的第一个参数小于第二个参数应返回true,否则返回false。
建立堆
make_heap(_First, _Last, _Comp)
默认是建立最大堆的。对int类型,可以在第三个参数传入greater<int>()得到最小堆。
在堆中添加数据
push_heap (_First, _Last)
要先在容器中加入数据,再调用push_heap ()
在堆中删除数据
pop_heap(_First, _Last)
要先调用pop_heap()再在容器中删除数据
堆排序
sort_heap(_First, _Last)
排序之后就不再是一个合法的heap了
有关堆与堆排序的更详细介绍请参阅——《白话经典算法系列之七 堆与堆排序》
下面给出STL中heap相关函数的使用范例:
- //by MoreWindows( http://blog.csdn.net/MoreWindows )
- #include <cstdio>
- #include <vector>
- #include <algorithm>
- #include <functional>
- using namespace std;
- void PrintfVectorInt(vector<int> &vet)
- {
- for (vector<int>::iterator pos = vet.begin(); pos != vet.end(); pos++)
- printf("%d ", *pos);
- putchar('\n');
- }
- int main()
- {
- const int MAXN = 20;
- int a[MAXN];
- int i;
- for (i = 0; i < MAXN; ++i)
- a[i] = rand() % (MAXN * 2);
-
- //动态申请vector 并对vector建堆
- vector<int> *pvet = new vector<int>(40);
- pvet->assign(a, a + MAXN);
-
- //建堆
- make_heap(pvet->begin(), pvet->end());
- PrintfVectorInt(*pvet);
-
- //加入新数据 先在容器中加入,再调用push_heap()
- pvet->push_back(25);
- push_heap(pvet->begin(), pvet->end());
- PrintfVectorInt(*pvet);
-
- //删除数据 要先调用pop_heap(),再在容器中删除
- pop_heap(pvet->begin(), pvet->end());
- pvet->pop_back();
- pop_heap(pvet->begin(), pvet->end());
- pvet->pop_back();
- PrintfVectorInt(*pvet);
-
- //堆排序
- sort_heap(pvet->begin(), pvet->end());
- PrintfVectorInt(*pvet);
-
- delete pvet;
- return 0;
- }
掌握其基本用法后,我们用这个堆排序和《白话经典算法系列》中的堆排序、快速排序,归并排序来进行个性能测试(Win7 + VS2008 Release下),测试代码如下:
- // by MoreWindows( http://blog.csdn.net/MoreWindows )
- #include <cstdio>
- #include <algorithm>
- #include <ctime>
- using namespace std;
- //------------------------快速排序----------------------------
- void quick_sort(int s[], int l, int r)
- {
- if (l < r)
- {
- int i = l, j = r, x = s[l];
- while (i < j)
- {
- while(i < j && s[j] >= x) // 从右向左找第一个小于x的数
- j--;
- if(i < j)
- s[i++] = s[j];
-
- while(i < j && s[i] < x) // 从左向右找第一个大于等于x的数
- i++;
- if(i < j)
- s[j--] = s[i];
- }
- s[i] = x;
- quick_sort(s, l, i - 1); // 递归调用
- quick_sort(s, i + 1, r);
- }
- }
- //------------------------归并排序----------------------------
- //将有二个有序数列a[first...mid]和a[mid...last]合并。
- void mergearray(int a[], int first, int mid, int last, int temp[])
- {
- int i = first, j = mid + 1;
- int m = mid, n = last;
- int k = 0;
-
- while (i <= m && j <= n)
- {
- if (a[i] < a[j])
- temp[k++] = a[i++];
- else
- temp[k++] = a[j++];
- }
-
- while (i <= m)
- temp[k++] = a[i++];
-
- while (j <= n)
- temp[k++] = a[j++];
-
- for (i = 0; i < k; i++)
- a[first + i] = temp[i];
- }
- void mergesort(int a[], int first, int last, int temp[])
- {
- if (first < last)
- {
- int mid = (first + last) / 2;
- mergesort(a, first, mid, temp); //左边有序
- mergesort(a, mid + 1, last, temp); //右边有序
- mergearray(a, first, mid, last, temp); //再将二个有序数列合并
- }
- }
- bool MergeSort(int a[], int n)
- {
- int *p = new int[n];
- if (p == NULL)
- return false;
- mergesort(a, 0, n - 1, p);
- return true;
- }
- //------------------------堆排序---------------------------
- inline void Swap(int &a, int &b)
- {
- int c = a;
- a = b;
- b = c;
- }
- //建立最小堆
- // 从i节点开始调整,n为节点总数 从0开始计算 i节点的子节点为 2*i+1, 2*i+2
- void MinHeapFixdown(int a[], int i, int n)
- {
- int j, temp;
-
- temp = a[i];
- j = 2 * i + 1;
- while (j < n)
- {
- if (j + 1 < n && a[j + 1] < a[j]) //在左右孩子中找最小的
- j++;
-
- if (a[j] >= temp)
- break;
-
- a[i] = a[j]; //把较小的子结点往上移动,替换它的父结点
- i = j;
- j = 2 * i + 1;
- }
- a[i] = temp;
- }
- //建立最小堆
- void MakeMinHeap(int a[], int n)
- {
- for (int i = n / 2 - 1; i >= 0; i--)
- MinHeapFixdown(a, i, n);
- }
- void MinheapsortTodescendarray(int a[], int n)
- {
- for (int i = n - 1; i >= 1; i--)
- {
- Swap(a[i], a[0]);
- MinHeapFixdown(a, 0, i);
- }
- }
- const int MAXN = 5000000;
- int a[MAXN];
- int b[MAXN], c[MAXN], d[MAXN];
- int main()
- {
- int i;
- srand(time(NULL));
- for (i = 0; i < MAXN; ++i)
- a[i] = rand() * rand(); //注rand()产生的数在0到65536之间
-
- for (i = 0; i < MAXN; ++i)
- d[i] = c[i] = b[i] = a[i];
-
- clock_t ibegin, iend;
-
- printf("--当前数据量为%d--By MoreWindows(http://blog.csdn.net/MoreWindows)--\n", MAXN);
- //快速排序
- printf("快速排序: ");
- ibegin = clock();
- quick_sort(a, 0, MAXN - 1);
- iend = clock();
- printf("%d毫秒\n", iend - ibegin);
-
-
- //归并排序
- printf("归并排序: ");
- ibegin = clock();
- MergeSort(b, MAXN);
- iend = clock();
- printf("%d毫秒\n", iend - ibegin);
-
- //堆排序
- printf("堆排序: ");
- ibegin = clock();
- MakeMinHeap(c, MAXN);
- MinheapsortTodescendarray(c, MAXN);
- iend = clock();
- printf("%d毫秒\n", iend - ibegin);
-
- //STL中的堆排序
- printf("STL中的堆排序: ");
- ibegin = clock();
- make_heap(d, d + MAXN);
- sort_heap(d, d + MAXN);
- iend = clock();
- printf("%d毫秒\n", iend - ibegin);
- return 0;
- }
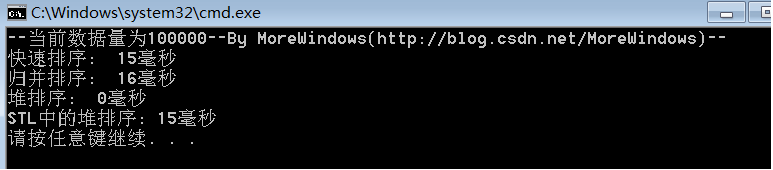
对100000(十万)个数据的测试结果:
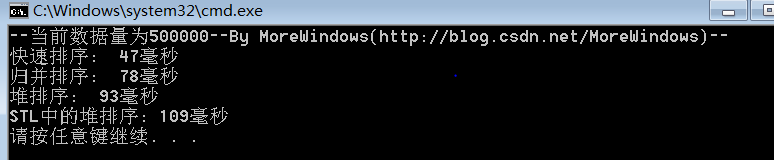
对500000(五十万)个数据的测试结果:
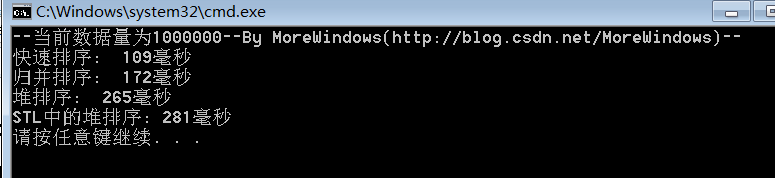
对1000000(一百万)个数据的测试结果:
对5000000(五百万)个数据的测试结果:
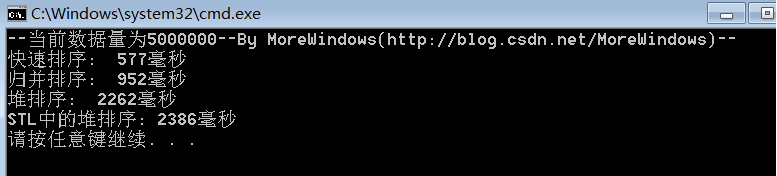
从中可以看出快速排序的效率确实要比其它同为O(N * logN)的排序算法要高,而STL中堆操作函数的性能与《白话经典算法系列之七 堆与堆排序》一文中堆操作函数的性能是相差无几的。
转载请标明出处,原文地址:http://blog.csdn.net/morewindows/article/details/6967409
STL系列之五 priority_queue 优先级队列
分类: STL 他山之石 2011-11-16 12:39 4119人阅读 评论(9)收藏 举报priority_queue 优先级队列是一个拥有权值概念的单向队列queue,在这个队列中,所有元素是按优先级排列的(也可以认为queue是个按进入队列的先后做为优先级的优先级队列——先进入队列的元素优先权要高于后进入队列的元素)。在计算机操作系统中,优先级队列的使用是相当频繁的,进线程调度都会用到。在STL的具体实现中,priority_queue也是以别的容器作为底部结构,再根据堆的处理规则来调整元素之间的位置。下面给出priority_queue的函数列表和VS2008中priority_queue的源代码,本文中与heap有关的函数参见《STL系列之四 heap 堆》。
priority_queue函数列表 函数描述 by MoreWindows( http://blog.csdn.net/MoreWindows )构造析构
priority_queue <Elem> c
创建一个空的queue 。
注:priority_queue构造函数有7个版本,请查阅MSDN
数据访问与增减
c.top() 返回队列头部数据
c.push(elem)在队列尾部增加elem数据
c.pop()队列头部数据出队
其它操作
c.empty()判断队列是否为空c.size() 返回队列中数据的个数
可以看出priority_queue的函数列表与栈stack的函数列表是相同的。
VS2008中priority_queue 优先级队列的源代码
友情提示:初次阅读时请注意其实现思想,不要在细节上浪费过多的时间
- //VS2008中 priority_queue的定义 MoreWindows整理( http://blog.csdn.net/MoreWindows )
- template<class _Ty, class _Container = vector<_Ty>, class _Pr = less<typename _Container::value_type> > //默认以vector为容器的
- class priority_queue
- { // priority queue implemented with a _Container
- public:
- typedef _Container container_type;
- typedef typename _Container::value_type value_type;
- typedef typename _Container::size_type size_type;
- typedef typename _Container::reference reference;
- typedef typename _Container::const_reference const_reference;
-
- priority_queue() : c(), comp()
- { // construct with empty container, default comparator
- }
-
- explicit priority_queue(const _Pr& _Pred) : c(), comp(_Pred)
- { // construct with empty container, specified comparator
- }
-
- priority_queue(const _Pr& _Pred, const _Container& _Cont) : c(_Cont), comp(_Pred)
- { // construct by copying specified container, comparator
- make_heap(c.begin(), c.end(), comp); //参见《STL系列之四 heap 堆的相关函数》
- }
-
- template<class _Iter>
- priority_queue(_Iter _First, _Iter _Last) : c(_First, _Last), comp()
- { // construct by copying [_First, _Last), default comparator
- make_heap(c.begin(), c.end(), comp);
- }
-
- template<class _Iter>
- priority_queue(_Iter _First, _Iter _Last, const _Pr& _Pred) : c(_First, _Last), comp(_Pred)
- { // construct by copying [_First, _Last), specified comparator
- make_heap(c.begin(), c.end(), comp);
- }
-
- template<class _Iter>
- priority_queue(_Iter _First, _Iter _Last, const _Pr& _Pred, const _Container& _Cont) : c(_Cont), comp(_Pred)
- { // construct by copying [_First, _Last), container, and comparator
- c.insert(c.end(), _First, _Last);
- make_heap(c.begin(), c.end(), comp);
- }
-
- bool empty() const
- { // test if queue is empty
- return (c.empty());
- }
-
- size_type size() const
- { // return length of queue
- return (c.size());
- }
-
- const_reference top() const
- { // return highest-priority element
- return (c.front());
- }
-
- reference top()
- { // return mutable highest-priority element (retained)
- return (c.front());
- }
-
- void push(const value_type& _Pred)
- { // insert value in priority order
- c.push_back(_Pred);
- push_heap(c.begin(), c.end(), comp);
- }
-
- void pop()
- { // erase highest-priority element
- pop_heap(c.begin(), c.end(), comp);
- c.pop_back();
- }
-
- protected:
- _Container c; // the underlying container
- _Pr comp; // the comparator functor
- };
下面先给出优级先级队列的使用范例。
- //优先级队列 priority_queue by MoreWindows( http://blog.csdn.net/MoreWindows )
- // 支持 empty() size() top() push() pop() 与stack的操作函数全部一样
- //by MoreWindows
- #include <queue>
- #include <list>
- #include <cstdio>
- using namespace std;
- int main()
- {
- //优先级队列默认是使用vector作容器。
- priority_queue<int> a;
- priority_queue<int, list<int>> b; //可以这样声明,但无法使用
- int i;
- //压入数据
- for (i = 0; i < 10; i++)
- {
- a.push(i * 2 - 5);
- //b.push(i); //编译错误
- }
- //优先级队列的大小
- printf("%d\n", a.size());
- //取优先级队列数据并将数据移出队列
- while (!a.empty())
- {
- printf("%d ", a.top());
- a.pop();
- }
- putchar('\n');
- return 0;
- }
下面程序是针对结构体的,对数据的比较是通过对结构体重载operator()。
程序功能是模拟排队过程,每人有姓名和优先级,优先级相同则比较姓名,开始有5个人进入队列,然后队头2个人出队,再有3个人进入队列,最后所有人都依次出队,程序会输出离开队伍的顺序。
- //by MoreWindows( http://blog.csdn.net/MoreWindows )
- #include <queue>
- #include <cstring>
- #include <cstdio>
- using namespace std;
- //结构体
- struct Node
- {
- char szName[20];
- int priority;
- Node(int nri, char *pszName)
- {
- strcpy(szName, pszName);
- priority = nri;
- }
- };
- //结构体的比较方法 改写operator()
- struct NodeCmp
- {
- bool operator()(const Node &na, const Node &nb)
- {
- if (na.priority != nb.priority)
- return na.priority <= nb.priority;
- else
- return strcmp(na.szName, nb.szName) > 0;
- }
- };
- void PrintfNode(Node &na)
- {
- printf("%s %d\n", na.szName, na.priority);
- }
- int main()
- {
- //优先级队列默认是使用vector作容器,底层数据结构为堆。
- priority_queue<Node, vector<Node>, NodeCmp> a;
-
- //有5个人进入队列
- a.push(Node(5, "小谭"));
- a.push(Node(3, "小刘"));
- a.push(Node(1, "小涛"));
- a.push(Node(5, "小王"));
-
- //队头的2个人出队
- PrintfNode(a.top());
- a.pop();
- PrintfNode(a.top());
- a.pop();
- printf("--------------------\n");
-
- //再进入3个人
- a.push(Node(2, "小白"));
- a.push(Node(2, "小强"));
- a.push(Node(3, "小新"));
-
- //所有人都依次出队
- while (!a.empty())
- {
- PrintfNode(a.top());
- a.pop();
- }
-
- return 0;
- }
读者可以将上面结构体Node改成类来试下,答案2天后发到本篇的评论中。
STL系列之六 set与hash_set
分类: STL 他山之石 2011-12-01 09:49 5916人阅读 评论(19)收藏 举报STL系列之六 set与hash_set
set和hash_set是STL中比较重要的容器,有必要对其进行深入了解。在STL中,set是以红黑树(RB-tree)作为底层数据结构的,hash_set是以Hash table(哈希表)作为底层数据结构的。set可以在时间复杂度为O(logN)情况下插入、删除和查找数据。hash_set操作的时间复杂度则比较复杂,这取决于哈希函数和哈希表的负载情况。下面列出set和hash_set的常用函数:

set和hase_set的更多函数请查阅MSDN。
set的使用范例如下(hash_set类似):
- // by MoreWindows( http://blog.csdn.net/MoreWindows )
- #include <set>
- #include <ctime>
- #include <cstdio>
- using namespace std;
-
- int main()
- {
- printf("--set使用 by MoreWindows( http://blog.csdn.net/MoreWindows ) --\n\n");
- const int MAXN = 15;
- int a[MAXN];
- int i;
- srand(time(NULL));
- for (i = 0; i < MAXN; ++i)
- a[i] = rand() % (MAXN * 2);
-
- set<int> iset;
- set<int>::iterator pos;
-
- //插入数据 insert()有三种重载
- iset.insert(a, a + MAXN);
-
- //当前集合中个数 最大容纳数据量
- printf("当前集合中个数: %d 最大容纳数据量: %d\n", iset.size(), iset.max_size());
-
- //依次输出
- printf("依次输出集合中所有元素-------\n");
- for (pos = iset.begin(); pos != iset.end(); ++pos)
- printf("%d ", *pos);
- putchar('\n');
-
- //查找
- int findNum = MAXN;
- printf("查找 %d是否存在-----------------------\n", findNum);
- pos = iset.find(findNum);
- if (pos != iset.end())
- printf("%d 存在\n", findNum);
- else
- printf("%d 不存在\n", findNum);
-
- //在最后位置插入数据,如果给定的位置不正确,会重新找个正确的位置并返回该位置
- pos = iset.insert(--iset.end(), MAXN * 2);
- printf("已经插入%d\n", *pos);
-
- //删除
- iset.erase(MAXN);
- printf("已经删除%d\n", MAXN);
-
- //依次输出
- printf("依次输出集合中所有元素-------\n");
- for (pos = iset.begin(); pos != iset.end(); ++pos)
- printf("%d ", *pos);
- putchar('\n');
- return 0;
- }
运行结果如下:

下面试下在set中使用类(结构体也可以类似这样做)。这个类很简单,只有一个成员变量,及设置和获取这个成员变量的成员函数。
- //在set中使用类要重载‘<’并实现拷贝构造函数
- // by MoreWindows( http://blog.csdn.net/MoreWindows )
- #include <set>
- #include <ctime>
- #include <cstdio>
- using namespace std;
- class Node
- {
- public:
- Node(int nAge = 0)
- {
- m_nAge = nAge;
- }
- Node(const Node &na) //拷贝构造函数
- {
- m_nAge = na.GetAge();
- }
- int GetAge()
- {
- return m_nAge;
- }
- private:
- int m_nAge;
- };
- //不能写成类的成员函数
- inline bool operator < (const Node &na, const Node &nb)
- {
- return na.GetAge() < nb.GetAge();
- }
- int main()
- {
- int i;
- set<Node> nset;
- for (i = 0; i < MAXN; ++i)
- nset.insert(Node(i));
- return 0;
- }
编译,直接报了3个错误!!1个在拷贝构造函数,2个在operator<()函数。如下图所示:
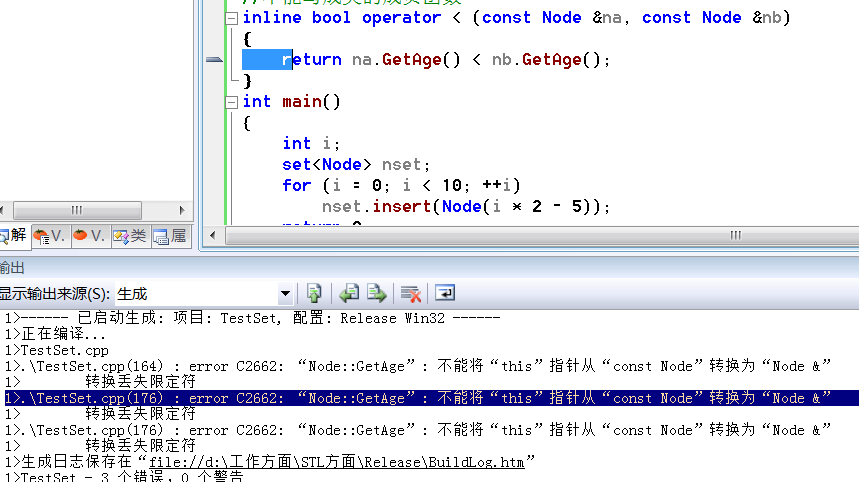
3个错误都是一样的:
error C2662: “Node::GetAge”: 不能将“this”指针从“const Node”转换为“Node &” 转换丢失限定符
这是怎么回事呀?分析下,拷贝构造函数与operator<()函数出错,错误都指向了GetAge()函数,有点古怪,比较下它们与GetAge()函数,可以发现最大的不同点在于这2个函数都用到了const而GetAge()函数没有使用const。难道是这个导致报错了吗?先给GetAge()函数加个const看看,如下:
int GetAge() const //增加这个const
{
returnm_nAge;
}
再编译,不报错了。再查下资料,原因如下——因为那2个函数都使用了const修饰的对象,但GetAge()没有加上const以保证它不修改对象,编译器认为这种写法是不安全的,所以就毫不犹豫报了个错误。
这种错误如果不亲身体会下,到笔试面试时很可能写了个错误程序而自己还处于一无所知中(死在这些小细节上最不值得)。另外,如果使用VC6.0则不会提示详细的错误信息——“转换丢失限定符”。
STL还为set提供了一些集合运算的函数,如交集set_intersection()、并集set_union()、差集set_difference()和对称差集set_symmetric_difference()。这些就不详细介绍了,有兴趣可以自己动手试一试。
下面开始对set和hash_set作个性能测试(Win7 +VS2008Release下)。
测试代码如下:
- // by MoreWindows( http://blog.csdn.net/MoreWindows )
- #include <set>
- #include <hash_set>
- #include <iostream>
- #include <ctime>
- #include <cstdio>
- #include <cstdlib>
- using namespace std;
- using namespace stdext; //hash_set
-
- // MAXN个数据 MAXQUERY次查询
- const int MAXN = 10000, MAXQUERY = 5000000;
- int a[MAXN], query[MAXQUERY];
-
- void PrintfContainertElapseTime(char *pszContainerName, char *pszOperator, long lElapsetime)
- {
- printf("%s 的%s操作 用时 %d毫秒\n", pszContainerName, pszOperator, lElapsetime);
- }
-
- int main()
- {
- printf("set VS hash_set 性能测试 数据容量 %d个 查询次数 %d次\n", MAXN, MAXQUERY);
- const int MAXNUM = MAXN * 4;
- const int MAXQUERYNUM = MAXN * 4;
- printf("容器中数据范围 [0, %d) 查询数据范围[0, %d)\n", MAXNUM, MAXQUERYNUM);
- printf("--by MoreWindows( http://blog.csdn.net/MoreWindows ) --\n\n");
-
- //随机生成在[0, MAXNUM)范围内的MAXN个数
- int i;
- srand(time(NULL));
- for (i = 0; i < MAXN; ++i)
- a[i] = (rand() * rand()) % MAXNUM;
- //随机生成在[0, MAXQUERYNUM)范围内的MAXQUERY个数
- srand(time(NULL));
- for (i = 0; i < MAXQUERY; ++i)
- query[i] = (rand() * rand()) % MAXQUERYNUM;
-
- set<int> nset;
- hash_set<int> nhashset;
- clock_t clockBegin, clockEnd;
-
-
- //insert
- printf("-----插入数据-----------\n");
-
- clockBegin = clock();
- nset.insert(a, a + MAXN);
- clockEnd = clock();
- printf("set中有数据%d个\n", nset.size());
- PrintfContainertElapseTime("set", "insert", clockEnd - clockBegin);
-
- clockBegin = clock();
- nhashset.insert(a, a + MAXN);
- clockEnd = clock();
- printf("hash_set中有数据%d个\n", nhashset.size());
- PrintfContainertElapseTime("hase_set", "insert", clockEnd - clockBegin);
-
-
- //find
- printf("-----查询数据-----------\n");
-
- int nFindSucceedCount, nFindFailedCount;
- nFindSucceedCount = nFindFailedCount = 0;
- clockBegin = clock();
- for (i = 0; i < MAXQUERY; ++i)
- if (nset.find(query[i]) != nset.end())
- ++nFindSucceedCount;
- else
- ++nFindFailedCount;
- clockEnd = clock();
- PrintfContainertElapseTime("set", "find", clockEnd - clockBegin);
- printf("查询成功次数: %d 查询失败次数: %d\n", nFindSucceedCount, nFindFailedCount);
-
- nFindSucceedCount = nFindFailedCount = 0;
- clockBegin = clock();
- for (i = 0; i < MAXQUERY; ++i)
- if (nhashset.find(query[i]) != nhashset.end())
- ++nFindSucceedCount;
- else
- ++nFindFailedCount;
- clockEnd = clock();
- PrintfContainertElapseTime("hash_set", "find", clockEnd - clockBegin);
- printf("查询成功次数: %d 查询失败次数: %d\n", nFindSucceedCount, nFindFailedCount);
- return 0;
- }
在数据容量100万,查询次数500万时,程序运行结果如下:

由于查询的失败次数太多,这次将查询范围变小使用再测试下:
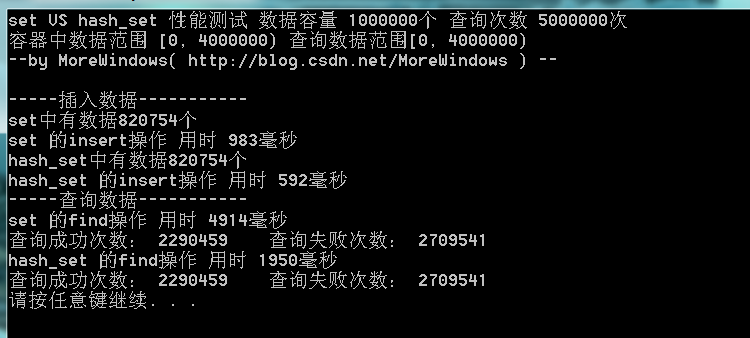
由于结点过多,80多万个结点,set的红黑树树高约为19(2^19=524288,2^20=1048576),查询起来还是比较费时的。hash_set在时间性能上比set要好一些,并且如果查询成功的几率比较大的话,hash_set会有更好的表现。想知道为什么hash_set会有优良的性能表现,请看继集——《STL系列之九 探索hash_set》。
注1. MSDN上讲set的erase()是有返回值的,但在VS2008中查看set的源代码,erase()函数的三个重载版本中,有二个返回值都为void即无返回值,另一个返回size_type。 可以通过http://msdn.microsoft.com/zh-cn/library/8h4a3515(v=VS.90).aspx查看MSDN上对set的erase()说明。
STL系列之七 快速计算x的n次幂 power()的实现
分类: STL 他山之石 2012-01-04 10:33 3697人阅读 评论(22)收藏 举报计算x的n次幂最简单直接的方法就是相乘n次,很容易写出程序:
- //计算x^n 直接乘n次 by MoreWindows( http://blog.csdn.net/MoreWindows )
- int power1(int x, unsigned int n)
- {
- int result = 1;
- while (n--)
- result *= x;
- return result;
- }
这种计算的效率显然不高,我们可以用二分法来加速计算x^n=x^(n/2)* x^(n/2)即x^10=x^5*x^5,这种计算N次幂只要相乘O(logN)次。运用递归的方法不难写出:
- //计算x^n 二分递归实现 by MoreWindows( http://blog.csdn.net/MoreWindows )
- int power2(int x, unsigned int n)
- {
- if (n == 0)
- return 1;
- else if (n == 1)
- return x;
- else
- {
- if (n % 2 == 1)
- return power2(x, n / 2) * power2(x, n / 2) * x;
- else
- return power2(x, n / 2) * power2(x, n / 2);
- }
- }
递归毕竟比较浪费时间,且会有很多重复计算。
因此最好能换成非递归的方式来实现二分法。
考虑x^23,可以先从x ->x^2 -> x^4 -> x^8 -> x^16 取result1 = x^16,然后23-16=7。
我们只要计算x^7再与result1相乘就可以得到x^23。对于x^7也可以采用这种方法
取result2 = x^4,然后7-4=3,只要计算x^3再与result2相乘就可以得到x^7。由此可以将x^23写成x^16 * x^4* x^2 * x,即23=16+4+2+1,而23 = 10111(二进制),所以只要将n化为二进制并由低位到高位依次判断如果第i位为1,则result *=x^(2^i)。
函数实现如下:
- //计算x^n by MoreWindows( http://blog.csdn.net/MoreWindows )
- int power3(int x, unsigned int n)
- {
- if (n == 0)
- return 1;
- int result = 1;
- while (n != 0)
- {
- if ((n & 1) != 0)
- result *= x;
- x *= x;
- n >>= 1;
- }
- return result;
- }
此函数可以在相乘O(logN)次内计算x的n次幂,且避免了重复计算。但还可以作进一步的优化,如像48=110000(二进制)这种低位有很多0的数,可以先过滤掉低位的0再进行计算,这样也会提高一些效率。程序如下:
- //计算x^n by MoreWindows( http://blog.csdn.net/MoreWindows )
- int power4(int x, unsigned int n)
- {
- if (n == 0)
- {
- return 1;
- }
- else
- {
- while ((n & 1) == 0)
- {
- n >>= 1;
- x *= x;
- }
- }
- int result = x;
- n >>= 1;
- while (n != 0)
- {
- x *= x;
- if ((n & 1) != 0)
- result *= x;
- n >>= 1;
- }
- return result;
- }
验证一下
- int main()
- {
- printf("验证power4() -- by MoreWindows( http://blog.csdn.net/MoreWindows ) --\n\n");
- for (int i = 0; i <= 10; i++)
- printf("2的%d次方为\t%d\n", i, power4(2, i));
- return 0;
- }
结果为
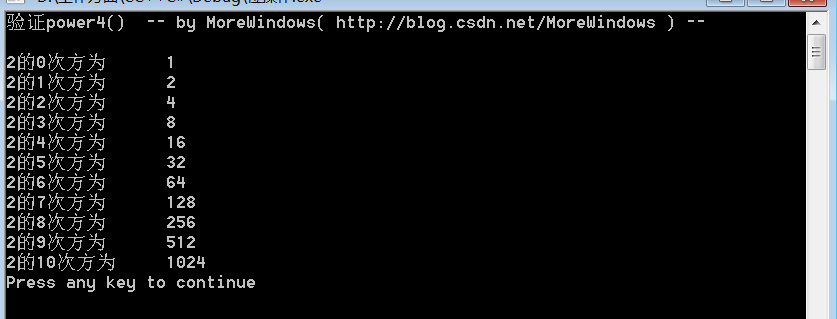
看到这里,理解STL的power()函数应该就是个水到渠成的事情了——我们自己写的power4()正是STL的power()函数。
注,非常感谢网友evaxiao帮我找出了power4()的一个错误,我已经在文中改正了,谢谢网友evaxiao。
转载请标明出处,原文地址:http://blog.csdn.net/morewindows/article/details/7174143
STL系列之八 slist单链表
分类: STL 他山之石 2012-01-09 09:54 3154人阅读 评论(8)收藏 举报微软的VS208所使用的PJ STL(注1)中的list是双链表,但在某些场合,一个轻量级的单链表会更加合适。单链表非常常见,这里就不去细说了,本文的slist(single linked list)单链表实现了链表的基本功能,如有需要,以后还会扩充的。slist单链表(带头结点)的示意图如下所示:

完整的C++代码如下:
- //带头结点的单链表
- //by MoreWindows( http://blog.csdn.net/MoreWindows )
- template<class T>
- struct Node
- {
- T val;
- Node *next;
- Node(T &n)
- {
- this->val = n;
- this->next = NULL;
- }
- };
- template<class T>
- class slist
- {
- public:
- slist();
- ~slist();
- void push_front(T &t);
- bool find(T &t);
- bool remove(T &t);
- bool removeAll(T &t);
- void clear();
- int size();
- public:
- int m_nListDataCount;
- Node<T> *m_head;
- };
- template<class T>
- slist<T>::slist()
- {
- m_head = NULL;
- m_nListDataCount = 0;
- }
- template<class T>
- slist<T>::~slist()
- {
- Node<T> *p, *pnext;
- for (p = m_head; p != NULL; p = pnext)
- {
- pnext = p->next;
- free(p);
- }
- m_nListDataCount = 0;
- }
- template<class T>
- void slist<T>::push_front(T &t)
- {
- Node<T> *pNode = (Node<T> *)malloc(sizeof(Node<T>));
- pNode->val = t;
- pNode->next = m_head;
- m_head = pNode;
- m_nListDataCount++;
- }
- template<class T>
- bool slist<T>::find(T &t)
- {
- for (Node<T> *p = m_head; p != NULL; p = p->next)
- if (p->val == t)
- return true;
-
- return false;
- }
- template<class T>
- int slist<T>::size()
- {
- return m_nListDataCount;
- }
- //删除链表中第一个值为t的结点
- template<class T>
- bool slist<T>::remove(T &t)
- {
- Node<T> *pNode, *pPreNode;
- pPreNode = pNode = m_head;
- while (pNode != NULL)
- {
- if (pNode->val == t)
- {
- if (pPreNode != pNode)
- pPreNode->next = pNode->next;
- else
- m_head = NULL;
- free(pNode);
- m_nListDataCount--;
- return true;
- }
- pPreNode = pNode;
- pNode = pNode->next;
- }
- return false;
- }
- //会删除链表中所有值为t的结点
- template<class T>
- bool slist<T>::removeAll(T &t)
- {
- bool flagDeleteNode = false;
- Node<T> *pNode, *pPreNode;
- pPreNode = pNode = m_head;
- while (pNode != NULL)
- {
- if (pNode->val == t)
- {
- pPreNode->next = pNode->next;
- free(pNode);
- pNode = pPreNode->next;
- m_nListDataCount--;
- flagDeleteNode = true;
- }
- else
- {
- pPreNode = pNode;
- pNode = pNode->next;
- }
- }
- return flagDeleteNode;
- }
- template<class T>
- void slist<T>::clear()
- {
- Node<T> *cur = m_head;
- while (cur != NULL)
- {
- Node<T> *next = cur->next;
- free(cur);
- cur = next;
- }
- m_head = NULL;
- }
该slist完成了从头部插入,查找和删除数据等链表的基本操作,下一篇将使用这个slist来完成一个哈希表,请关注下一篇——《STL系列之九 探索hash_set》
注1.STL分为很多版本,微软的VS系列使用的是PJ STL。而《STL源码剖析》书中主要使用SGI STL。
STL系列之九 探索hash_set
分类: STL 他山之石 2012-03-08 11:52 4180人阅读 评论(13)收藏 举报Title: STL系列之九 探索hash_set
Author: MoreWindows
Blog: http://blog.csdn.net/MoreWindows
E-mail: morewindows@126.com
KeyWord: C++ STL set hash_set 哈希表 链地址法
本文将着重探索hash_set比set快速高效的原因,阅读本文前,推荐先阅读本文的姊妹篇《STL系列之六 set与hash_set》
一.hash_set之基石——哈希表
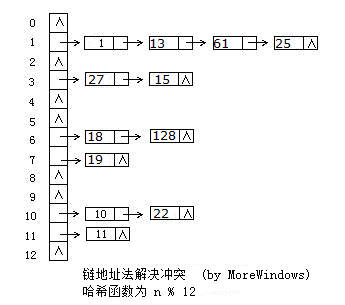
hash_set的底层数据结构是哈希表,因此要深入了解hash_set,必须先分析哈希表。哈希表是根据关键码值(Key-Value)而直接进行访问的数据结构,它用哈希函数处理数据得到关键码值,关键码值对应表中一个特定位置再由应该位置来访问记录,这样可以在时间复杂性度为O(1)内访问到数据。但是很有可能出现多个数据经哈希函数处理后得到同一个关键码——这就产生了冲突,解决冲突的方法也有很多,各大数据结构教材及考研辅导书上都会介绍大把方法。这里采用最方便最有效的一种——链地址法,当有冲突发生时将具同一关键码的数据组成一个链表。下图展示了链地址法的使用:
二.简化版的hash_table
按照上面的分析和图示,并参考《编程珠玑》第15章中哈希表的实现,不难写出一个简单的哈希表,我们称之为简化版hash_table。该哈希表由一个指针数组组成,数组中每个元素都是链表的表头指针,程序分为hash_table.h,hash_table.cpp和main.cpp。
1.hash_table.h
- #pragma once
- #define NULL 0
- //简化版hash_table
- //by MoreWindows( http://blog.csdn.net/MoreWindows )
- struct Node
- {
- int val;
- Node *next;
- Node(int n)
- {
- this->val = n;
- this->next = NULL;
- }
- };
- class hash_table
- {
- public:
- hash_table(const int ntablesize);
- ~hash_table();
- bool insert(int n);
- void insert(int *pFirst, int *pLast);
- bool find(int n);
- int size();
- int HashFun(int n);
- public:
- int m_nTableSize;
- int m_nTableDataCount;
- Node** m_ppTable;
- };
2.hash_table.cpp
- //简化版hash_table
- //by MoreWindows( http://blog.csdn.net/MoreWindows )
- #include "hash_table.h"
- #include <malloc.h>
- #include <memory.h>
- hash_table::hash_table(const int ntablesize)
- {
- m_nTableSize = ntablesize;
- m_ppTable = (Node**)malloc(sizeof(Node*) * m_nTableSize);
- if (m_ppTable == NULL)
- return ;
- m_nTableDataCount = 0;
- memset(m_ppTable, 0, sizeof(Node*) * m_nTableSize);
- }
- hash_table::~hash_table()
- {
- free(m_ppTable);
- m_ppTable = NULL;
- m_nTableDataCount = 0;
- m_nTableSize = 0;
- }
- int inline hash_table::HashFun(int n)
- {
- return (n ^ 0xdeadbeef) % m_nTableSize;
- }
- int hash_table::size()
- {
- return m_nTableDataCount;
- }
- bool hash_table::insert(int n)
- {
- int key = HashFun(n);
- //在该链表中查找该数是否已经存在
- for (Node *p = m_ppTable[key]; p != NULL; p = p->next)
- if (p->val == n)
- return true;
- //在链表的头部插入
- Node *pNode = new Node(n);
- if (pNode == NULL)
- return false;
- pNode->next = m_ppTable[key];
- m_ppTable[key] = pNode;
- m_nTableDataCount++;
- return true;
- }
- bool hash_table::find(int n)
- {
- int key = HashFun(n);
- for (Node *pNode = m_ppTable[key]; pNode != NULL; pNode = pNode->next)
- if (pNode->val == n)
- return true;
- return false;
- }
- void hash_table::insert(int *pFirst, int *pLast)
- {
- for (int *p = pFirst; p != pLast; p++)
- this->insert(*p);
- }
3.main.cpp
在main.cpp中,对set、hash_set、简化版hash_table作一个性能测试,测试环境为Win7+VS2008的Release设置(下同)。
- //测试set,hash_set及简化版hash_table
- // by MoreWindows( http://blog.csdn.net/MoreWindows )
- #include <set>
- #include <hash_set>
- #include "hash_table.h"
- #include <iostream>
- #include <ctime>
- #include <cstdio>
- #include <cstdlib>
- using namespace std;
- using namespace stdext; //hash_set
- void PrintfContainerElapseTime(char *pszContainerName, char *pszOperator, long lElapsetime)
- {
- printf("%s 的 %s操作 用时 %d毫秒\n", pszContainerName, pszOperator, lElapsetime);
- }
- // MAXN个数据 MAXQUERY次查询
- const int MAXN = 5000000, MAXQUERY = 5000000;
- int a[MAXN], query[MAXQUERY];
- int main()
- {
- printf("set VS hash_set VS hash_table(简化版) 性能测试\n");
- printf("数据容量 %d个 查询次数 %d次\n", MAXN, MAXQUERY);
- const int MAXNUM = MAXN * 4;
- const int MAXQUERYNUM = MAXN * 4;
- printf("容器中数据范围 [0, %d) 查询数据范围[0, %d)\n", MAXNUM, MAXQUERYNUM);
- printf("--by MoreWindows( http://blog.csdn.net/MoreWindows ) --\n\n");
-
- //随机生成在[0, MAXNUM)范围内的MAXN个数
- int i;
- srand((unsigned int)time(NULL));
- for (i = 0; i < MAXN; ++i)
- a[i] = (rand() * rand()) % MAXNUM;
- //随机生成在[0, MAXQUERYNUM)范围内的MAXQUERY个数
- srand((unsigned int)time(NULL));
- for (i = 0; i < MAXQUERY; ++i)
- query[i] = (rand() * rand()) % MAXQUERYNUM;
-
- set<int> nset;
- hash_set<int> nhashset;
- hash_table nhashtable(MAXN + 123);
- clock_t clockBegin, clockEnd;
-
- //insert
- printf("-----插入数据-----------\n");
- clockBegin = clock();
- nset.insert(a, a + MAXN);
- clockEnd = clock();
- printf("set中有数据%d个\n", nset.size());
- PrintfContainerElapseTime("set", "insert", clockEnd - clockBegin);
-
- clockBegin = clock();
- nhashset.insert(a, a + MAXN);
- clockEnd = clock();
- printf("hash_set中有数据%d个\n", nhashset.size());
- PrintfContainerElapseTime("hash_set", "insert", clockEnd - clockBegin);
-
- clockBegin = clock();
- for (i = 0; i < MAXN; i++)
- nhashtable.insert(a[i]);
- clockEnd = clock();
- printf("hash_table中有数据%d个\n", nhashtable.size());
- PrintfContainerElapseTime("Hash_table", "insert", clockEnd - clockBegin);
-
- //find
- printf("-----查询数据-----------\n");
- int nFindSucceedCount, nFindFailedCount;
- nFindSucceedCount = nFindFailedCount = 0;
- clockBegin = clock();
- for (i = 0; i < MAXQUERY; ++i)
- if (nset.find(query[i]) != nset.end())
- ++nFindSucceedCount;
- else
- ++nFindFailedCount;
- clockEnd = clock();
- PrintfContainerElapseTime("set", "find", clockEnd - clockBegin);
- printf("查询成功次数: %d 查询失败次数: %d\n", nFindSucceedCount, nFindFailedCount);
-
- nFindSucceedCount = nFindFailedCount = 0;
- clockBegin = clock();
- for (i = 0; i < MAXQUERY; ++i)
- if (nhashset.find(query[i]) != nhashset.end())
- ++nFindSucceedCount;
- else
- ++nFindFailedCount;
- clockEnd = clock();
- PrintfContainerElapseTime("hash_set", "find", clockEnd - clockBegin);
- printf("查询成功次数: %d 查询失败次数: %d\n", nFindSucceedCount, nFindFailedCount);
-
- nFindSucceedCount = nFindFailedCount = 0;
- clockBegin = clock();
- for (i = 0; i < MAXQUERY; ++i)
- if (nhashtable.find(query[i]))
- ++nFindSucceedCount;
- else
- ++nFindFailedCount;
- clockEnd = clock();
- PrintfContainerElapseTime("hash_table", "find", clockEnd - clockBegin);
- printf("查询成功次数: %d 查询失败次数: %d\n", nFindSucceedCount, nFindFailedCount);
- return 0;
- }
在数据量为500万时测试结果如下:
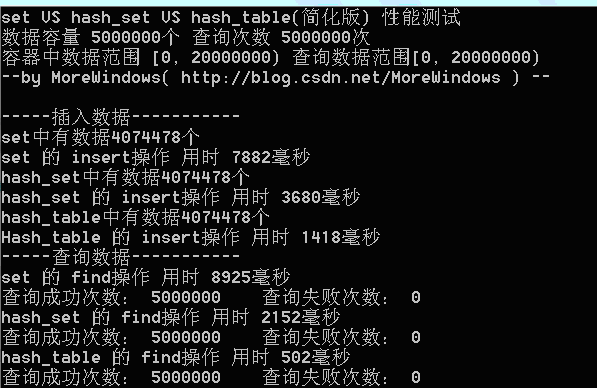
从程序运行结果可以发现,我们自己实现的hash_table(简化版)在插入和查找的效率要远高于set。为了进一步分析,最好能统计hash_table中的各个链表的长度情况,这样可以有效的了解平均每次查找要访问多少个数据。写出统计hash_table各链表长度的函数如下:
- // by MoreWindows( http://blog.csdn.net/MoreWindows )
- void StatisticHashTable(hash_table &ht)
- {
- const int MAXLISTLINE = 100;
- int i, a[MAXLISTLINE], nExtendListNum;
- nExtendListNum = 0;
- memset(a, 0, sizeof(a[0]) * MAXLISTLINE);
- for (i = 0; i < ht.m_nTableSize; i++)
- {
- int sum = 0;
- for (Node *p = ht.m_ppTable[i]; p != NULL; p = p->next)
- ++sum;
- if (sum >= MAXLISTLINE)
- nExtendListNum++;
- else
- a[sum]++;
- }
- printf("hash_table中链表长度统计:\n");
- for (i = 0; i < MAXLISTLINE; i++)
- if (a[i] > 0)
- {
- printf(" 长度为%d的链表有%d个 这些链表中数据占总数据的%.2lf%%\n", i, a[i], (a[i] * i * 100.0) / ht.size());
- }
- printf(" 长度超过%d的链表有%d个\n", MAXLISTLINE, nExtendListNum);
- }
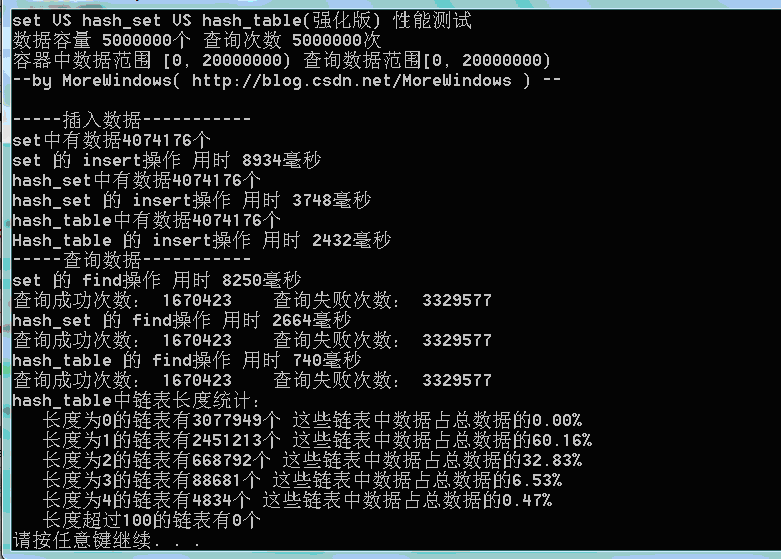
用此段代码得到链表长度的统计结果:

可以发现在hash_table中最长的链表也只有5个元素,长度为1和长度为2的链表中的数据占全部数据的89%以上。因此绝大数查询将仅仅访问哈希表1次到2次。这样的查询效率当然会比set(内部使用红黑树——类似于二叉平衡树)高的多。有了这个图示,无疑已经可以证明hash_set会比set快速高效了。但hash_set还可以动态的增加表的大小,因此我们再实现一个表大小可增加的hash_table。
三.强化版hash_table
首先来看看VS2008中hash_set是如何实现动态的增加表的大小,hash_set是在hash_set.h中声明的,在hash_set.h中可以发现hash_set是继承_Hash类的,hash_set本身并没有太多的代码,只是对_Hash作了进一步的封装,这种做法在STL中非常常见,如stack栈和queue单向队列都是以deque双向队列作底层数据结构再加一层封装。
_Hash类的定义和实现都在xhash.h类中,微软对_Hash类的第一句注释如下——
hash table -- list with vector of iterators for quick access。
哈哈,这句话说的非常明白。这说明_Hash实际上就是由vector和list组成哈希表。再阅读下代码可以发现_Hash类增加空间由_Grow()函数完成,当空间不足时就倍增,并且表中原有数据都要重新计算hash值以确定新的位置。
知道了_Hash类是如何运作的,下面就来考虑如何实现强化版的hash_table。当然有二个地方还可以改进:
1._Hash类使用的list为双向链表,但在在哈希表中使用普通的单链表就可以了。因此使用STL中的vector再加入《STL系列之八 slist单链表》一文中的slist来实现强化版的hash_table。
2.在空间分配上使用了一个近似于倍增的素数表,最开始取第一个素数,当空间不足时就使用下一个素数。经过实际测试这种效果要比倍增法高效一些。
在这二个改进之上的强化版的hash_table代码如下:
- //使用vector< slist<T> >为容器的hash_table
- // by MoreWindows( http://blog.csdn.net/MoreWindows )
- template< class T, class container = vector<slist<T>> >
- class hash_table
- {
- public:
- hash_table();
- hash_table(const int ntablesize);
- ~hash_table();
- void clear();
- bool insert(T &n);
- void insert(T *pFirst, T *pLast);
- bool erase(T &n);
- void resize(int nNewTableSize);
- bool find(T &n);
- int size();
- int HashFun(T &n);
- private:
- static int findNextPrime(int curPrime);
- public:
- int m_nDataCount;
- int m_nTableSize;
- container m_Table;
- static const unsigned int m_primes[50];
- };
- //素数表
- template< class T, class container>
- const unsigned int hash_table<T, container>::m_primes[50] = {
- 53, 97, 193, 389, 769, 1453, 3079, 6151, 1289, 24593, 49157, 98317,
- 196613, 393241, 786433, 1572869, 3145739, 6291469, 12582917,
- 25165843, 50331653, 100663319, 201326611, -1
- };
- template< class T, class container>
- int inline hash_table<T, container>::HashFun(T &n)
- {
- return (n ^ 0xdeadbeef) % m_nTableSize;
- }
- template< class T, class container>
- hash_table<T, container>::hash_table()
- {
- m_nDataCount = 0;
- m_nTableSize = m_primes[0];
- m_Table.resize(m_nTableSize);
- }
- template< class T, class container>
- hash_table<T, container>::hash_table(const int ntablesize)
- {
- m_nDataCount = 0;
- m_nTableSize = ntablesize;
- m_Table.resize(m_nTableSize);
- }
- template< class T, class container>
- hash_table<T, container>::~hash_table()
- {
- clear();
- }
- template< class T, class container>
- void hash_table<T, container>::clear()
- {
- for (int i = 0; i < m_nTableSize; i++)
- m_Table[i].clear();
- m_nDataCount = 0;
- }
- template< class T, class container>
- bool hash_table<T, container>::insert(T &n)
- {
- int key = HashFun(n);
- if (!m_Table[key].find(n))
- {
- m_nDataCount++;
- m_Table[key].push_front(n);
- if (m_nDataCount >= m_nTableSize)
- resize(findNextPrime(m_nTableSize));
- }
- return true;
- }
- template< class T, class container>
- bool hash_table<T, container>::erase(T &n)
- {
- int key = HashFun(n);
- if (m_Table[key].remove(n))
- {
- m_nDataCount--;
- return true;
- }
- else
- {
- return false;
- }
- }
- template< class T, class container>
- void hash_table<T, container>::insert(T *pFirst, T *pLast)
- {
- for (T *p = pFirst; p != pLast; p++)
- this->insert(*p);
- }
- template< class T, class container>
- void hash_table<T, container>::resize(int nNewTableSize)
- {
- if (nNewTableSize <= m_nTableSize)
- return;
- int nOldTableSize = m_nTableSize;
- m_nTableSize = nNewTableSize;
- container tempTable(m_nTableSize); //创建一个更大的表
- for (int i = 0; i < nOldTableSize; i++)//将原表中数据重新插入到新表中
- {
- Node<T> *cur = m_Table[i].m_head;
- while (cur != NULL)
- {
- int key = HashFun(cur->val);
- Node<T> *pNext = cur->next;
- cur->next = tempTable[key].m_head;
- tempTable[key].m_head = cur;
- cur = pNext;
- }
- m_Table[i].m_head = NULL;
- }
- m_Table.swap(tempTable);
- }
- template< class T, class container>
- int hash_table<T, container>::size()
- {
- return m_nDataCount;
- }
- template< class T, class container>
- bool hash_table<T, container>::find(T &n)
- {
- int key = HashFun(n);
- return m_Table[key].find(n);
- }
- //在素数表中找到比当前数大的最小数
- template< class T, class container>
- int hash_table<T, container>::findNextPrime(int curPrime)
- {
- unsigned int *pStart = (unsigned int *)m_primes;
- while (*pStart <= curPrime)
- ++pStart;
- return *pStart;
- }
下面再对set、hash_set、强化版hash_table的性能测试:
测试结果一(数据量500万):
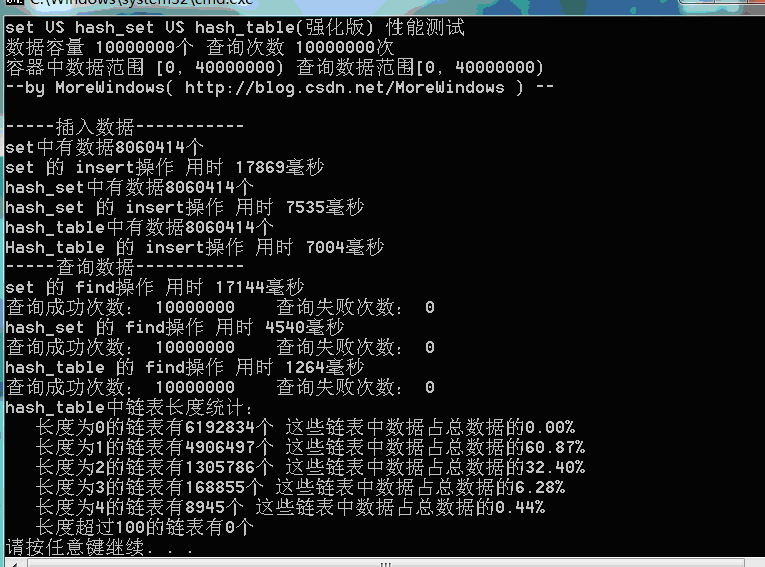
测试结果二(数据量1千万):

测试结果三(数据量1千万):
可以看出,由于强化版hash_table的哈希表在增加表空间大小时会花费额外的一些时间,所以插入数据的用时与STL提供的hash_set用时相差不多了。但查找还是比hash_set要快的一些。
四.结语
从简化版到强化版的hash_table,我们不仅知道了hash_set底层数据结构——哈希表的运作机制,还知道了如何实现大小动态变化的哈希表。达到了本文让读者了解hash_set快速高效的原因。当然本文所给hash_table距真正的hash_set还有不小的距离,有兴趣的读者可以进一步改进。
此外,本文所示范的哈希表也与最近流行的NoSql数据库颇有渊源, NoSql数据库也是通过Key-Value方式来访问数据的(访问数据的方式上非常类似哈希表),其查找效率与传统的数据库相比也正如本文中hast_set与set的比较。正因为NoSql数据库在基础数据结构上的天然优势,所以它完全可以支持海量数据的查询修改且对操作性能要求很高场合如微博等。
转载请标明出处,原文地址:http://blog.csdn.net/morewindows/article/details/7330323
STL系列之一 deque双向队列
分类: STL 他山之石 2011-11-08 09:52 7949人阅读 评论(8)收藏 举报deque双向队列是一种双向开口的连续线性空间,可以高效的在头尾两端插入和删除元素,deque在接口上和vector非常相似,下面列出deque的常用成员函数:
deque的实现比较复杂,内部会维护一个map(注意!不是STL中的map容器)即一小块连续的空间,该空间中每个元素都是指针,指向另一段(较大的)区域,这个区域称为缓冲区,缓冲区用来保存deque中的数据。因此deque在随机访问和遍历数据会比vector慢。具体的deque实现可以参考《STL源码剖析》,当然此书中使用的SGI STL与VS2008所使用的PJ STL的实现方法还是有区别的。下面给出了deque的结构图:
由于篇幅问题,deque的实现细节就不再深入了,下面给出deque的使用范例:
- //双向队列 deque
- //by MoreWindows http://blog.csdn.net/morewindows
- #include <deque>
- #include <cstdio>
- #include <algorithm>
- using namespace std;
- int main()
- {
- deque<int> ideq(20); //Create a deque ideq with 20 elements of default value 0
- deque<int>::iterator pos;
- int i;
-
- //使用assign()赋值 assign在计算机中就是赋值的意思
- for (i = 0; i < 20; ++i)
- ideq[i] = i;
-
- //输出deque
- printf("输出deque中数据:\n");
- for (i = 0; i < 20; ++i)
- printf("%d ", ideq[i]);
- putchar('\n');
-
- //在头尾加入新数据
- printf("\n在头尾加入新数据...\n");
- ideq.push_back(100);
- ideq.push_front(i);
-
- //输出deque
- printf("\n输出deque中数据:\n");
- for (pos = ideq.begin(); pos != ideq.end(); pos++)
- printf("%d ", *pos);
- putchar('\n');
-
- //查找
- const int FINDNUMBER = 19;
- printf("\n查找%d\n", FINDNUMBER);
- pos = find(ideq.begin(), ideq.end(), FINDNUMBER);
- if (pos != ideq.end())
- printf("find %d success\n", *pos);
- else
- printf("find failed\n");
-
- //在头尾删除数据
- printf("\n在头尾删除数据...\n");
- ideq.pop_back();
- ideq.pop_front();
-
- //输出deque
- printf("\n输出deque中数据:\n");
- for (pos = ideq.begin(); pos != ideq.end(); pos++)
- printf("%d ", *pos);
- putchar('\n');
- return 0;
- }
运行结果如下:
另外要注意一点。对于deque和vector来说,尽量少用erase(pos)和erase(beg,end)。因为这在中间删除数据后会导致后面的数据向前移动,从而使效率低下。
STL系列之二 stack栈
分类: STL 他山之石 2011-11-09 09:03 4131人阅读 评论(4)收藏 举报栈(statck)这种数据结构在计算机中是相当出名的。栈中的数据是先进后出的(First In Last Out, FILO)。栈只有一个出口,允许新增元素(只能在栈顶上增加)、移出元素(只能移出栈顶元素)、取得栈顶元素等操作。在STL中,栈是以别的容器作为底部结构,再将接口改变,使之符合栈的特性就可以了。因此实现非常的方便。下面就给出栈的函数列表和VS2008中栈的源代码,在STL中栈一共就5个常用操作函数(top()、push()、pop()、 size()、empty() ),很好记的。
VS2008中栈的源代码
友情提示:初次阅读时请注意其实现思想,不要在细节上浪费过多的时间。
- //VS2008中 stack的定义 MoreWindows整理(http://blog.csdn.net/MoreWindows)
- template<class _Ty, class _Container = deque<_Ty> >
- class stack
- { // LIFO queue implemented with a container
- public:
- typedef _Container container_type;
- typedef typename _Container::value_type value_type;
- typedef typename _Container::size_type size_type;
- typedef typename _Container::reference reference;
- typedef typename _Container::const_reference const_reference;
-
- stack() : c()
- { // construct with empty container
- }
-
- explicit stack(const _Container& _Cont) : c(_Cont)
- { // construct by copying specified container
- }
-
- bool empty() const
- { // test if stack is empty
- return (c.empty());
- }
-
- size_type size() const
- { // test length of stack
- return (c.size());
- }
-
- reference top()
- { // return last element of mutable stack
- return (c.back());
- }
-
- const_reference top() const
- { // return last element of nonmutable stack
- return (c.back());
- }
-
- void push(const value_type& _Val)
- { // insert element at end
- c.push_back(_Val);
- }
-
- void pop()
- { // erase last element
- c.pop_back();
- }
-
- const _Container& _Get_container() const
- { // get reference to container
- return (c);
- }
-
- protected:
- _Container c; // the underlying container
- };
可以看出,由于栈只是进一步封装别的数据结构,并提供自己的接口,所以代码非常简洁,如果不指定容器,默认是用deque来作为其底层数据结构的(对deque不是很了解?可以参阅《STL系列之一 deque双向队列》)。下面给出栈的使用范例:
- //栈 stack支持 empty() size() top() push() pop()
- // by MoreWindows(http://blog.csdn.net/MoreWindows)
- #include <stack>
- #include <vector>
- #include <list>
- #include <cstdio>
- using namespace std;
- int main()
- {
- //可以使用list或vector作为栈的容器,默认是使用deque的。
- stack<int, list<int>> a;
- stack<int, vector<int>> b;
- int i;
-
- //压入数据
- for (i = 0; i < 10; i++)
- {
- a.push(i);
- b.push(i);
- }
-
- //栈的大小
- printf("%d %d\n", a.size(), b.size());
-
- //取栈项数据并将数据弹出栈
- while (!a.empty())
- {
- printf("%d ", a.top());
- a.pop();
- }
- putchar('\n');
-
- while (!b.empty())
- {
- printf("%d ", b.top());
- b.pop();
- }
- putchar('\n');
- return 0;
- }
转载请标明出处,原文地址:http://blog.csdn.net/morewindows/article/details/6950881
STL系列之三 queue 单向队列
分类: STL 他山之石 2011-11-09 09:20 3895人阅读 评论(1)收藏 举报queue单向队列与栈有点类似,一个是在同一端存取数据,另一个是在一端存入数据,另一端取出数据。单向队列中的数据是先进先出(First In First Out,FIFO)。在STL中,单向队列也是以别的容器作为底部结构,再将接口改变,使之符合单向队列的特性就可以了。因此实现也是非常方便的。下面就给出单向队列的函数列表和VS2008中单向队列的源代码。单向队列一共6个常用函数(front()、back()、push()、pop()、empty()、size()),与栈的常用函数较为相似。
VS2008中queue单向队列的源代码
友情提示:初次阅读时请注意其实现思想,不要在细节上浪费过多的时间。
- <span style="font-size:18px;">//VS2008中 queue的定义 MoreWindows整理(http://blog.csdn.net/MoreWindows)
- template<class _Ty, class _Container = deque<_Ty> >
- class queue
- { // FIFO queue implemented with a container
- public:
- typedef _Container container_type;
- typedef typename _Container::value_type value_type;
- typedef typename _Container::size_type size_type;
- typedef typename _Container::reference reference;
- typedef typename _Container::const_reference const_reference;
-
- queue() : c()
- { // construct with empty container
- }
-
- explicit queue(const _Container& _Cont) : c(_Cont)
- { // construct by copying specified container
- }
-
- bool empty() const
- { // test if queue is empty
- return (c.empty());
- }
-
- size_type size() const
- { // return length of queue
- return (c.size());
- }
-
- reference front()
- { // return first element of mutable queue
- return (c.front());
- }
-
- const_reference front() const
- { // return first element of nonmutable queue
- return (c.front());
- }
-
- reference back()
- { // return last element of mutable queue
- return (c.back());
- }
-
- const_reference back() const
- { // return last element of nonmutable queue
- return (c.back());
- }
-
- void push(const value_type& _Val)
- { // insert element at beginning
- c.push_back(_Val);
- }
-
- void pop()
- { // erase element at end
- c.pop_front();
- }
-
- const _Container& _Get_container() const
- { // get reference to container
- return (c);
- }
-
- protected:
- _Container c; // the underlying container
- };</span>
可以看出,由于栈只是进一步封装别的数据结构,并提供自己的接口,所以代码非常简洁,如果不指定容器,默认是用deque来作为其底层数据结构的(对deque不是很了解?可以参阅《STL系列之一deque双向队列》)。下面给出单向队列的使用范例:
- //单向队列 queue支持 empty() size() front() back() push() pop()
- //By MoreWindows(http://blog.csdn.net/MoreWindows)
- #include <queue>
- #include <vector>
- #include <list>
- #include <cstdio>
- using namespace std;
-
- int main()
- {
- //可以使用list作为单向队列的容器,默认是使用deque的。
- queue<int, list<int>> a;
- queue<int> b;
- int i;
-
- //压入数据
- for (i = 0; i < 10; i++)
- {
- a.push(i);
- b.push(i);
- }
-
- //单向队列的大小
- printf("%d %d\n", a.size(), b.size());
-
- //队列头和队列尾
- printf("%d %d\n", a.front(), a.back());
- printf("%d %d\n", b.front(), b.back());
-
- //取单向队列项数据并将数据移出单向队列
- while (!a.empty())
- {
- printf("%d ", a.front());
- a.pop();
- }
- putchar('\n');
-
- while (!b.empty())
- {
- printf("%d ", b.front());
- b.pop();
- }
- putchar('\n');
- return 0;
- }
STL系列之四 heap 堆
分类: STL 他山之石 2011-11-14 09:16 4591人阅读 评论(9)收藏 举报下面再介绍STL中与堆相关的4个函数——建立堆make_heap(),在堆中添加数据push_heap(),在堆中删除数据pop_heap()和堆排序sort_heap():
头文件 #include <algorithm>
下面的_First与_Last为可以随机访问的迭代器(指针),_Comp为比较函数(仿函数),其规则——如果函数的第一个参数小于第二个参数应返回true,否则返回false。
建立堆
make_heap(_First, _Last, _Comp)
默认是建立最大堆的。对int类型,可以在第三个参数传入greater<int>()得到最小堆。
在堆中添加数据
push_heap (_First, _Last)
要先在容器中加入数据,再调用push_heap ()
在堆中删除数据
pop_heap(_First, _Last)
要先调用pop_heap()再在容器中删除数据
堆排序
sort_heap(_First, _Last)
排序之后就不再是一个合法的heap了
有关堆与堆排序的更详细介绍请参阅——《白话经典算法系列之七 堆与堆排序》
下面给出STL中heap相关函数的使用范例:
- //by MoreWindows( http://blog.csdn.net/MoreWindows )
- #include <cstdio>
- #include <vector>
- #include <algorithm>
- #include <functional>
- using namespace std;
- void PrintfVectorInt(vector<int> &vet)
- {
- for (vector<int>::iterator pos = vet.begin(); pos != vet.end(); pos++)
- printf("%d ", *pos);
- putchar('\n');
- }
- int main()
- {
- const int MAXN = 20;
- int a[MAXN];
- int i;
- for (i = 0; i < MAXN; ++i)
- a[i] = rand() % (MAXN * 2);
-
- //动态申请vector 并对vector建堆
- vector<int> *pvet = new vector<int>(40);
- pvet->assign(a, a + MAXN);
-
- //建堆
- make_heap(pvet->begin(), pvet->end());
- PrintfVectorInt(*pvet);
-
- //加入新数据 先在容器中加入,再调用push_heap()
- pvet->push_back(25);
- push_heap(pvet->begin(), pvet->end());
- PrintfVectorInt(*pvet);
-
- //删除数据 要先调用pop_heap(),再在容器中删除
- pop_heap(pvet->begin(), pvet->end());
- pvet->pop_back();
- pop_heap(pvet->begin(), pvet->end());
- pvet->pop_back();
- PrintfVectorInt(*pvet);
-
- //堆排序
- sort_heap(pvet->begin(), pvet->end());
- PrintfVectorInt(*pvet);
-
- delete pvet;
- return 0;
- }
掌握其基本用法后,我们用这个堆排序和《白话经典算法系列》中的堆排序、快速排序,归并排序来进行个性能测试(Win7 + VS2008 Release下),测试代码如下:
- // by MoreWindows( http://blog.csdn.net/MoreWindows )
- #include <cstdio>
- #include <algorithm>
- #include <ctime>
- using namespace std;
- //------------------------快速排序----------------------------
- void quick_sort(int s[], int l, int r)
- {
- if (l < r)
- {
- int i = l, j = r, x = s[l];
- while (i < j)
- {
- while(i < j && s[j] >= x) // 从右向左找第一个小于x的数
- j--;
- if(i < j)
- s[i++] = s[j];
-
- while(i < j && s[i] < x) // 从左向右找第一个大于等于x的数
- i++;
- if(i < j)
- s[j--] = s[i];
- }
- s[i] = x;
- quick_sort(s, l, i - 1); // 递归调用
- quick_sort(s, i + 1, r);
- }
- }
- //------------------------归并排序----------------------------
- //将有二个有序数列a[first...mid]和a[mid...last]合并。
- void mergearray(int a[], int first, int mid, int last, int temp[])
- {
- int i = first, j = mid + 1;
- int m = mid, n = last;
- int k = 0;
-
- while (i <= m && j <= n)
- {
- if (a[i] < a[j])
- temp[k++] = a[i++];
- else
- temp[k++] = a[j++];
- }
-
- while (i <= m)
- temp[k++] = a[i++];
-
- while (j <= n)
- temp[k++] = a[j++];
-
- for (i = 0; i < k; i++)
- a[first + i] = temp[i];
- }
- void mergesort(int a[], int first, int last, int temp[])
- {
- if (first < last)
- {
- int mid = (first + last) / 2;
- mergesort(a, first, mid, temp); //左边有序
- mergesort(a, mid + 1, last, temp); //右边有序
- mergearray(a, first, mid, last, temp); //再将二个有序数列合并
- }
- }
- bool MergeSort(int a[], int n)
- {
- int *p = new int[n];
- if (p == NULL)
- return false;
- mergesort(a, 0, n - 1, p);
- return true;
- }
- //------------------------堆排序---------------------------
- inline void Swap(int &a, int &b)
- {
- int c = a;
- a = b;
- b = c;
- }
- //建立最小堆
- // 从i节点开始调整,n为节点总数 从0开始计算 i节点的子节点为 2*i+1, 2*i+2
- void MinHeapFixdown(int a[], int i, int n)
- {
- int j, temp;
-
- temp = a[i];
- j = 2 * i + 1;
- while (j < n)
- {
- if (j + 1 < n && a[j + 1] < a[j]) //在左右孩子中找最小的
- j++;
-
- if (a[j] >= temp)
- break;
-
- a[i] = a[j]; //把较小的子结点往上移动,替换它的父结点
- i = j;
- j = 2 * i + 1;
- }
- a[i] = temp;
- }
- //建立最小堆
- void MakeMinHeap(int a[], int n)
- {
- for (int i = n / 2 - 1; i >= 0; i--)
- MinHeapFixdown(a, i, n);
- }
- void MinheapsortTodescendarray(int a[], int n)
- {
- for (int i = n - 1; i >= 1; i--)
- {
- Swap(a[i], a[0]);
- MinHeapFixdown(a, 0, i);
- }
- }
- const int MAXN = 5000000;
- int a[MAXN];
- int b[MAXN], c[MAXN], d[MAXN];
- int main()
- {
- int i;
- srand(time(NULL));
- for (i = 0; i < MAXN; ++i)
- a[i] = rand() * rand(); //注rand()产生的数在0到65536之间
-
- for (i = 0; i < MAXN; ++i)
- d[i] = c[i] = b[i] = a[i];
-
- clock_t ibegin, iend;
-
- printf("--当前数据量为%d--By MoreWindows(http://blog.csdn.net/MoreWindows)--\n", MAXN);
- //快速排序
- printf("快速排序: ");
- ibegin = clock();
- quick_sort(a, 0, MAXN - 1);
- iend = clock();
- printf("%d毫秒\n", iend - ibegin);
-
-
- //归并排序
- printf("归并排序: ");
- ibegin = clock();
- MergeSort(b, MAXN);
- iend = clock();
- printf("%d毫秒\n", iend - ibegin);
-
- //堆排序
- printf("堆排序: ");
- ibegin = clock();
- MakeMinHeap(c, MAXN);
- MinheapsortTodescendarray(c, MAXN);
- iend = clock();
- printf("%d毫秒\n", iend - ibegin);
-
- //STL中的堆排序
- printf("STL中的堆排序: ");
- ibegin = clock();
- make_heap(d, d + MAXN);
- sort_heap(d, d + MAXN);
- iend = clock();
- printf("%d毫秒\n", iend - ibegin);
- return 0;
- }
对100000(十万)个数据的测试结果:
对500000(五十万)个数据的测试结果:
对1000000(一百万)个数据的测试结果:
对5000000(五百万)个数据的测试结果:
从中可以看出快速排序的效率确实要比其它同为O(N * logN)的排序算法要高,而STL中堆操作函数的性能与《白话经典算法系列之七 堆与堆排序》一文中堆操作函数的性能是相差无几的。
转载请标明出处,原文地址:http://blog.csdn.net/morewindows/article/details/6967409
STL系列之五 priority_queue 优先级队列
分类: STL 他山之石 2011-11-16 12:39 4119人阅读 评论(9)收藏 举报priority_queue 优先级队列是一个拥有权值概念的单向队列queue,在这个队列中,所有元素是按优先级排列的(也可以认为queue是个按进入队列的先后做为优先级的优先级队列——先进入队列的元素优先权要高于后进入队列的元素)。在计算机操作系统中,优先级队列的使用是相当频繁的,进线程调度都会用到。在STL的具体实现中,priority_queue也是以别的容器作为底部结构,再根据堆的处理规则来调整元素之间的位置。下面给出priority_queue的函数列表和VS2008中priority_queue的源代码,本文中与heap有关的函数参见《STL系列之四 heap 堆》。
priority_queue函数列表 函数描述 by MoreWindows( http://blog.csdn.net/MoreWindows )构造析构
priority_queue <Elem> c
创建一个空的queue 。
注:priority_queue构造函数有7个版本,请查阅MSDN
数据访问与增减
c.top() 返回队列头部数据
c.push(elem)在队列尾部增加elem数据
c.pop()队列头部数据出队
其它操作
c.empty()判断队列是否为空c.size() 返回队列中数据的个数
可以看出priority_queue的函数列表与栈stack的函数列表是相同的。
VS2008中priority_queue 优先级队列的源代码
友情提示:初次阅读时请注意其实现思想,不要在细节上浪费过多的时间
- //VS2008中 priority_queue的定义 MoreWindows整理( http://blog.csdn.net/MoreWindows )
- template<class _Ty, class _Container = vector<_Ty>, class _Pr = less<typename _Container::value_type> > //默认以vector为容器的
- class priority_queue
- { // priority queue implemented with a _Container
- public:
- typedef _Container container_type;
- typedef typename _Container::value_type value_type;
- typedef typename _Container::size_type size_type;
- typedef typename _Container::reference reference;
- typedef typename _Container::const_reference const_reference;
-
- priority_queue() : c(), comp()
- { // construct with empty container, default comparator
- }
-
- explicit priority_queue(const _Pr& _Pred) : c(), comp(_Pred)
- { // construct with empty container, specified comparator
- }
-
- priority_queue(const _Pr& _Pred, const _Container& _Cont) : c(_Cont), comp(_Pred)
- { // construct by copying specified container, comparator
- make_heap(c.begin(), c.end(), comp); //参见《STL系列之四 heap 堆的相关函数》
- }
-
- template<class _Iter>
- priority_queue(_Iter _First, _Iter _Last) : c(_First, _Last), comp()
- { // construct by copying [_First, _Last), default comparator
- make_heap(c.begin(), c.end(), comp);
- }
-
- template<class _Iter>
- priority_queue(_Iter _First, _Iter _Last, const _Pr& _Pred) : c(_First, _Last), comp(_Pred)
- { // construct by copying [_First, _Last), specified comparator
- make_heap(c.begin(), c.end(), comp);
- }
-
- template<class _Iter>
- priority_queue(_Iter _First, _Iter _Last, const _Pr& _Pred, const _Container& _Cont) : c(_Cont), comp(_Pred)
- { // construct by copying [_First, _Last), container, and comparator
- c.insert(c.end(), _First, _Last);
- make_heap(c.begin(), c.end(), comp);
- }
-
- bool empty() const
- { // test if queue is empty
- return (c.empty());
- }
-
- size_type size() const
- { // return length of queue
- return (c.size());
- }
-
- const_reference top() const
- { // return highest-priority element
- return (c.front());
- }
-
- reference top()
- { // return mutable highest-priority element (retained)
- return (c.front());
- }
-
- void push(const value_type& _Pred)
- { // insert value in priority order
- c.push_back(_Pred);
- push_heap(c.begin(), c.end(), comp);
- }
-
- void pop()
- { // erase highest-priority element
- pop_heap(c.begin(), c.end(), comp);
- c.pop_back();
- }
-
- protected:
- _Container c; // the underlying container
- _Pr comp; // the comparator functor
- };
下面先给出优级先级队列的使用范例。
- //优先级队列 priority_queue by MoreWindows( http://blog.csdn.net/MoreWindows )
- // 支持 empty() size() top() push() pop() 与stack的操作函数全部一样
- //by MoreWindows
- #include <queue>
- #include <list>
- #include <cstdio>
- using namespace std;
- int main()
- {
- //优先级队列默认是使用vector作容器。
- priority_queue<int> a;
- priority_queue<int, list<int>> b; //可以这样声明,但无法使用
- int i;
- //压入数据
- for (i = 0; i < 10; i++)
- {
- a.push(i * 2 - 5);
- //b.push(i); //编译错误
- }
- //优先级队列的大小
- printf("%d\n", a.size());
- //取优先级队列数据并将数据移出队列
- while (!a.empty())
- {
- printf("%d ", a.top());
- a.pop();
- }
- putchar('\n');
- return 0;
- }
下面程序是针对结构体的,对数据的比较是通过对结构体重载operator()。
程序功能是模拟排队过程,每人有姓名和优先级,优先级相同则比较姓名,开始有5个人进入队列,然后队头2个人出队,再有3个人进入队列,最后所有人都依次出队,程序会输出离开队伍的顺序。
- //by MoreWindows( http://blog.csdn.net/MoreWindows )
- #include <queue>
- #include <cstring>
- #include <cstdio>
- using namespace std;
- //结构体
- struct Node
- {
- char szName[20];
- int priority;
- Node(int nri, char *pszName)
- {
- strcpy(szName, pszName);
- priority = nri;
- }
- };
- //结构体的比较方法 改写operator()
- struct NodeCmp
- {
- bool operator()(const Node &na, const Node &nb)
- {
- if (na.priority != nb.priority)
- return na.priority <= nb.priority;
- else
- return strcmp(na.szName, nb.szName) > 0;
- }
- };
- void PrintfNode(Node &na)
- {
- printf("%s %d\n", na.szName, na.priority);
- }
- int main()
- {
- //优先级队列默认是使用vector作容器,底层数据结构为堆。
- priority_queue<Node, vector<Node>, NodeCmp> a;
-
- //有5个人进入队列
- a.push(Node(5, "小谭"));
- a.push(Node(3, "小刘"));
- a.push(Node(1, "小涛"));
- a.push(Node(5, "小王"));
-
- //队头的2个人出队
- PrintfNode(a.top());
- a.pop();
- PrintfNode(a.top());
- a.pop();
- printf("--------------------\n");
-
- //再进入3个人
- a.push(Node(2, "小白"));
- a.push(Node(2, "小强"));
- a.push(Node(3, "小新"));
-
- //所有人都依次出队
- while (!a.empty())
- {
- PrintfNode(a.top());
- a.pop();
- }
-
- return 0;
- }
读者可以将上面结构体Node改成类来试下,答案2天后发到本篇的评论中。
STL系列之六 set与hash_set
分类: STL 他山之石 2011-12-01 09:49 5916人阅读 评论(19)收藏 举报STL系列之六 set与hash_set
set和hash_set是STL中比较重要的容器,有必要对其进行深入了解。在STL中,set是以红黑树(RB-tree)作为底层数据结构的,hash_set是以Hash table(哈希表)作为底层数据结构的。set可以在时间复杂度为O(logN)情况下插入、删除和查找数据。hash_set操作的时间复杂度则比较复杂,这取决于哈希函数和哈希表的负载情况。下面列出set和hash_set的常用函数:
set和hase_set的更多函数请查阅MSDN。
set的使用范例如下(hash_set类似):
- // by MoreWindows( http://blog.csdn.net/MoreWindows )
- #include <set>
- #include <ctime>
- #include <cstdio>
- using namespace std;
-
- int main()
- {
- printf("--set使用 by MoreWindows( http://blog.csdn.net/MoreWindows ) --\n\n");
- const int MAXN = 15;
- int a[MAXN];
- int i;
- srand(time(NULL));
- for (i = 0; i < MAXN; ++i)
- a[i] = rand() % (MAXN * 2);
-
- set<int> iset;
- set<int>::iterator pos;
-
- //插入数据 insert()有三种重载
- iset.insert(a, a + MAXN);
-
- //当前集合中个数 最大容纳数据量
- printf("当前集合中个数: %d 最大容纳数据量: %d\n", iset.size(), iset.max_size());
-
- //依次输出
- printf("依次输出集合中所有元素-------\n");
- for (pos = iset.begin(); pos != iset.end(); ++pos)
- printf("%d ", *pos);
- putchar('\n');
-
- //查找
- int findNum = MAXN;
- printf("查找 %d是否存在-----------------------\n", findNum);
- pos = iset.find(findNum);
- if (pos != iset.end())
- printf("%d 存在\n", findNum);
- else
- printf("%d 不存在\n", findNum);
-
- //在最后位置插入数据,如果给定的位置不正确,会重新找个正确的位置并返回该位置
- pos = iset.insert(--iset.end(), MAXN * 2);
- printf("已经插入%d\n", *pos);
-
- //删除
- iset.erase(MAXN);
- printf("已经删除%d\n", MAXN);
-
- //依次输出
- printf("依次输出集合中所有元素-------\n");
- for (pos = iset.begin(); pos != iset.end(); ++pos)
- printf("%d ", *pos);
- putchar('\n');
- return 0;
- }
运行结果如下:
下面试下在set中使用类(结构体也可以类似这样做)。这个类很简单,只有一个成员变量,及设置和获取这个成员变量的成员函数。
- //在set中使用类要重载‘<’并实现拷贝构造函数
- // by MoreWindows( http://blog.csdn.net/MoreWindows )
- #include <set>
- #include <ctime>
- #include <cstdio>
- using namespace std;
- class Node
- {
- public:
- Node(int nAge = 0)
- {
- m_nAge = nAge;
- }
- Node(const Node &na) //拷贝构造函数
- {
- m_nAge = na.GetAge();
- }
- int GetAge()
- {
- return m_nAge;
- }
- private:
- int m_nAge;
- };
- //不能写成类的成员函数
- inline bool operator < (const Node &na, const Node &nb)
- {
- return na.GetAge() < nb.GetAge();
- }
- int main()
- {
- int i;
- set<Node> nset;
- for (i = 0; i < MAXN; ++i)
- nset.insert(Node(i));
- return 0;
- }
编译,直接报了3个错误!!1个在拷贝构造函数,2个在operator<()函数。如下图所示:
3个错误都是一样的:
error C2662: “Node::GetAge”: 不能将“this”指针从“const Node”转换为“Node &” 转换丢失限定符
这是怎么回事呀?分析下,拷贝构造函数与operator<()函数出错,错误都指向了GetAge()函数,有点古怪,比较下它们与GetAge()函数,可以发现最大的不同点在于这2个函数都用到了const而GetAge()函数没有使用const。难道是这个导致报错了吗?先给GetAge()函数加个const看看,如下:
int GetAge() const //增加这个const
{
returnm_nAge;
}
再编译,不报错了。再查下资料,原因如下——因为那2个函数都使用了const修饰的对象,但GetAge()没有加上const以保证它不修改对象,编译器认为这种写法是不安全的,所以就毫不犹豫报了个错误。
这种错误如果不亲身体会下,到笔试面试时很可能写了个错误程序而自己还处于一无所知中(死在这些小细节上最不值得)。另外,如果使用VC6.0则不会提示详细的错误信息——“转换丢失限定符”。
STL还为set提供了一些集合运算的函数,如交集set_intersection()、并集set_union()、差集set_difference()和对称差集set_symmetric_difference()。这些就不详细介绍了,有兴趣可以自己动手试一试。
下面开始对set和hash_set作个性能测试(Win7 +VS2008Release下)。
测试代码如下:
- // by MoreWindows( http://blog.csdn.net/MoreWindows )
- #include <set>
- #include <hash_set>
- #include <iostream>
- #include <ctime>
- #include <cstdio>
- #include <cstdlib>
- using namespace std;
- using namespace stdext; //hash_set
-
- // MAXN个数据 MAXQUERY次查询
- const int MAXN = 10000, MAXQUERY = 5000000;
- int a[MAXN], query[MAXQUERY];
-
- void PrintfContainertElapseTime(char *pszContainerName, char *pszOperator, long lElapsetime)
- {
- printf("%s 的%s操作 用时 %d毫秒\n", pszContainerName, pszOperator, lElapsetime);
- }
-
- int main()
- {
- printf("set VS hash_set 性能测试 数据容量 %d个 查询次数 %d次\n", MAXN, MAXQUERY);
- const int MAXNUM = MAXN * 4;
- const int MAXQUERYNUM = MAXN * 4;
- printf("容器中数据范围 [0, %d) 查询数据范围[0, %d)\n", MAXNUM, MAXQUERYNUM);
- printf("--by MoreWindows( http://blog.csdn.net/MoreWindows ) --\n\n");
-
- //随机生成在[0, MAXNUM)范围内的MAXN个数
- int i;
- srand(time(NULL));
- for (i = 0; i < MAXN; ++i)
- a[i] = (rand() * rand()) % MAXNUM;
- //随机生成在[0, MAXQUERYNUM)范围内的MAXQUERY个数
- srand(time(NULL));
- for (i = 0; i < MAXQUERY; ++i)
- query[i] = (rand() * rand()) % MAXQUERYNUM;
-
- set<int> nset;
- hash_set<int> nhashset;
- clock_t clockBegin, clockEnd;
-
-
- //insert
- printf("-----插入数据-----------\n");
-
- clockBegin = clock();
- nset.insert(a, a + MAXN);
- clockEnd = clock();
- printf("set中有数据%d个\n", nset.size());
- PrintfContainertElapseTime("set", "insert", clockEnd - clockBegin);
-
- clockBegin = clock();
- nhashset.insert(a, a + MAXN);
- clockEnd = clock();
- printf("hash_set中有数据%d个\n", nhashset.size());
- PrintfContainertElapseTime("hase_set", "insert", clockEnd - clockBegin);
-
-
- //find
- printf("-----查询数据-----------\n");
-
- int nFindSucceedCount, nFindFailedCount;
- nFindSucceedCount = nFindFailedCount = 0;
- clockBegin = clock();
- for (i = 0; i < MAXQUERY; ++i)
- if (nset.find(query[i]) != nset.end())
- ++nFindSucceedCount;
- else
- ++nFindFailedCount;
- clockEnd = clock();
- PrintfContainertElapseTime("set", "find", clockEnd - clockBegin);
- printf("查询成功次数: %d 查询失败次数: %d\n", nFindSucceedCount, nFindFailedCount);
-
- nFindSucceedCount = nFindFailedCount = 0;
- clockBegin = clock();
- for (i = 0; i < MAXQUERY; ++i)
- if (nhashset.find(query[i]) != nhashset.end())
- ++nFindSucceedCount;
- else
- ++nFindFailedCount;
- clockEnd = clock();
- PrintfContainertElapseTime("hash_set", "find", clockEnd - clockBegin);
- printf("查询成功次数: %d 查询失败次数: %d\n", nFindSucceedCount, nFindFailedCount);
- return 0;
- }
在数据容量100万,查询次数500万时,程序运行结果如下:
由于查询的失败次数太多,这次将查询范围变小使用再测试下:
由于结点过多,80多万个结点,set的红黑树树高约为19(2^19=524288,2^20=1048576),查询起来还是比较费时的。hash_set在时间性能上比set要好一些,并且如果查询成功的几率比较大的话,hash_set会有更好的表现。想知道为什么hash_set会有优良的性能表现,请看继集——《STL系列之九 探索hash_set》。
注1. MSDN上讲set的erase()是有返回值的,但在VS2008中查看set的源代码,erase()函数的三个重载版本中,有二个返回值都为void即无返回值,另一个返回size_type。 可以通过http://msdn.microsoft.com/zh-cn/library/8h4a3515(v=VS.90).aspx查看MSDN上对set的erase()说明。
STL系列之七 快速计算x的n次幂 power()的实现
分类: STL 他山之石 2012-01-04 10:33 3697人阅读 评论(22)收藏 举报计算x的n次幂最简单直接的方法就是相乘n次,很容易写出程序:
- //计算x^n 直接乘n次 by MoreWindows( http://blog.csdn.net/MoreWindows )
- int power1(int x, unsigned int n)
- {
- int result = 1;
- while (n--)
- result *= x;
- return result;
- }
这种计算的效率显然不高,我们可以用二分法来加速计算x^n=x^(n/2)* x^(n/2)即x^10=x^5*x^5,这种计算N次幂只要相乘O(logN)次。运用递归的方法不难写出:
- //计算x^n 二分递归实现 by MoreWindows( http://blog.csdn.net/MoreWindows )
- int power2(int x, unsigned int n)
- {
- if (n == 0)
- return 1;
- else if (n == 1)
- return x;
- else
- {
- if (n % 2 == 1)
- return power2(x, n / 2) * power2(x, n / 2) * x;
- else
- return power2(x, n / 2) * power2(x, n / 2);
- }
- }
递归毕竟比较浪费时间,且会有很多重复计算。
因此最好能换成非递归的方式来实现二分法。
考虑x^23,可以先从x ->x^2 -> x^4 -> x^8 -> x^16 取result1 = x^16,然后23-16=7。
我们只要计算x^7再与result1相乘就可以得到x^23。对于x^7也可以采用这种方法
取result2 = x^4,然后7-4=3,只要计算x^3再与result2相乘就可以得到x^7。由此可以将x^23写成x^16 * x^4* x^2 * x,即23=16+4+2+1,而23 = 10111(二进制),所以只要将n化为二进制并由低位到高位依次判断如果第i位为1,则result *=x^(2^i)。
函数实现如下:
- //计算x^n by MoreWindows( http://blog.csdn.net/MoreWindows )
- int power3(int x, unsigned int n)
- {
- if (n == 0)
- return 1;
- int result = 1;
- while (n != 0)
- {
- if ((n & 1) != 0)
- result *= x;
- x *= x;
- n >>= 1;
- }
- return result;
- }
此函数可以在相乘O(logN)次内计算x的n次幂,且避免了重复计算。但还可以作进一步的优化,如像48=110000(二进制)这种低位有很多0的数,可以先过滤掉低位的0再进行计算,这样也会提高一些效率。程序如下:
- //计算x^n by MoreWindows( http://blog.csdn.net/MoreWindows )
- int power4(int x, unsigned int n)
- {
- if (n == 0)
- {
- return 1;
- }
- else
- {
- while ((n & 1) == 0)
- {
- n >>= 1;
- x *= x;
- }
- }
- int result = x;
- n >>= 1;
- while (n != 0)
- {
- x *= x;
- if ((n & 1) != 0)
- result *= x;
- n >>= 1;
- }
- return result;
- }
验证一下
- int main()
- {
- printf("验证power4() -- by MoreWindows( http://blog.csdn.net/MoreWindows ) --\n\n");
- for (int i = 0; i <= 10; i++)
- printf("2的%d次方为\t%d\n", i, power4(2, i));
- return 0;
- }
结果为
看到这里,理解STL的power()函数应该就是个水到渠成的事情了——我们自己写的power4()正是STL的power()函数。
注,非常感谢网友evaxiao帮我找出了power4()的一个错误,我已经在文中改正了,谢谢网友evaxiao。
转载请标明出处,原文地址:http://blog.csdn.net/morewindows/article/details/7174143
STL系列之一 deque双向队列
分类: STL 他山之石 2011-11-08 09:52 7949人阅读 评论(8)收藏 举报deque双向队列是一种双向开口的连续线性空间,可以高效的在头尾两端插入和删除元素,deque在接口上和vector非常相似,下面列出deque的常用成员函数:
deque的实现比较复杂,内部会维护一个map(注意!不是STL中的map容器)即一小块连续的空间,该空间中每个元素都是指针,指向另一段(较大的)区域,这个区域称为缓冲区,缓冲区用来保存deque中的数据。因此deque在随机访问和遍历数据会比vector慢。具体的deque实现可以参考《STL源码剖析》,当然此书中使用的SGI STL与VS2008所使用的PJ STL的实现方法还是有区别的。下面给出了deque的结构图:
由于篇幅问题,deque的实现细节就不再深入了,下面给出deque的使用范例:
- //双向队列 deque
- //by MoreWindows http://blog.csdn.net/morewindows
- #include <deque>
- #include <cstdio>
- #include <algorithm>
- using namespace std;
- int main()
- {
- deque<int> ideq(20); //Create a deque ideq with 20 elements of default value 0
- deque<int>::iterator pos;
- int i;
-
- //使用assign()赋值 assign在计算机中就是赋值的意思
- for (i = 0; i < 20; ++i)
- ideq[i] = i;
-
- //输出deque
- printf("输出deque中数据:\n");
- for (i = 0; i < 20; ++i)
- printf("%d ", ideq[i]);
- putchar('\n');
-
- //在头尾加入新数据
- printf("\n在头尾加入新数据...\n");
- ideq.push_back(100);
- ideq.push_front(i);
-
- //输出deque
- printf("\n输出deque中数据:\n");
- for (pos = ideq.begin(); pos != ideq.end(); pos++)
- printf("%d ", *pos);
- putchar('\n');
-
- //查找
- const int FINDNUMBER = 19;
- printf("\n查找%d\n", FINDNUMBER);
- pos = find(ideq.begin(), ideq.end(), FINDNUMBER);
- if (pos != ideq.end())
- printf("find %d success\n", *pos);
- else
- printf("find failed\n");
-
- //在头尾删除数据
- printf("\n在头尾删除数据...\n");
- ideq.pop_back();
- ideq.pop_front();
-
- //输出deque
- printf("\n输出deque中数据:\n");
- for (pos = ideq.begin(); pos != ideq.end(); pos++)
- printf("%d ", *pos);
- putchar('\n');
- return 0;
- }
运行结果如下:
另外要注意一点。对于deque和vector来说,尽量少用erase(pos)和erase(beg,end)。因为这在中间删除数据后会导致后面的数据向前移动,从而使效率低下。
STL系列之二 stack栈
分类: STL 他山之石 2011-11-09 09:03 4131人阅读 评论(4)收藏 举报栈(statck)这种数据结构在计算机中是相当出名的。栈中的数据是先进后出的(First In Last Out, FILO)。栈只有一个出口,允许新增元素(只能在栈顶上增加)、移出元素(只能移出栈顶元素)、取得栈顶元素等操作。在STL中,栈是以别的容器作为底部结构,再将接口改变,使之符合栈的特性就可以了。因此实现非常的方便。下面就给出栈的函数列表和VS2008中栈的源代码,在STL中栈一共就5个常用操作函数(top()、push()、pop()、 size()、empty() ),很好记的。
VS2008中栈的源代码
友情提示:初次阅读时请注意其实现思想,不要在细节上浪费过多的时间。
- //VS2008中 stack的定义 MoreWindows整理(http://blog.csdn.net/MoreWindows)
- template<class _Ty, class _Container = deque<_Ty> >
- class stack
- { // LIFO queue implemented with a container
- public:
- typedef _Container container_type;
- typedef typename _Container::value_type value_type;
- typedef typename _Container::size_type size_type;
- typedef typename _Container::reference reference;
- typedef typename _Container::const_reference const_reference;
-
- stack() : c()
- { // construct with empty container
- }
-
- explicit stack(const _Container& _Cont) : c(_Cont)
- { // construct by copying specified container
- }
-
- bool empty() const
- { // test if stack is empty
- return (c.empty());
- }
-
- size_type size() const
- { // test length of stack
- return (c.size());
- }
-
- reference top()
- { // return last element of mutable stack
- return (c.back());
- }
-
- const_reference top() const
- { // return last element of nonmutable stack
- return (c.back());
- }
-
- void push(const value_type& _Val)
- { // insert element at end
- c.push_back(_Val);
- }
-
- void pop()
- { // erase last element
- c.pop_back();
- }
-
- const _Container& _Get_container() const
- { // get reference to container
- return (c);
- }
-
- protected:
- _Container c; // the underlying container
- };
可以看出,由于栈只是进一步封装别的数据结构,并提供自己的接口,所以代码非常简洁,如果不指定容器,默认是用deque来作为其底层数据结构的(对deque不是很了解?可以参阅《STL系列之一 deque双向队列》)。下面给出栈的使用范例:
- //栈 stack支持 empty() size() top() push() pop()
- // by MoreWindows(http://blog.csdn.net/MoreWindows)
- #include <stack>
- #include <vector>
- #include <list>
- #include <cstdio>
- using namespace std;
- int main()
- {
- //可以使用list或vector作为栈的容器,默认是使用deque的。
- stack<int, list<int>> a;
- stack<int, vector<int>> b;
- int i;
-
- //压入数据
- for (i = 0; i < 10; i++)
- {
- a.push(i);
- b.push(i);
- }
-
- //栈的大小
- printf("%d %d\n", a.size(), b.size());
-
- //取栈项数据并将数据弹出栈
- while (!a.empty())
- {
- printf("%d ", a.top());
- a.pop();
- }
- putchar('\n');
-
- while (!b.empty())
- {
- printf("%d ", b.top());
- b.pop();
- }
- putchar('\n');
- return 0;
- }
转载请标明出处,原文地址:http://blog.csdn.net/morewindows/article/details/6950881
STL系列之三 queue 单向队列
分类: STL 他山之石 2011-11-09 09:20 3895人阅读 评论(1)收藏 举报queue单向队列与栈有点类似,一个是在同一端存取数据,另一个是在一端存入数据,另一端取出数据。单向队列中的数据是先进先出(First In First Out,FIFO)。在STL中,单向队列也是以别的容器作为底部结构,再将接口改变,使之符合单向队列的特性就可以了。因此实现也是非常方便的。下面就给出单向队列的函数列表和VS2008中单向队列的源代码。单向队列一共6个常用函数(front()、back()、push()、pop()、empty()、size()),与栈的常用函数较为相似。
VS2008中queue单向队列的源代码
友情提示:初次阅读时请注意其实现思想,不要在细节上浪费过多的时间。
- <span style="font-size:18px;">//VS2008中 queue的定义 MoreWindows整理(http://blog.csdn.net/MoreWindows)
- template<class _Ty, class _Container = deque<_Ty> >
- class queue
- { // FIFO queue implemented with a container
- public:
- typedef _Container container_type;
- typedef typename _Container::value_type value_type;
- typedef typename _Container::size_type size_type;
- typedef typename _Container::reference reference;
- typedef typename _Container::const_reference const_reference;
-
- queue() : c()
- { // construct with empty container
- }
-
- explicit queue(const _Container& _Cont) : c(_Cont)
- { // construct by copying specified container
- }
-
- bool empty() const
- { // test if queue is empty
- return (c.empty());
- }
-
- size_type size() const
- { // return length of queue
- return (c.size());
- }
-
- reference front()
- { // return first element of mutable queue
- return (c.front());
- }
-
- const_reference front() const
- { // return first element of nonmutable queue
- return (c.front());
- }
-
- reference back()
- { // return last element of mutable queue
- return (c.back());
- }
-
- const_reference back() const
- { // return last element of nonmutable queue
- return (c.back());
- }
-
- void push(const value_type& _Val)
- { // insert element at beginning
- c.push_back(_Val);
- }
-
- void pop()
- { // erase element at end
- c.pop_front();
- }
-
- const _Container& _Get_container() const
- { // get reference to container
- return (c);
- }
-
- protected:
- _Container c; // the underlying container
- };</span>
可以看出,由于栈只是进一步封装别的数据结构,并提供自己的接口,所以代码非常简洁,如果不指定容器,默认是用deque来作为其底层数据结构的(对deque不是很了解?可以参阅《STL系列之一deque双向队列》)。下面给出单向队列的使用范例:
- //单向队列 queue支持 empty() size() front() back() push() pop()
- //By MoreWindows(http://blog.csdn.net/MoreWindows)
- #include <queue>
- #include <vector>
- #include <list>
- #include <cstdio>
- using namespace std;
-
- int main()
- {
- //可以使用list作为单向队列的容器,默认是使用deque的。
- queue<int, list<int>> a;
- queue<int> b;
- int i;
-
- //压入数据
- for (i = 0; i < 10; i++)
- {
- a.push(i);
- b.push(i);
- }
-
- //单向队列的大小
- printf("%d %d\n", a.size(), b.size());
-
- //队列头和队列尾
- printf("%d %d\n", a.front(), a.back());
- printf("%d %d\n", b.front(), b.back());
-
- //取单向队列项数据并将数据移出单向队列
- while (!a.empty())
- {
- printf("%d ", a.front());
- a.pop();
- }
- putchar('\n');
-
- while (!b.empty())
- {
- printf("%d ", b.front());
- b.pop();
- }
- putchar('\n');
- return 0;
- }
STL系列之四 heap 堆
分类: STL 他山之石 2011-11-14 09:16 4591人阅读 评论(9)收藏 举报下面再介绍STL中与堆相关的4个函数——建立堆make_heap(),在堆中添加数据push_heap(),在堆中删除数据pop_heap()和堆排序sort_heap():
头文件 #include <algorithm>
下面的_First与_Last为可以随机访问的迭代器(指针),_Comp为比较函数(仿函数),其规则——如果函数的第一个参数小于第二个参数应返回true,否则返回false。
建立堆
make_heap(_First, _Last, _Comp)
默认是建立最大堆的。对int类型,可以在第三个参数传入greater<int>()得到最小堆。
在堆中添加数据
push_heap (_First, _Last)
要先在容器中加入数据,再调用push_heap ()
在堆中删除数据
pop_heap(_First, _Last)
要先调用pop_heap()再在容器中删除数据
堆排序
sort_heap(_First, _Last)
排序之后就不再是一个合法的heap了
有关堆与堆排序的更详细介绍请参阅——《白话经典算法系列之七 堆与堆排序》
下面给出STL中heap相关函数的使用范例:
- //by MoreWindows( http://blog.csdn.net/MoreWindows )
- #include <cstdio>
- #include <vector>
- #include <algorithm>
- #include <functional>
- using namespace std;
- void PrintfVectorInt(vector<int> &vet)
- {
- for (vector<int>::iterator pos = vet.begin(); pos != vet.end(); pos++)
- printf("%d ", *pos);
- putchar('\n');
- }
- int main()
- {
- const int MAXN = 20;
- int a[MAXN];
- int i;
- for (i = 0; i < MAXN; ++i)
- a[i] = rand() % (MAXN * 2);
-
- //动态申请vector 并对vector建堆
- vector<int> *pvet = new vector<int>(40);
- pvet->assign(a, a + MAXN);
-
- //建堆
- make_heap(pvet->begin(), pvet->end());
- PrintfVectorInt(*pvet);
-
- //加入新数据 先在容器中加入,再调用push_heap()
- pvet->push_back(25);
- push_heap(pvet->begin(), pvet->end());
- PrintfVectorInt(*pvet);
-
- //删除数据 要先调用pop_heap(),再在容器中删除
- pop_heap(pvet->begin(), pvet->end());
- pvet->pop_back();
- pop_heap(pvet->begin(), pvet->end());
- pvet->pop_back();
- PrintfVectorInt(*pvet);
-
- //堆排序
- sort_heap(pvet->begin(), pvet->end());
- PrintfVectorInt(*pvet);
-
- delete pvet;
- return 0;
- }
掌握其基本用法后,我们用这个堆排序和《白话经典算法系列》中的堆排序、快速排序,归并排序来进行个性能测试(Win7 + VS2008 Release下),测试代码如下:
- // by MoreWindows( http://blog.csdn.net/MoreWindows )
- #include <cstdio>
- #include <algorithm>
- #include <ctime>
- using namespace std;
- //------------------------快速排序----------------------------
- void quick_sort(int s[], int l, int r)
- {
- if (l < r)
- {
- int i = l, j = r, x = s[l];
- while (i < j)
- {
- while(i < j && s[j] >= x) // 从右向左找第一个小于x的数
- j--;
- if(i < j)
- s[i++] = s[j];
-
- while(i < j && s[i] < x) // 从左向右找第一个大于等于x的数
- i++;
- if(i < j)
- s[j--] = s[i];
- }
- s[i] = x;
- quick_sort(s, l, i - 1); // 递归调用
- quick_sort(s, i + 1, r);
- }
- }
- //------------------------归并排序----------------------------
- //将有二个有序数列a[first...mid]和a[mid...last]合并。
- void mergearray(int a[], int first, int mid, int last, int temp[])
- {
- int i = first, j = mid + 1;
- int m = mid, n = last;
- int k = 0;
-
- while (i <= m && j <= n)
- {
- if (a[i] < a[j])
- temp[k++] = a[i++];
- else
- temp[k++] = a[j++];
- }
-
- while (i <= m)
- temp[k++] = a[i++];
-
- while (j <= n)
- temp[k++] = a[j++];
-
- for (i = 0; i < k; i++)
- a[first + i] = temp[i];
- }
- void mergesort(int a[], int first, int last, int temp[])
- {
- if (first < last)
- {
- int mid = (first + last) / 2;
- mergesort(a, first, mid, temp); //左边有序
- mergesort(a, mid + 1, last, temp); //右边有序
- mergearray(a, first, mid, last, temp); //再将二个有序数列合并
- }
- }
- bool MergeSort(int a[], int n)
- {
- int *p = new int[n];
- if (p == NULL)
- return false;
- mergesort(a, 0, n - 1, p);
- return true;
- }
- //------------------------堆排序---------------------------
- inline void Swap(int &a, int &b)
- {
- int c = a;
- a = b;
- b = c;
- }
- //建立最小堆
- // 从i节点开始调整,n为节点总数 从0开始计算 i节点的子节点为 2*i+1, 2*i+2
- void MinHeapFixdown(int a[], int i, int n)
- {
- int j, temp;
-
- temp = a[i];
- j = 2 * i + 1;
- while (j < n)
- {
- if (j + 1 < n && a[j + 1] < a[j]) //在左右孩子中找最小的
- j++;
-
- if (a[j] >= temp)
- break;
-
- a[i] = a[j]; //把较小的子结点往上移动,替换它的父结点
- i = j;
- j = 2 * i + 1;
- }
- a[i] = temp;
- }
- //建立最小堆
- void MakeMinHeap(int a[], int n)
- {
- for (int i = n / 2 - 1; i >= 0; i--)
- MinHeapFixdown(a, i, n);
- }
- void MinheapsortTodescendarray(int a[], int n)
- {
- for (int i = n - 1; i >= 1; i--)
- {
- Swap(a[i], a[0]);
- MinHeapFixdown(a, 0, i);
- }
- }
- const int MAXN = 5000000;
- int a[MAXN];
- int b[MAXN], c[MAXN], d[MAXN];
- int main()
- {
- int i;
- srand(time(NULL));
- for (i = 0; i < MAXN; ++i)
- a[i] = rand() * rand(); //注rand()产生的数在0到65536之间
-
- for (i = 0; i < MAXN; ++i)
- d[i] = c[i] = b[i] = a[i];
-
- clock_t ibegin, iend;
-
- printf("--当前数据量为%d--By MoreWindows(http://blog.csdn.net/MoreWindows)--\n", MAXN);
- //快速排序
- printf("快速排序: ");
- ibegin = clock();
- quick_sort(a, 0, MAXN - 1);
- iend = clock();
- printf("%d毫秒\n", iend - ibegin);
-
-
- //归并排序
- printf("归并排序: ");
- ibegin = clock();
- MergeSort(b, MAXN);
- iend = clock();
- printf("%d毫秒\n", iend - ibegin);
-
- //堆排序
- printf("堆排序: ");
- ibegin = clock();
- MakeMinHeap(c, MAXN);
- MinheapsortTodescendarray(c, MAXN);
- iend = clock();
- printf("%d毫秒\n", iend - ibegin);
-
- //STL中的堆排序
- printf("STL中的堆排序: ");
- ibegin = clock();
- make_heap(d, d + MAXN);
- sort_heap(d, d + MAXN);
- iend = clock();
- printf("%d毫秒\n", iend - ibegin);
- return 0;
- }
对100000(十万)个数据的测试结果:
对500000(五十万)个数据的测试结果:
对1000000(一百万)个数据的测试结果:
对5000000(五百万)个数据的测试结果:
从中可以看出快速排序的效率确实要比其它同为O(N * logN)的排序算法要高,而STL中堆操作函数的性能与《白话经典算法系列之七 堆与堆排序》一文中堆操作函数的性能是相差无几的。
转载请标明出处,原文地址:http://blog.csdn.net/morewindows/article/details/6967409
STL系列之五 priority_queue 优先级队列
分类: STL 他山之石 2011-11-16 12:39 4119人阅读 评论(9)收藏 举报priority_queue 优先级队列是一个拥有权值概念的单向队列queue,在这个队列中,所有元素是按优先级排列的(也可以认为queue是个按进入队列的先后做为优先级的优先级队列——先进入队列的元素优先权要高于后进入队列的元素)。在计算机操作系统中,优先级队列的使用是相当频繁的,进线程调度都会用到。在STL的具体实现中,priority_queue也是以别的容器作为底部结构,再根据堆的处理规则来调整元素之间的位置。下面给出priority_queue的函数列表和VS2008中priority_queue的源代码,本文中与heap有关的函数参见《STL系列之四 heap 堆》。
priority_queue函数列表 函数描述 by MoreWindows( http://blog.csdn.net/MoreWindows )构造析构
priority_queue <Elem> c
创建一个空的queue 。
注:priority_queue构造函数有7个版本,请查阅MSDN
数据访问与增减
c.top() 返回队列头部数据
c.push(elem)在队列尾部增加elem数据
c.pop()队列头部数据出队
其它操作
c.empty()判断队列是否为空c.size() 返回队列中数据的个数
可以看出priority_queue的函数列表与栈stack的函数列表是相同的。
VS2008中priority_queue 优先级队列的源代码
友情提示:初次阅读时请注意其实现思想,不要在细节上浪费过多的时间
- //VS2008中 priority_queue的定义 MoreWindows整理( http://blog.csdn.net/MoreWindows )
- template<class _Ty, class _Container = vector<_Ty>, class _Pr = less<typename _Container::value_type> > //默认以vector为容器的
- class priority_queue
- { // priority queue implemented with a _Container
- public:
- typedef _Container container_type;
- typedef typename _Container::value_type value_type;
- typedef typename _Container::size_type size_type;
- typedef typename _Container::reference reference;
- typedef typename _Container::const_reference const_reference;
-
- priority_queue() : c(), comp()
- { // construct with empty container, default comparator
- }
-
- explicit priority_queue(const _Pr& _Pred) : c(), comp(_Pred)
- { // construct with empty container, specified comparator
- }
-
- priority_queue(const _Pr& _Pred, const _Container& _Cont) : c(_Cont), comp(_Pred)
- { // construct by copying specified container, comparator
- make_heap(c.begin(), c.end(), comp); //参见《STL系列之四 heap 堆的相关函数》
- }
-
- template<class _Iter>
- priority_queue(_Iter _First, _Iter _Last) : c(_First, _Last), comp()
- { // construct by copying [_First, _Last), default comparator
- make_heap(c.begin(), c.end(), comp);
- }
-
- template<class _Iter>
- priority_queue(_Iter _First, _Iter _Last, const _Pr& _Pred) : c(_First, _Last), comp(_Pred)
- { // construct by copying [_First, _Last), specified comparator
- make_heap(c.begin(), c.end(), comp);
- }
-
- template<class _Iter>
- priority_queue(_Iter _First, _Iter _Last, const _Pr& _Pred, const _Container& _Cont) : c(_Cont), comp(_Pred)
- { // construct by copying [_First, _Last), container, and comparator
- c.insert(c.end(), _First, _Last);
- make_heap(c.begin(), c.end(), comp);
- }
-
- bool empty() const
- { // test if queue is empty
- return (c.empty());
- }
-
- size_type size() const
- { // return length of queue
- return (c.size());
- }
-
- const_reference top() const
- { // return highest-priority element
- return (c.front());
- }
-
- reference top()
- { // return mutable highest-priority element (retained)
- return (c.front());
- }
-
- void push(const value_type& _Pred)
- { // insert value in priority order
- c.push_back(_Pred);
- push_heap(c.begin(), c.end(), comp);
- }
-
- void pop()
- { // erase highest-priority element
- pop_heap(c.begin(), c.end(), comp);
- c.pop_back();
- }
-
- protected:
- _Container c; // the underlying container
- _Pr comp; // the comparator functor
- };
下面先给出优级先级队列的使用范例。
- //优先级队列 priority_queue by MoreWindows( http://blog.csdn.net/MoreWindows )
- // 支持 empty() size() top() push() pop() 与stack的操作函数全部一样
- //by MoreWindows
- #include <queue>
- #include <list>
- #include <cstdio>
- using namespace std;
- int main()
- {
- //优先级队列默认是使用vector作容器。
- priority_queue<int> a;
- priority_queue<int, list<int>> b; //可以这样声明,但无法使用
- int i;
- //压入数据
- for (i = 0; i < 10; i++)
- {
- a.push(i * 2 - 5);
- //b.push(i); //编译错误
- }
- //优先级队列的大小
- printf("%d\n", a.size());
- //取优先级队列数据并将数据移出队列
- while (!a.empty())
- {
- printf("%d ", a.top());
- a.pop();
- }
- putchar('\n');
- return 0;
- }
下面程序是针对结构体的,对数据的比较是通过对结构体重载operator()。
程序功能是模拟排队过程,每人有姓名和优先级,优先级相同则比较姓名,开始有5个人进入队列,然后队头2个人出队,再有3个人进入队列,最后所有人都依次出队,程序会输出离开队伍的顺序。
- //by MoreWindows( http://blog.csdn.net/MoreWindows )
- #include <queue>
- #include <cstring>
- #include <cstdio>
- using namespace std;
- //结构体
- struct Node
- {
- char szName[20];
- int priority;
- Node(int nri, char *pszName)
- {
- strcpy(szName, pszName);
- priority = nri;
- }
- };
- //结构体的比较方法 改写operator()
- struct NodeCmp
- {
- bool operator()(const Node &na, const Node &nb)
- {
- if (na.priority != nb.priority)
- return na.priority <= nb.priority;
- else
- return strcmp(na.szName, nb.szName) > 0;
- }
- };
- void PrintfNode(Node &na)
- {
- printf("%s %d\n", na.szName, na.priority);
- }
- int main()
- {
- //优先级队列默认是使用vector作容器,底层数据结构为堆。
- priority_queue<Node, vector<Node>, NodeCmp> a;
-
- //有5个人进入队列
- a.push(Node(5, "小谭"));
- a.push(Node(3, "小刘"));
- a.push(Node(1, "小涛"));
- a.push(Node(5, "小王"));
-
- //队头的2个人出队
- PrintfNode(a.top());
- a.pop();
- PrintfNode(a.top());
- a.pop();
- printf("--------------------\n");
-
- //再进入3个人
- a.push(Node(2, "小白"));
- a.push(Node(2, "小强"));
- a.push(Node(3, "小新"));
-
- //所有人都依次出队
- while (!a.empty())
- {
- PrintfNode(a.top());
- a.pop();
- }
-
- return 0;
- }
读者可以将上面结构体Node改成类来试下,答案2天后发到本篇的评论中。
STL系列之一 deque双向队列
分类: STL 他山之石 2011-11-08 09:52 7949人阅读 评论(8)收藏 举报deque双向队列是一种双向开口的连续线性空间,可以高效的在头尾两端插入和删除元素,deque在接口上和vector非常相似,下面列出deque的常用成员函数:
deque的实现比较复杂,内部会维护一个map(注意!不是STL中的map容器)即一小块连续的空间,该空间中每个元素都是指针,指向另一段(较大的)区域,这个区域称为缓冲区,缓冲区用来保存deque中的数据。因此deque在随机访问和遍历数据会比vector慢。具体的deque实现可以参考《STL源码剖析》,当然此书中使用的SGI STL与VS2008所使用的PJ STL的实现方法还是有区别的。下面给出了deque的结构图:
由于篇幅问题,deque的实现细节就不再深入了,下面给出deque的使用范例:
- //双向队列 deque
- //by MoreWindows http://blog.csdn.net/morewindows
- #include <deque>
- #include <cstdio>
- #include <algorithm>
- using namespace std;
- int main()
- {
- deque<int> ideq(20); //Create a deque ideq with 20 elements of default value 0
- deque<int>::iterator pos;
- int i;
-
- //使用assign()赋值 assign在计算机中就是赋值的意思
- for (i = 0; i < 20; ++i)
- ideq[i] = i;
-
- //输出deque
- printf("输出deque中数据:\n");
- for (i = 0; i < 20; ++i)
- printf("%d ", ideq[i]);
- putchar('\n');
-
- //在头尾加入新数据
- printf("\n在头尾加入新数据...\n");
- ideq.push_back(100);
- ideq.push_front(i);
-
- //输出deque
- printf("\n输出deque中数据:\n");
- for (pos = ideq.begin(); pos != ideq.end(); pos++)
- printf("%d ", *pos);
- putchar('\n');
-
- //查找
- const int FINDNUMBER = 19;
- printf("\n查找%d\n", FINDNUMBER);
- pos = find(ideq.begin(), ideq.end(), FINDNUMBER);
- if (pos != ideq.end())
- printf("find %d success\n", *pos);
- else
- printf("find failed\n");
-
- //在头尾删除数据
- printf("\n在头尾删除数据...\n");
- ideq.pop_back();
- ideq.pop_front();
-
- //输出deque
- printf("\n输出deque中数据:\n");
- for (pos = ideq.begin(); pos != ideq.end(); pos++)
- printf("%d ", *pos);
- putchar('\n');
- return 0;
- }
运行结果如下:
另外要注意一点。对于deque和vector来说,尽量少用erase(pos)和erase(beg,end)。因为这在中间删除数据后会导致后面的数据向前移动,从而使效率低下。
STL系列之二 stack栈
分类: STL 他山之石 2011-11-09 09:03 4131人阅读 评论(4)收藏 举报栈(statck)这种数据结构在计算机中是相当出名的。栈中的数据是先进后出的(First In Last Out, FILO)。栈只有一个出口,允许新增元素(只能在栈顶上增加)、移出元素(只能移出栈顶元素)、取得栈顶元素等操作。在STL中,栈是以别的容器作为底部结构,再将接口改变,使之符合栈的特性就可以了。因此实现非常的方便。下面就给出栈的函数列表和VS2008中栈的源代码,在STL中栈一共就5个常用操作函数(top()、push()、pop()、 size()、empty() ),很好记的。
VS2008中栈的源代码
友情提示:初次阅读时请注意其实现思想,不要在细节上浪费过多的时间。
- //VS2008中 stack的定义 MoreWindows整理(http://blog.csdn.net/MoreWindows)
- template<class _Ty, class _Container = deque<_Ty> >
- class stack
- { // LIFO queue implemented with a container
- public:
- typedef _Container container_type;
- typedef typename _Container::value_type value_type;
- typedef typename _Container::size_type size_type;
- typedef typename _Container::reference reference;
- typedef typename _Container::const_reference const_reference;
-
- stack() : c()
- { // construct with empty container
- }
-
- explicit stack(const _Container& _Cont) : c(_Cont)
- { // construct by copying specified container
- }
-
- bool empty() const
- { // test if stack is empty
- return (c.empty());
- }
-
- size_type size() const
- { // test length of stack
- return (c.size());
- }
-
- reference top()
- { // return last element of mutable stack
- return (c.back());
- }
-
- const_reference top() const
- { // return last element of nonmutable stack
- return (c.back());
- }
-
- void push(const value_type& _Val)
- { // insert element at end
- c.push_back(_Val);
- }
-
- void pop()
- { // erase last element
- c.pop_back();
- }
-
- const _Container& _Get_container() const
- { // get reference to container
- return (c);
- }
-
- protected:
- _Container c; // the underlying container
- };
可以看出,由于栈只是进一步封装别的数据结构,并提供自己的接口,所以代码非常简洁,如果不指定容器,默认是用deque来作为其底层数据结构的(对deque不是很了解?可以参阅《STL系列之一 deque双向队列》)。下面给出栈的使用范例:
- //栈 stack支持 empty() size() top() push() pop()
- // by MoreWindows(http://blog.csdn.net/MoreWindows)
- #include <stack>
- #include <vector>
- #include <list>
- #include <cstdio>
- using namespace std;
- int main()
- {
- //可以使用list或vector作为栈的容器,默认是使用deque的。
- stack<int, list<int>> a;
- stack<int, vector<int>> b;
- int i;
-
- //压入数据
- for (i = 0; i < 10; i++)
- {
- a.push(i);
- b.push(i);
- }
-
- //栈的大小
- printf("%d %d\n", a.size(), b.size());
-
- //取栈项数据并将数据弹出栈
- while (!a.empty())
- {
- printf("%d ", a.top());
- a.pop();
- }
- putchar('\n');
-
- while (!b.empty())
- {
- printf("%d ", b.top());
- b.pop();
- }
- putchar('\n');
- return 0;
- }
转载请标明出处,原文地址:http://blog.csdn.net/morewindows/article/details/6950881
STL系列之三 queue 单向队列
分类: STL 他山之石 2011-11-09 09:20 3895人阅读 评论(1)收藏 举报queue单向队列与栈有点类似,一个是在同一端存取数据,另一个是在一端存入数据,另一端取出数据。单向队列中的数据是先进先出(First In First Out,FIFO)。在STL中,单向队列也是以别的容器作为底部结构,再将接口改变,使之符合单向队列的特性就可以了。因此实现也是非常方便的。下面就给出单向队列的函数列表和VS2008中单向队列的源代码。单向队列一共6个常用函数(front()、back()、push()、pop()、empty()、size()),与栈的常用函数较为相似。
VS2008中queue单向队列的源代码
友情提示:初次阅读时请注意其实现思想,不要在细节上浪费过多的时间。
- <span style="font-size:18px;">//VS2008中 queue的定义 MoreWindows整理(http://blog.csdn.net/MoreWindows)
- template<class _Ty, class _Container = deque<_Ty> >
- class queue
- { // FIFO queue implemented with a container
- public:
- typedef _Container container_type;
- typedef typename _Container::value_type value_type;
- typedef typename _Container::size_type size_type;
- typedef typename _Container::reference reference;
- typedef typename _Container::const_reference const_reference;
-
- queue() : c()
- { // construct with empty container
- }
-
- explicit queue(const _Container& _Cont) : c(_Cont)
- { // construct by copying specified container
- }
-
- bool empty() const
- { // test if queue is empty
- return (c.empty());
- }
-
- size_type size() const
- { // return length of queue
- return (c.size());
- }
-
- reference front()
- { // return first element of mutable queue
- return (c.front());
- }
-
- const_reference front() const
- { // return first element of nonmutable queue
- return (c.front());
- }
-
- reference back()
- { // return last element of mutable queue
- return (c.back());
- }
-
- const_reference back() const
- { // return last element of nonmutable queue
- return (c.back());
- }
-
- void push(const value_type& _Val)
- { // insert element at beginning
- c.push_back(_Val);
- }
-
- void pop()
- { // erase element at end
- c.pop_front();
- }
-
- const _Container& _Get_container() const
- { // get reference to container
- return (c);
- }
-
- protected:
- _Container c; // the underlying container
- };</span>
可以看出,由于栈只是进一步封装别的数据结构,并提供自己的接口,所以代码非常简洁,如果不指定容器,默认是用deque来作为其底层数据结构的(对deque不是很了解?可以参阅《STL系列之一deque双向队列》)。下面给出单向队列的使用范例:
- //单向队列 queue支持 empty() size() front() back() push() pop()
- //By MoreWindows(http://blog.csdn.net/MoreWindows)
- #include <queue>
- #include <vector>
- #include <list>
- #include <cstdio>
- using namespace std;
-
- int main()
- {
- //可以使用list作为单向队列的容器,默认是使用deque的。
- queue<int, list<int>> a;
- queue<int> b;
- int i;
-
- //压入数据
- for (i = 0; i < 10; i++)
- {
- a.push(i);
- b.push(i);
- }
-
- //单向队列的大小
- printf("%d %d\n", a.size(), b.size());
-
- //队列头和队列尾
- printf("%d %d\n", a.front(), a.back());
- printf("%d %d\n", b.front(), b.back());
-
- //取单向队列项数据并将数据移出单向队列
- while (!a.empty())
- {
- printf("%d ", a.front());
- a.pop();
- }
- putchar('\n');
-
- while (!b.empty())
- {
- printf("%d ", b.front());
- b.pop();
- }
- putchar('\n');
- return 0;
- }
STL系列之一 deque双向队列
分类: STL 他山之石 2011-11-08 09:52 7949人阅读 评论(8)收藏 举报deque双向队列是一种双向开口的连续线性空间,可以高效的在头尾两端插入和删除元素,deque在接口上和vector非常相似,下面列出deque的常用成员函数:
deque的实现比较复杂,内部会维护一个map(注意!不是STL中的map容器)即一小块连续的空间,该空间中每个元素都是指针,指向另一段(较大的)区域,这个区域称为缓冲区,缓冲区用来保存deque中的数据。因此deque在随机访问和遍历数据会比vector慢。具体的deque实现可以参考《STL源码剖析》,当然此书中使用的SGI STL与VS2008所使用的PJ STL的实现方法还是有区别的。下面给出了deque的结构图:
由于篇幅问题,deque的实现细节就不再深入了,下面给出deque的使用范例:
- //双向队列 deque
- //by MoreWindows http://blog.csdn.net/morewindows
- #include <deque>
- #include <cstdio>
- #include <algorithm>
- using namespace std;
- int main()
- {
- deque<int> ideq(20); //Create a deque ideq with 20 elements of default value 0
- deque<int>::iterator pos;
- int i;
-
- //使用assign()赋值 assign在计算机中就是赋值的意思
- for (i = 0; i < 20; ++i)
- ideq[i] = i;
-
- //输出deque
- printf("输出deque中数据:\n");
- for (i = 0; i < 20; ++i)
- printf("%d ", ideq[i]);
- putchar('\n');
-
- //在头尾加入新数据
- printf("\n在头尾加入新数据...\n");
- ideq.push_back(100);
- ideq.push_front(i);
-
- //输出deque
- printf("\n输出deque中数据:\n");
- for (pos = ideq.begin(); pos != ideq.end(); pos++)
- printf("%d ", *pos);
- putchar('\n');
-
- //查找
- const int FINDNUMBER = 19;
- printf("\n查找%d\n", FINDNUMBER);
- pos = find(ideq.begin(), ideq.end(), FINDNUMBER);
- if (pos != ideq.end())
- printf("find %d success\n", *pos);
- else
- printf("find failed\n");
-
- //在头尾删除数据
- printf("\n在头尾删除数据...\n");
- ideq.pop_back();
- ideq.pop_front();
-
- //输出deque
- printf("\n输出deque中数据:\n");
- for (pos = ideq.begin(); pos != ideq.end(); pos++)
- printf("%d ", *pos);
- putchar('\n');
- return 0;
- }
运行结果如下:
另外要注意一点。对于deque和vector来说,尽量少用erase(pos)和erase(beg,end)。因为这在中间删除数据后会导致后面的数据向前移动,从而使效率低下。
deque双向队列是一种双向开口的连续线性空间,可以高效的在头尾两端插入和删除元素,deque在接口上和vector非常相似,下面列出deque的常用成员函数:
deque的实现比较复杂,内部会维护一个map(注意!不是STL中的map容器)即一小块连续的空间,该空间中每个元素都是指针,指向另一段(较大的)区域,这个区域称为缓冲区,缓冲区用来保存deque中的数据。因此deque在随机访问和遍历数据会比vector慢。具体的deque实现可以参考《STL源码剖析》,当然此书中使用的SGI STL与VS2008所使用的PJ STL的实现方法还是有区别的。下面给出了deque的结构图:
由于篇幅问题,deque的实现细节就不再深入了,下面给出deque的使用范例:
- //双向队列 deque
- //by MoreWindows http://blog.csdn.net/morewindows
- #include <deque>
- #include <cstdio>
- #include <algorithm>
- using namespace std;
- int main()
- {
- deque<int> ideq(20); //Create a deque ideq with 20 elements of default value 0
- deque<int>::iterator pos;
- int i;
- //使用assign()赋值 assign在计算机中就是赋值的意思
- for (i = 0; i < 20; ++i)
- ideq[i] = i;
- //输出deque
- printf("输出deque中数据:\n");
- for (i = 0; i < 20; ++i)
- printf("%d ", ideq[i]);
- putchar('\n');
- //在头尾加入新数据
- printf("\n在头尾加入新数据...\n");
- ideq.push_back(100);
- ideq.push_front(i);
- //输出deque
- printf("\n输出deque中数据:\n");
- for (pos = ideq.begin(); pos != ideq.end(); pos++)
- printf("%d ", *pos);
- putchar('\n');
- //查找
- const int FINDNUMBER = 19;
- printf("\n查找%d\n", FINDNUMBER);
- pos = find(ideq.begin(), ideq.end(), FINDNUMBER);
- if (pos != ideq.end())
- printf("find %d success\n", *pos);
- else
- printf("find failed\n");
- //在头尾删除数据
- printf("\n在头尾删除数据...\n");
- ideq.pop_back();
- ideq.pop_front();
- //输出deque
- printf("\n输出deque中数据:\n");
- for (pos = ideq.begin(); pos != ideq.end(); pos++)
- printf("%d ", *pos);
- putchar('\n');
- return 0;
- }
运行结果如下:
另外要注意一点。对于deque和vector来说,尽量少用erase(pos)和erase(beg,end)。因为这在中间删除数据后会导致后面的数据向前移动,从而使效率低下。
STL系列之二 stack栈
栈(statck)这种数据结构在计算机中是相当出名的。栈中的数据是先进后出的(First In Last Out, FILO)。栈只有一个出口,允许新增元素(只能在栈顶上增加)、移出元素(只能移出栈顶元素)、取得栈顶元素等操作。在STL中,栈是以别的容器作为底部结构,再将接口改变,使之符合栈的特性就可以了。因此实现非常的方便。下面就给出栈的函数列表和VS2008中栈的源代码,在STL中栈一共就5个常用操作函数(top()、push()、pop()、 size()、empty() ),很好记的。
VS2008中栈的源代码
友情提示:初次阅读时请注意其实现思想,不要在细节上浪费过多的时间。
- //VS2008中 stack的定义 MoreWindows整理(http://blog.csdn.net/MoreWindows)
- template<class _Ty, class _Container = deque<_Ty> >
- class stack
- { // LIFO queue implemented with a container
- public:
- typedef _Container container_type;
- typedef typename _Container::value_type value_type;
- typedef typename _Container::size_type size_type;
- typedef typename _Container::reference reference;
- typedef typename _Container::const_reference const_reference;
- stack() : c()
- { // construct with empty container
- }
- explicit stack(const _Container& _Cont) : c(_Cont)
- { // construct by copying specified container
- }
- bool empty() const
- { // test if stack is empty
- return (c.empty());
- }
- size_type size() const
- { // test length of stack
- return (c.size());
- }
- reference top()
- { // return last element of mutable stack
- return (c.back());
- }
- const_reference top() const
- { // return last element of nonmutable stack
- return (c.back());
- }
- void push(const value_type& _Val)
- { // insert element at end
- c.push_back(_Val);
- }
- void pop()
- { // erase last element
- c.pop_back();
- }
- const _Container& _Get_container() const
- { // get reference to container
- return (c);
- }
- protected:
- _Container c; // the underlying container
- };
可以看出,由于栈只是进一步封装别的数据结构,并提供自己的接口,所以代码非常简洁,如果不指定容器,默认是用deque来作为其底层数据结构的(对deque不是很了解?可以参阅《STL系列之一 deque双向队列》)。下面给出栈的使用范例:
- //栈 stack支持 empty() size() top() push() pop()
- // by MoreWindows(http://blog.csdn.net/MoreWindows)
- #include <stack>
- #include <vector>
- #include <list>
- #include <cstdio>
- using namespace std;
- int main()
- {
- //可以使用list或vector作为栈的容器,默认是使用deque的。
- stack<int, list<int>> a;
- stack<int, vector<int>> b;
- int i;
- //压入数据
- for (i = 0; i < 10; i++)
- {
- a.push(i);
- b.push(i);
- }
- //栈的大小
- printf("%d %d\n", a.size(), b.size());
- //取栈项数据并将数据弹出栈
- while (!a.empty())
- {
- printf("%d ", a.top());
- a.pop();
- }
- putchar('\n');
- while (!b.empty())
- {
- printf("%d ", b.top());
- b.pop();
- }
- putchar('\n');
- return 0;
- }
转载请标明出处,原文地址:http://blog.csdn.net/morewindows/article/details/6950881
queue单向队列与栈有点类似,一个是在同一端存取数据,另一个是在一端存入数据,另一端取出数据。单向队列中的数据是先进先出(First In First Out,FIFO)。在STL中,单向队列也是以别的容器作为底部结构,再将接口改变,使之符合单向队列的特性就可以了。因此实现也是非常方便的。下面就给出单向队列的函数列表和VS2008中单向队列的源代码。单向队列一共6个常用函数(front()、back()、push()、pop()、empty()、size()),与栈的常用函数较为相似。
VS2008中queue单向队列的源代码
友情提示:初次阅读时请注意其实现思想,不要在细节上浪费过多的时间。
- <span style="font-size:18px;">//VS2008中 queue的定义 MoreWindows整理(http://blog.csdn.net/MoreWindows)
- template<class _Ty, class _Container = deque<_Ty> >
- class queue
- { // FIFO queue implemented with a container
- public:
- typedef _Container container_type;
- typedef typename _Container::value_type value_type;
- typedef typename _Container::size_type size_type;
- typedef typename _Container::reference reference;
- typedef typename _Container::const_reference const_reference;
- queue() : c()
- { // construct with empty container
- }
- explicit queue(const _Container& _Cont) : c(_Cont)
- { // construct by copying specified container
- }
- bool empty() const
- { // test if queue is empty
- return (c.empty());
- }
- size_type size() const
- { // return length of queue
- return (c.size());
- }
- reference front()
- { // return first element of mutable queue
- return (c.front());
- }
- const_reference front() const
- { // return first element of nonmutable queue
- return (c.front());
- }
- reference back()
- { // return last element of mutable queue
- return (c.back());
- }
- const_reference back() const
- { // return last element of nonmutable queue
- return (c.back());
- }
- void push(const value_type& _Val)
- { // insert element at beginning
- c.push_back(_Val);
- }
- void pop()
- { // erase element at end
- c.pop_front();
- }
- const _Container& _Get_container() const
- { // get reference to container
- return (c);
- }
- protected:
- _Container c; // the underlying container
- };</span>
可以看出,由于栈只是进一步封装别的数据结构,并提供自己的接口,所以代码非常简洁,如果不指定容器,默认是用deque来作为其底层数据结构的(对deque不是很了解?可以参阅《STL系列之一deque双向队列》)。下面给出单向队列的使用范例:
- //单向队列 queue支持 empty() size() front() back() push() pop()
- //By MoreWindows(http://blog.csdn.net/MoreWindows)
- #include <queue>
- #include <vector>
- #include <list>
- #include <cstdio>
- using namespace std;
- int main()
- {
- //可以使用list作为单向队列的容器,默认是使用deque的。
- queue<int, list<int>> a;
- queue<int> b;
- int i;
- //压入数据
- for (i = 0; i < 10; i++)
- {
- a.push(i);
- b.push(i);
- }
- //单向队列的大小
- printf("%d %d\n", a.size(), b.size());
- //队列头和队列尾
- printf("%d %d\n", a.front(), a.back());
- printf("%d %d\n", b.front(), b.back());
- //取单向队列项数据并将数据移出单向队列
- while (!a.empty())
- {
- printf("%d ", a.front());
- a.pop();
- }
- putchar('\n');
- while (!b.empty())
- {
- printf("%d ", b.front());
- b.pop();
- }
- putchar('\n');
- return 0;
- }
STL系列之四 heap 堆
下面再介绍STL中与堆相关的4个函数——建立堆make_heap(),在堆中添加数据push_heap(),在堆中删除数据pop_heap()和堆排序sort_heap():
头文件 #include <algorithm>
下面的_First与_Last为可以随机访问的迭代器(指针),_Comp为比较函数(仿函数),其规则——如果函数的第一个参数小于第二个参数应返回true,否则返回false。
建立堆
make_heap(_First, _Last, _Comp)
默认是建立最大堆的。对int类型,可以在第三个参数传入greater<int>()得到最小堆。
在堆中添加数据
push_heap (_First, _Last)
要先在容器中加入数据,再调用push_heap ()
在堆中删除数据
pop_heap(_First, _Last)
要先调用pop_heap()再在容器中删除数据
堆排序
sort_heap(_First, _Last)
排序之后就不再是一个合法的heap了
有关堆与堆排序的更详细介绍请参阅——《白话经典算法系列之七 堆与堆排序》
下面给出STL中heap相关函数的使用范例:
- //by MoreWindows( http://blog.csdn.net/MoreWindows )
- #include <cstdio>
- #include <vector>
- #include <algorithm>
- #include <functional>
- using namespace std;
- void PrintfVectorInt(vector<int> &vet)
- {
- for (vector<int>::iterator pos = vet.begin(); pos != vet.end(); pos++)
- printf("%d ", *pos);
- putchar('\n');
- }
- int main()
- {
- const int MAXN = 20;
- int a[MAXN];
- int i;
- for (i = 0; i < MAXN; ++i)
- a[i] = rand() % (MAXN * 2);
- //动态申请vector 并对vector建堆
- vector<int> *pvet = new vector<int>(40);
- pvet->assign(a, a + MAXN);
- //建堆
- make_heap(pvet->begin(), pvet->end());
- PrintfVectorInt(*pvet);
- //加入新数据 先在容器中加入,再调用push_heap()
- pvet->push_back(25);
- push_heap(pvet->begin(), pvet->end());
- PrintfVectorInt(*pvet);
- //删除数据 要先调用pop_heap(),再在容器中删除
- pop_heap(pvet->begin(), pvet->end());
- pvet->pop_back();
- pop_heap(pvet->begin(), pvet->end());
- pvet->pop_back();
- PrintfVectorInt(*pvet);
- //堆排序
- sort_heap(pvet->begin(), pvet->end());
- PrintfVectorInt(*pvet);
- delete pvet;
- return 0;
- }
掌握其基本用法后,我们用这个堆排序和《白话经典算法系列》中的堆排序、快速排序,归并排序来进行个性能测试(Win7 + VS2008 Release下),测试代码如下:
- // by MoreWindows( http://blog.csdn.net/MoreWindows )
- #include <cstdio>
- #include <algorithm>
- #include <ctime>
- using namespace std;
- //------------------------快速排序----------------------------
- void quick_sort(int s[], int l, int r)
- {
- if (l < r)
- {
- int i = l, j = r, x = s[l];
- while (i < j)
- {
- while(i < j && s[j] >= x) // 从右向左找第一个小于x的数
- j--;
- if(i < j)
- s[i++] = s[j];
- while(i < j && s[i] < x) // 从左向右找第一个大于等于x的数
- i++;
- if(i < j)
- s[j--] = s[i];
- }
- s[i] = x;
- quick_sort(s, l, i - 1); // 递归调用
- quick_sort(s, i + 1, r);
- }
- }
- //------------------------归并排序----------------------------
- //将有二个有序数列a[first...mid]和a[mid...last]合并。
- void mergearray(int a[], int first, int mid, int last, int temp[])
- {
- int i = first, j = mid + 1;
- int m = mid, n = last;
- int k = 0;
- while (i <= m && j <= n)
- {
- if (a[i] < a[j])
- temp[k++] = a[i++];
- else
- temp[k++] = a[j++];
- }
- while (i <= m)
- temp[k++] = a[i++];
- while (j <= n)
- temp[k++] = a[j++];
- for (i = 0; i < k; i++)
- a[first + i] = temp[i];
- }
- void mergesort(int a[], int first, int last, int temp[])
- {
- if (first < last)
- {
- int mid = (first + last) / 2;
- mergesort(a, first, mid, temp); //左边有序
- mergesort(a, mid + 1, last, temp); //右边有序
- mergearray(a, first, mid, last, temp); //再将二个有序数列合并
- }
- }
- bool MergeSort(int a[], int n)
- {
- int *p = new int[n];
- if (p == NULL)
- return false;
- mergesort(a, 0, n - 1, p);
- return true;
- }
- //------------------------堆排序---------------------------
- inline void Swap(int &a, int &b)
- {
- int c = a;
- a = b;
- b = c;
- }
- //建立最小堆
- // 从i节点开始调整,n为节点总数 从0开始计算 i节点的子节点为 2*i+1, 2*i+2
- void MinHeapFixdown(int a[], int i, int n)
- {
- int j, temp;
- temp = a[i];
- j = 2 * i + 1;
- while (j < n)
- {
- if (j + 1 < n && a[j + 1] < a[j]) //在左右孩子中找最小的
- j++;
- if (a[j] >= temp)
- break;
- a[i] = a[j]; //把较小的子结点往上移动,替换它的父结点
- i = j;
- j = 2 * i + 1;
- }
- a[i] = temp;
- }
- //建立最小堆
- void MakeMinHeap(int a[], int n)
- {
- for (int i = n / 2 - 1; i >= 0; i--)
- MinHeapFixdown(a, i, n);
- }
- void MinheapsortTodescendarray(int a[], int n)
- {
- for (int i = n - 1; i >= 1; i--)
- {
- Swap(a[i], a[0]);
- MinHeapFixdown(a, 0, i);
- }
- }
- const int MAXN = 5000000;
- int a[MAXN];
- int b[MAXN], c[MAXN], d[MAXN];
- int main()
- {
- int i;
- srand(time(NULL));
- for (i = 0; i < MAXN; ++i)
- a[i] = rand() * rand(); //注rand()产生的数在0到65536之间
- for (i = 0; i < MAXN; ++i)
- d[i] = c[i] = b[i] = a[i];
- clock_t ibegin, iend;
- printf("--当前数据量为%d--By MoreWindows(http://blog.csdn.net/MoreWindows)--\n", MAXN);
- //快速排序
- printf("快速排序: ");
- ibegin = clock();
- quick_sort(a, 0, MAXN - 1);
- iend = clock();
- printf("%d毫秒\n", iend - ibegin);
- //归并排序
- printf("归并排序: ");
- ibegin = clock();
- MergeSort(b, MAXN);
- iend = clock();
- printf("%d毫秒\n", iend - ibegin);
- //堆排序
- printf("堆排序: ");
- ibegin = clock();
- MakeMinHeap(c, MAXN);
- MinheapsortTodescendarray(c, MAXN);
- iend = clock();
- printf("%d毫秒\n", iend - ibegin);
- //STL中的堆排序
- printf("STL中的堆排序: ");
- ibegin = clock();
- make_heap(d, d + MAXN);
- sort_heap(d, d + MAXN);
- iend = clock();
- printf("%d毫秒\n", iend - ibegin);
- return 0;
- }
对100000(十万)个数据的测试结果:
对500000(五十万)个数据的测试结果:
对1000000(一百万)个数据的测试结果:
对5000000(五百万)个数据的测试结果:
从中可以看出快速排序的效率确实要比其它同为O(N * logN)的排序算法要高,而STL中堆操作函数的性能与《白话经典算法系列之七 堆与堆排序》一文中堆操作函数的性能是相差无几的。
转载请标明出处,原文地址:http://blog.csdn.net/morewindows/article/details/6967409
priority_queue 优先级队列是一个拥有权值概念的单向队列queue,在这个队列中,所有元素是按优先级排列的(也可以认为queue是个按进入队列的先后做为优先级的优先级队列——先进入队列的元素优先权要高于后进入队列的元素)。在计算机操作系统中,优先级队列的使用是相当频繁的,进线程调度都会用到。在STL的具体实现中,priority_queue也是以别的容器作为底部结构,再根据堆的处理规则来调整元素之间的位置。下面给出priority_queue的函数列表和VS2008中priority_queue的源代码,本文中与heap有关的函数参见《STL系列之四 heap 堆》。
priority_queue <Elem> c
创建一个空的queue 。
注:priority_queue构造函数有7个版本,请查阅MSDN
数据访问与增减
c.top() 返回队列头部数据
c.push(elem)在队列尾部增加elem数据
c.pop()队列头部数据出队
其它操作
c.empty()判断队列是否为空c.size()
返回队列中数据的个数
可以看出priority_queue的函数列表与栈stack的函数列表是相同的。
VS2008中priority_queue 优先级队列的源代码
友情提示:初次阅读时请注意其实现思想,不要在细节上浪费过多的时间
- //VS2008中 priority_queue的定义 MoreWindows整理( http://blog.csdn.net/MoreWindows )
- template<class _Ty, class _Container = vector<_Ty>, class _Pr = less<typename _Container::value_type> > //默认以vector为容器的
- class priority_queue
- { // priority queue implemented with a _Container
- public:
- typedef _Container container_type;
- typedef typename _Container::value_type value_type;
- typedef typename _Container::size_type size_type;
- typedef typename _Container::reference reference;
- typedef typename _Container::const_reference const_reference;
- priority_queue() : c(), comp()
- { // construct with empty container, default comparator
- }
- explicit priority_queue(const _Pr& _Pred) : c(), comp(_Pred)
- { // construct with empty container, specified comparator
- }
- priority_queue(const _Pr& _Pred, const _Container& _Cont) : c(_Cont), comp(_Pred)
- { // construct by copying specified container, comparator
- make_heap(c.begin(), c.end(), comp); //参见《STL系列之四 heap 堆的相关函数》
- }
- template<class _Iter>
- priority_queue(_Iter _First, _Iter _Last) : c(_First, _Last), comp()
- { // construct by copying [_First, _Last), default comparator
- make_heap(c.begin(), c.end(), comp);
- }
- template<class _Iter>
- priority_queue(_Iter _First, _Iter _Last, const _Pr& _Pred) : c(_First, _Last), comp(_Pred)
- { // construct by copying [_First, _Last), specified comparator
- make_heap(c.begin(), c.end(), comp);
- }
- template<class _Iter>
- priority_queue(_Iter _First, _Iter _Last, const _Pr& _Pred, const _Container& _Cont) : c(_Cont), comp(_Pred)
- { // construct by copying [_First, _Last), container, and comparator
- c.insert(c.end(), _First, _Last);
- make_heap(c.begin(), c.end(), comp);
- }
- bool empty() const
- { // test if queue is empty
- return (c.empty());
- }
- size_type size() const
- { // return length of queue
- return (c.size());
- }
- const_reference top() const
- { // return highest-priority element
- return (c.front());
- }
- reference top()
- { // return mutable highest-priority element (retained)
- return (c.front());
- }
- void push(const value_type& _Pred)
- { // insert value in priority order
- c.push_back(_Pred);
- push_heap(c.begin(), c.end(), comp);
- }
- void pop()
- { // erase highest-priority element
- pop_heap(c.begin(), c.end(), comp);
- c.pop_back();
- }
- protected:
- _Container c; // the underlying container
- _Pr comp; // the comparator functor
- };
下面先给出优级先级队列的使用范例。
- //优先级队列 priority_queue by MoreWindows( http://blog.csdn.net/MoreWindows )
- // 支持 empty() size() top() push() pop() 与stack的操作函数全部一样
- //by MoreWindows
- #include <queue>
- #include <list>
- #include <cstdio>
- using namespace std;
- int main()
- {
- //优先级队列默认是使用vector作容器。
- priority_queue<int> a;
- priority_queue<int, list<int>> b; //可以这样声明,但无法使用
- int i;
- //压入数据
- for (i = 0; i < 10; i++)
- {
- a.push(i * 2 - 5);
- //b.push(i); //编译错误
- }
- //优先级队列的大小
- printf("%d\n", a.size());
- //取优先级队列数据并将数据移出队列
- while (!a.empty())
- {
- printf("%d ", a.top());
- a.pop();
- }
- putchar('\n');
- return 0;
- }
下面程序是针对结构体的,对数据的比较是通过对结构体重载operator()。
程序功能是模拟排队过程,每人有姓名和优先级,优先级相同则比较姓名,开始有5个人进入队列,然后队头2个人出队,再有3个人进入队列,最后所有人都依次出队,程序会输出离开队伍的顺序。
- //by MoreWindows( http://blog.csdn.net/MoreWindows )
- #include <queue>
- #include <cstring>
- #include <cstdio>
- using namespace std;
- //结构体
- struct Node
- {
- char szName[20];
- int priority;
- Node(int nri, char *pszName)
- {
- strcpy(szName, pszName);
- priority = nri;
- }
- };
- //结构体的比较方法 改写operator()
- struct NodeCmp
- {
- bool operator()(const Node &na, const Node &nb)
- {
- if (na.priority != nb.priority)
- return na.priority <= nb.priority;
- else
- return strcmp(na.szName, nb.szName) > 0;
- }
- };
- void PrintfNode(Node &na)
- {
- printf("%s %d\n", na.szName, na.priority);
- }
- int main()
- {
- //优先级队列默认是使用vector作容器,底层数据结构为堆。
- priority_queue<Node, vector<Node>, NodeCmp> a;
- //有5个人进入队列
- a.push(Node(5, "小谭"));
- a.push(Node(3, "小刘"));
- a.push(Node(1, "小涛"));
- a.push(Node(5, "小王"));
- //队头的2个人出队
- PrintfNode(a.top());
- a.pop();
- PrintfNode(a.top());
- a.pop();
- printf("--------------------\n");
- //再进入3个人
- a.push(Node(2, "小白"));
- a.push(Node(2, "小强"));
- a.push(Node(3, "小新"));
- //所有人都依次出队
- while (!a.empty())
- {
- PrintfNode(a.top());
- a.pop();
- }
- return 0;
- }
读者可以将上面结构体Node改成类来试下,答案2天后发到本篇的评论中。
STL系列之六 set与hash_set
STL系列之六 set与hash_set
set和hash_set是STL中比较重要的容器,有必要对其进行深入了解。在STL中,set是以红黑树(RB-tree)作为底层数据结构的,hash_set是以Hash table(哈希表)作为底层数据结构的。set可以在时间复杂度为O(logN)情况下插入、删除和查找数据。hash_set操作的时间复杂度则比较复杂,这取决于哈希函数和哈希表的负载情况。下面列出set和hash_set的常用函数:
set和hase_set的更多函数请查阅MSDN。
set的使用范例如下(hash_set类似):
- // by MoreWindows( http://blog.csdn.net/MoreWindows )
- #include <set>
- #include <ctime>
- #include <cstdio>
- using namespace std;
- int main()
- {
- printf("--set使用 by MoreWindows( http://blog.csdn.net/MoreWindows ) --\n\n");
- const int MAXN = 15;
- int a[MAXN];
- int i;
- srand(time(NULL));
- for (i = 0; i < MAXN; ++i)
- a[i] = rand() % (MAXN * 2);
- set<int> iset;
- set<int>::iterator pos;
- //插入数据 insert()有三种重载
- iset.insert(a, a + MAXN);
- //当前集合中个数 最大容纳数据量
- printf("当前集合中个数: %d 最大容纳数据量: %d\n", iset.size(), iset.max_size());
- //依次输出
- printf("依次输出集合中所有元素-------\n");
- for (pos = iset.begin(); pos != iset.end(); ++pos)
- printf("%d ", *pos);
- putchar('\n');
- //查找
- int findNum = MAXN;
- printf("查找 %d是否存在-----------------------\n", findNum);
- pos = iset.find(findNum);
- if (pos != iset.end())
- printf("%d 存在\n", findNum);
- else
- printf("%d 不存在\n", findNum);
- //在最后位置插入数据,如果给定的位置不正确,会重新找个正确的位置并返回该位置
- pos = iset.insert(--iset.end(), MAXN * 2);
- printf("已经插入%d\n", *pos);
- //删除
- iset.erase(MAXN);
- printf("已经删除%d\n", MAXN);
- //依次输出
- printf("依次输出集合中所有元素-------\n");
- for (pos = iset.begin(); pos != iset.end(); ++pos)
- printf("%d ", *pos);
- putchar('\n');
- return 0;
- }
运行结果如下:
下面试下在set中使用类(结构体也可以类似这样做)。这个类很简单,只有一个成员变量,及设置和获取这个成员变量的成员函数。
- //在set中使用类要重载‘<’并实现拷贝构造函数
- // by MoreWindows( http://blog.csdn.net/MoreWindows )
- #include <set>
- #include <ctime>
- #include <cstdio>
- using namespace std;
- class Node
- {
- public:
- Node(int nAge = 0)
- {
- m_nAge = nAge;
- }
- Node(const Node &na) //拷贝构造函数
- {
- m_nAge = na.GetAge();
- }
- int GetAge()
- {
- return m_nAge;
- }
- private:
- int m_nAge;
- };
- //不能写成类的成员函数
- inline bool operator < (const Node &na, const Node &nb)
- {
- return na.GetAge() < nb.GetAge();
- }
- int main()
- {
- int i;
- set<Node> nset;
- for (i = 0; i < MAXN; ++i)
- nset.insert(Node(i));
- return 0;
- }
编译,直接报了3个错误!!1个在拷贝构造函数,2个在operator<()函数。如下图所示:
3个错误都是一样的:
error C2662: “Node::GetAge”: 不能将“this”指针从“const Node”转换为“Node &” 转换丢失限定符
这是怎么回事呀?分析下,拷贝构造函数与operator<()函数出错,错误都指向了GetAge()函数,有点古怪,比较下它们与GetAge()函数,可以发现最大的不同点在于这2个函数都用到了const而GetAge()函数没有使用const。难道是这个导致报错了吗?先给GetAge()函数加个const看看,如下:
int GetAge() const //增加这个const
{
returnm_nAge;
}
再编译,不报错了。再查下资料,原因如下——因为那2个函数都使用了const修饰的对象,但GetAge()没有加上const以保证它不修改对象,编译器认为这种写法是不安全的,所以就毫不犹豫报了个错误。
这种错误如果不亲身体会下,到笔试面试时很可能写了个错误程序而自己还处于一无所知中(死在这些小细节上最不值得)。另外,如果使用VC6.0则不会提示详细的错误信息——“转换丢失限定符”。
STL还为set提供了一些集合运算的函数,如交集set_intersection()、并集set_union()、差集set_difference()和对称差集set_symmetric_difference()。这些就不详细介绍了,有兴趣可以自己动手试一试。
下面开始对set和hash_set作个性能测试(Win7 +VS2008Release下)。
测试代码如下:
- // by MoreWindows( http://blog.csdn.net/MoreWindows )
- #include <set>
- #include <hash_set>
- #include <iostream>
- #include <ctime>
- #include <cstdio>
- #include <cstdlib>
- using namespace std;
- using namespace stdext; //hash_set
- // MAXN个数据 MAXQUERY次查询
- const int MAXN = 10000, MAXQUERY = 5000000;
- int a[MAXN], query[MAXQUERY];
- void PrintfContainertElapseTime(char *pszContainerName, char *pszOperator, long lElapsetime)
- {
- printf("%s 的%s操作 用时 %d毫秒\n", pszContainerName, pszOperator, lElapsetime);
- }
- int main()
- {
- printf("set VS hash_set 性能测试 数据容量 %d个 查询次数 %d次\n", MAXN, MAXQUERY);
- const int MAXNUM = MAXN * 4;
- const int MAXQUERYNUM = MAXN * 4;
- printf("容器中数据范围 [0, %d) 查询数据范围[0, %d)\n", MAXNUM, MAXQUERYNUM);
- printf("--by MoreWindows( http://blog.csdn.net/MoreWindows ) --\n\n");
- //随机生成在[0, MAXNUM)范围内的MAXN个数
- int i;
- srand(time(NULL));
- for (i = 0; i < MAXN; ++i)
- a[i] = (rand() * rand()) % MAXNUM;
- //随机生成在[0, MAXQUERYNUM)范围内的MAXQUERY个数
- srand(time(NULL));
- for (i = 0; i < MAXQUERY; ++i)
- query[i] = (rand() * rand()) % MAXQUERYNUM;
- set<int> nset;
- hash_set<int> nhashset;
- clock_t clockBegin, clockEnd;
- //insert
- printf("-----插入数据-----------\n");
- clockBegin = clock();
- nset.insert(a, a + MAXN);
- clockEnd = clock();
- printf("set中有数据%d个\n", nset.size());
- PrintfContainertElapseTime("set", "insert", clockEnd - clockBegin);
- clockBegin = clock();
- nhashset.insert(a, a + MAXN);
- clockEnd = clock();
- printf("hash_set中有数据%d个\n", nhashset.size());
- PrintfContainertElapseTime("hase_set", "insert", clockEnd - clockBegin);
- //find
- printf("-----查询数据-----------\n");
- int nFindSucceedCount, nFindFailedCount;
- nFindSucceedCount = nFindFailedCount = 0;
- clockBegin = clock();
- for (i = 0; i < MAXQUERY; ++i)
- if (nset.find(query[i]) != nset.end())
- ++nFindSucceedCount;
- else
- ++nFindFailedCount;
- clockEnd = clock();
- PrintfContainertElapseTime("set", "find", clockEnd - clockBegin);
- printf("查询成功次数: %d 查询失败次数: %d\n", nFindSucceedCount, nFindFailedCount);
- nFindSucceedCount = nFindFailedCount = 0;
- clockBegin = clock();
- for (i = 0; i < MAXQUERY; ++i)
- if (nhashset.find(query[i]) != nhashset.end())
- ++nFindSucceedCount;
- else
- ++nFindFailedCount;
- clockEnd = clock();
- PrintfContainertElapseTime("hash_set", "find", clockEnd - clockBegin);
- printf("查询成功次数: %d 查询失败次数: %d\n", nFindSucceedCount, nFindFailedCount);
- return 0;
- }
在数据容量100万,查询次数500万时,程序运行结果如下:
由于查询的失败次数太多,这次将查询范围变小使用再测试下:
由于结点过多,80多万个结点,set的红黑树树高约为19(2^19=524288,2^20=1048576),查询起来还是比较费时的。hash_set在时间性能上比set要好一些,并且如果查询成功的几率比较大的话,hash_set会有更好的表现。想知道为什么hash_set会有优良的性能表现,请看继集——《STL系列之九 探索hash_set》。
注1. MSDN上讲set的erase()是有返回值的,但在VS2008中查看set的源代码,erase()函数的三个重载版本中,有二个返回值都为void即无返回值,另一个返回size_type。 可以通过http://msdn.microsoft.com/zh-cn/library/8h4a3515(v=VS.90).aspx查看MSDN上对set的erase()说明。
计算x的n次幂最简单直接的方法就是相乘n次,很容易写出程序:
- //计算x^n 直接乘n次 by MoreWindows( http://blog.csdn.net/MoreWindows )
- int power1(int x, unsigned int n)
- {
- int result = 1;
- while (n--)
- result *= x;
- return result;
- }
这种计算的效率显然不高,我们可以用二分法来加速计算x^n=x^(n/2)* x^(n/2)即x^10=x^5*x^5,这种计算N次幂只要相乘O(logN)次。运用递归的方法不难写出:
- //计算x^n 二分递归实现 by MoreWindows( http://blog.csdn.net/MoreWindows )
- int power2(int x, unsigned int n)
- {
- if (n == 0)
- return 1;
- else if (n == 1)
- return x;
- else
- {
- if (n % 2 == 1)
- return power2(x, n / 2) * power2(x, n / 2) * x;
- else
- return power2(x, n / 2) * power2(x, n / 2);
- }
- }
递归毕竟比较浪费时间,且会有很多重复计算。
因此最好能换成非递归的方式来实现二分法。
考虑x^23,可以先从x ->x^2 -> x^4 -> x^8 -> x^16 取result1 = x^16,然后23-16=7。
我们只要计算x^7再与result1相乘就可以得到x^23。对于x^7也可以采用这种方法
取result2 = x^4,然后7-4=3,只要计算x^3再与result2相乘就可以得到x^7。由此可以将x^23写成x^16 * x^4* x^2 * x,即23=16+4+2+1,而23 = 10111(二进制),所以只要将n化为二进制并由低位到高位依次判断如果第i位为1,则result *=x^(2^i)。
函数实现如下:
- //计算x^n by MoreWindows( http://blog.csdn.net/MoreWindows )
- int power3(int x, unsigned int n)
- {
- if (n == 0)
- return 1;
- int result = 1;
- while (n != 0)
- {
- if ((n & 1) != 0)
- result *= x;
- x *= x;
- n >>= 1;
- }
- return result;
- }
此函数可以在相乘O(logN)次内计算x的n次幂,且避免了重复计算。但还可以作进一步的优化,如像48=110000(二进制)这种低位有很多0的数,可以先过滤掉低位的0再进行计算,这样也会提高一些效率。程序如下:
- //计算x^n by MoreWindows( http://blog.csdn.net/MoreWindows )
- int power4(int x, unsigned int n)
- {
- if (n == 0)
- {
- return 1;
- }
- else
- {
- while ((n & 1) == 0)
- {
- n >>= 1;
- x *= x;
- }
- }
- int result = x;
- n >>= 1;
- while (n != 0)
- {
- x *= x;
- if ((n & 1) != 0)
- result *= x;
- n >>= 1;
- }
- return result;
- }
验证一下
- int main()
- {
- printf("验证power4() -- by MoreWindows( http://blog.csdn.net/MoreWindows ) --\n\n");
- for (int i = 0; i <= 10; i++)
- printf("2的%d次方为\t%d\n", i, power4(2, i));
- return 0;
- }
结果为
注,非常感谢网友evaxiao帮我找出了power4()的一个错误,我已经在文中改正了,谢谢网友evaxiao。
转载请标明出处,原文地址:http://blog.csdn.net/morewindows/article/details/7174143
STL系列之八 slist单链表
微软的VS208所使用的PJ STL(注1)中的list是双链表,但在某些场合,一个轻量级的单链表会更加合适。单链表非常常见,这里就不去细说了,本文的slist(single linked list)单链表实现了链表的基本功能,如有需要,以后还会扩充的。slist单链表(带头结点)的示意图如下所示:
完整的C++代码如下:
- //带头结点的单链表
- //by MoreWindows( http://blog.csdn.net/MoreWindows )
- template<class T>
- struct Node
- {
- T val;
- Node *next;
- Node(T &n)
- {
- this->val = n;
- this->next = NULL;
- }
- };
- template<class T>
- class slist
- {
- public:
- slist();
- ~slist();
- void push_front(T &t);
- bool find(T &t);
- bool remove(T &t);
- bool removeAll(T &t);
- void clear();
- int size();
- public:
- int m_nListDataCount;
- Node<T> *m_head;
- };
- template<class T>
- slist<T>::slist()
- {
- m_head = NULL;
- m_nListDataCount = 0;
- }
- template<class T>
- slist<T>::~slist()
- {
- Node<T> *p, *pnext;
- for (p = m_head; p != NULL; p = pnext)
- {
- pnext = p->next;
- free(p);
- }
- m_nListDataCount = 0;
- }
- template<class T>
- void slist<T>::push_front(T &t)
- {
- Node<T> *pNode = (Node<T> *)malloc(sizeof(Node<T>));
- pNode->val = t;
- pNode->next = m_head;
- m_head = pNode;
- m_nListDataCount++;
- }
- template<class T>
- bool slist<T>::find(T &t)
- {
- for (Node<T> *p = m_head; p != NULL; p = p->next)
- if (p->val == t)
- return true;
- return false;
- }
- template<class T>
- int slist<T>::size()
- {
- return m_nListDataCount;
- }
- //删除链表中第一个值为t的结点
- template<class T>
- bool slist<T>::remove(T &t)
- {
- Node<T> *pNode, *pPreNode;
- pPreNode = pNode = m_head;
- while (pNode != NULL)
- {
- if (pNode->val == t)
- {
- if (pPreNode != pNode)
- pPreNode->next = pNode->next;
- else
- m_head = NULL;
- free(pNode);
- m_nListDataCount--;
- return true;
- }
- pPreNode = pNode;
- pNode = pNode->next;
- }
- return false;
- }
- //会删除链表中所有值为t的结点
- template<class T>
- bool slist<T>::removeAll(T &t)
- {
- bool flagDeleteNode = false;
- Node<T> *pNode, *pPreNode;
- pPreNode = pNode = m_head;
- while (pNode != NULL)
- {
- if (pNode->val == t)
- {
- pPreNode->next = pNode->next;
- free(pNode);
- pNode = pPreNode->next;
- m_nListDataCount--;
- flagDeleteNode = true;
- }
- else
- {
- pPreNode = pNode;
- pNode = pNode->next;
- }
- }
- return flagDeleteNode;
- }
- template<class T>
- void slist<T>::clear()
- {
- Node<T> *cur = m_head;
- while (cur != NULL)
- {
- Node<T> *next = cur->next;
- free(cur);
- cur = next;
- }
- m_head = NULL;
- }
该slist完成了从头部插入,查找和删除数据等链表的基本操作,下一篇将使用这个slist来完成一个哈希表,请关注下一篇——《STL系列之九 探索hash_set》
注1.STL分为很多版本,微软的VS系列使用的是PJ STL。而《STL源码剖析》书中主要使用SGI STL。
Title: STL系列之九 探索hash_set
Author: MoreWindows
Blog: http://blog.csdn.net/MoreWindows
E-mail: morewindows@126.com
KeyWord: C++ STL set hash_set 哈希表 链地址法
本文将着重探索hash_set比set快速高效的原因,阅读本文前,推荐先阅读本文的姊妹篇《STL系列之六 set与hash_set》
一.hash_set之基石——哈希表
hash_set的底层数据结构是哈希表,因此要深入了解hash_set,必须先分析哈希表。哈希表是根据关键码值(Key-Value)而直接进行访问的数据结构,它用哈希函数处理数据得到关键码值,关键码值对应表中一个特定位置再由应该位置来访问记录,这样可以在时间复杂性度为O(1)内访问到数据。但是很有可能出现多个数据经哈希函数处理后得到同一个关键码——这就产生了冲突,解决冲突的方法也有很多,各大数据结构教材及考研辅导书上都会介绍大把方法。这里采用最方便最有效的一种——链地址法,当有冲突发生时将具同一关键码的数据组成一个链表。下图展示了链地址法的使用:
二.简化版的hash_table
按照上面的分析和图示,并参考《编程珠玑》第15章中哈希表的实现,不难写出一个简单的哈希表,我们称之为简化版hash_table。该哈希表由一个指针数组组成,数组中每个元素都是链表的表头指针,程序分为hash_table.h,hash_table.cpp和main.cpp。
1.hash_table.h
- #pragma once
- #define NULL 0
- //简化版hash_table
- //by MoreWindows( http://blog.csdn.net/MoreWindows )
- struct Node
- {
- int val;
- Node *next;
- Node(int n)
- {
- this->val = n;
- this->next = NULL;
- }
- };
- class hash_table
- {
- public:
- hash_table(const int ntablesize);
- ~hash_table();
- bool insert(int n);
- void insert(int *pFirst, int *pLast);
- bool find(int n);
- int size();
- int HashFun(int n);
- public:
- int m_nTableSize;
- int m_nTableDataCount;
- Node** m_ppTable;
- };
2.hash_table.cpp
- //简化版hash_table
- //by MoreWindows( http://blog.csdn.net/MoreWindows )
- #include "hash_table.h"
- #include <malloc.h>
- #include <memory.h>
- hash_table::hash_table(const int ntablesize)
- {
- m_nTableSize = ntablesize;
- m_ppTable = (Node**)malloc(sizeof(Node*) * m_nTableSize);
- if (m_ppTable == NULL)
- return ;
- m_nTableDataCount = 0;
- memset(m_ppTable, 0, sizeof(Node*) * m_nTableSize);
- }
- hash_table::~hash_table()
- {
- free(m_ppTable);
- m_ppTable = NULL;
- m_nTableDataCount = 0;
- m_nTableSize = 0;
- }
- int inline hash_table::HashFun(int n)
- {
- return (n ^ 0xdeadbeef) % m_nTableSize;
- }
- int hash_table::size()
- {
- return m_nTableDataCount;
- }
- bool hash_table::insert(int n)
- {
- int key = HashFun(n);
- //在该链表中查找该数是否已经存在
- for (Node *p = m_ppTable[key]; p != NULL; p = p->next)
- if (p->val == n)
- return true;
- //在链表的头部插入
- Node *pNode = new Node(n);
- if (pNode == NULL)
- return false;
- pNode->next = m_ppTable[key];
- m_ppTable[key] = pNode;
- m_nTableDataCount++;
- return true;
- }
- bool hash_table::find(int n)
- {
- int key = HashFun(n);
- for (Node *pNode = m_ppTable[key]; pNode != NULL; pNode = pNode->next)
- if (pNode->val == n)
- return true;
- return false;
- }
- void hash_table::insert(int *pFirst, int *pLast)
- {
- for (int *p = pFirst; p != pLast; p++)
- this->insert(*p);
- }
3.main.cpp
在main.cpp中,对set、hash_set、简化版hash_table作一个性能测试,测试环境为Win7+VS2008的Release设置(下同)。
- //测试set,hash_set及简化版hash_table
- // by MoreWindows( http://blog.csdn.net/MoreWindows )
- #include <set>
- #include <hash_set>
- #include "hash_table.h"
- #include <iostream>
- #include <ctime>
- #include <cstdio>
- #include <cstdlib>
- using namespace std;
- using namespace stdext; //hash_set
- void PrintfContainerElapseTime(char *pszContainerName, char *pszOperator, long lElapsetime)
- {
- printf("%s 的 %s操作 用时 %d毫秒\n", pszContainerName, pszOperator, lElapsetime);
- }
- // MAXN个数据 MAXQUERY次查询
- const int MAXN = 5000000, MAXQUERY = 5000000;
- int a[MAXN], query[MAXQUERY];
- int main()
- {
- printf("set VS hash_set VS hash_table(简化版) 性能测试\n");
- printf("数据容量 %d个 查询次数 %d次\n", MAXN, MAXQUERY);
- const int MAXNUM = MAXN * 4;
- const int MAXQUERYNUM = MAXN * 4;
- printf("容器中数据范围 [0, %d) 查询数据范围[0, %d)\n", MAXNUM, MAXQUERYNUM);
- printf("--by MoreWindows( http://blog.csdn.net/MoreWindows ) --\n\n");
- //随机生成在[0, MAXNUM)范围内的MAXN个数
- int i;
- srand((unsigned int)time(NULL));
- for (i = 0; i < MAXN; ++i)
- a[i] = (rand() * rand()) % MAXNUM;
- //随机生成在[0, MAXQUERYNUM)范围内的MAXQUERY个数
- srand((unsigned int)time(NULL));
- for (i = 0; i < MAXQUERY; ++i)
- query[i] = (rand() * rand()) % MAXQUERYNUM;
- set<int> nset;
- hash_set<int> nhashset;
- hash_table nhashtable(MAXN + 123);
- clock_t clockBegin, clockEnd;
- //insert
- printf("-----插入数据-----------\n");
- clockBegin = clock();
- nset.insert(a, a + MAXN);
- clockEnd = clock();
- printf("set中有数据%d个\n", nset.size());
- PrintfContainerElapseTime("set", "insert", clockEnd - clockBegin);
- clockBegin = clock();
- nhashset.insert(a, a + MAXN);
- clockEnd = clock();
- printf("hash_set中有数据%d个\n", nhashset.size());
- PrintfContainerElapseTime("hash_set", "insert", clockEnd - clockBegin);
- clockBegin = clock();
- for (i = 0; i < MAXN; i++)
- nhashtable.insert(a[i]);
- clockEnd = clock();
- printf("hash_table中有数据%d个\n", nhashtable.size());
- PrintfContainerElapseTime("Hash_table", "insert", clockEnd - clockBegin);
- //find
- printf("-----查询数据-----------\n");
- int nFindSucceedCount, nFindFailedCount;
- nFindSucceedCount = nFindFailedCount = 0;
- clockBegin = clock();
- for (i = 0; i < MAXQUERY; ++i)
- if (nset.find(query[i]) != nset.end())
- ++nFindSucceedCount;
- else
- ++nFindFailedCount;
- clockEnd = clock();
- PrintfContainerElapseTime("set", "find", clockEnd - clockBegin);
- printf("查询成功次数: %d 查询失败次数: %d\n", nFindSucceedCount, nFindFailedCount);
- nFindSucceedCount = nFindFailedCount = 0;
- clockBegin = clock();
- for (i = 0; i < MAXQUERY; ++i)
- if (nhashset.find(query[i]) != nhashset.end())
- ++nFindSucceedCount;
- else
- ++nFindFailedCount;
- clockEnd = clock();
- PrintfContainerElapseTime("hash_set", "find", clockEnd - clockBegin);
- printf("查询成功次数: %d 查询失败次数: %d\n", nFindSucceedCount, nFindFailedCount);
- nFindSucceedCount = nFindFailedCount = 0;
- clockBegin = clock();
- for (i = 0; i < MAXQUERY; ++i)
- if (nhashtable.find(query[i]))
- ++nFindSucceedCount;
- else
- ++nFindFailedCount;
- clockEnd = clock();
- PrintfContainerElapseTime("hash_table", "find", clockEnd - clockBegin);
- printf("查询成功次数: %d 查询失败次数: %d\n", nFindSucceedCount, nFindFailedCount);
- return 0;
- }
在数据量为500万时测试结果如下:
从程序运行结果可以发现,我们自己实现的hash_table(简化版)在插入和查找的效率要远高于set。为了进一步分析,最好能统计hash_table中的各个链表的长度情况,这样可以有效的了解平均每次查找要访问多少个数据。写出统计hash_table各链表长度的函数如下:
- // by MoreWindows( http://blog.csdn.net/MoreWindows )
- void StatisticHashTable(hash_table &ht)
- {
- const int MAXLISTLINE = 100;
- int i, a[MAXLISTLINE], nExtendListNum;
- nExtendListNum = 0;
- memset(a, 0, sizeof(a[0]) * MAXLISTLINE);
- for (i = 0; i < ht.m_nTableSize; i++)
- {
- int sum = 0;
- for (Node *p = ht.m_ppTable[i]; p != NULL; p = p->next)
- ++sum;
- if (sum >= MAXLISTLINE)
- nExtendListNum++;
- else
- a[sum]++;
- }
- printf("hash_table中链表长度统计:\n");
- for (i = 0; i < MAXLISTLINE; i++)
- if (a[i] > 0)
- {
- printf(" 长度为%d的链表有%d个 这些链表中数据占总数据的%.2lf%%\n", i, a[i], (a[i] * i * 100.0) / ht.size());
- }
- printf(" 长度超过%d的链表有%d个\n", MAXLISTLINE, nExtendListNum);
- }
用此段代码得到链表长度的统计结果:
可以发现在hash_table中最长的链表也只有5个元素,长度为1和长度为2的链表中的数据占全部数据的89%以上。因此绝大数查询将仅仅访问哈希表1次到2次。这样的查询效率当然会比set(内部使用红黑树——类似于二叉平衡树)高的多。有了这个图示,无疑已经可以证明hash_set会比set快速高效了。但hash_set还可以动态的增加表的大小,因此我们再实现一个表大小可增加的hash_table。
三.强化版hash_table
首先来看看VS2008中hash_set是如何实现动态的增加表的大小,hash_set是在hash_set.h中声明的,在hash_set.h中可以发现hash_set是继承_Hash类的,hash_set本身并没有太多的代码,只是对_Hash作了进一步的封装,这种做法在STL中非常常见,如stack栈和queue单向队列都是以deque双向队列作底层数据结构再加一层封装。
_Hash类的定义和实现都在xhash.h类中,微软对_Hash类的第一句注释如下——
hash table -- list with vector of iterators for quick access。
哈哈,这句话说的非常明白。这说明_Hash实际上就是由vector和list组成哈希表。再阅读下代码可以发现_Hash类增加空间由_Grow()函数完成,当空间不足时就倍增,并且表中原有数据都要重新计算hash值以确定新的位置。
知道了_Hash类是如何运作的,下面就来考虑如何实现强化版的hash_table。当然有二个地方还可以改进:
1._Hash类使用的list为双向链表,但在在哈希表中使用普通的单链表就可以了。因此使用STL中的vector再加入《STL系列之八 slist单链表》一文中的slist来实现强化版的hash_table。
2.在空间分配上使用了一个近似于倍增的素数表,最开始取第一个素数,当空间不足时就使用下一个素数。经过实际测试这种效果要比倍增法高效一些。
在这二个改进之上的强化版的hash_table代码如下:
- //使用vector< slist<T> >为容器的hash_table
- // by MoreWindows( http://blog.csdn.net/MoreWindows )
- template< class T, class container = vector<slist<T>> >
- class hash_table
- {
- public:
- hash_table();
- hash_table(const int ntablesize);
- ~hash_table();
- void clear();
- bool insert(T &n);
- void insert(T *pFirst, T *pLast);
- bool erase(T &n);
- void resize(int nNewTableSize);
- bool find(T &n);
- int size();
- int HashFun(T &n);
- private:
- static int findNextPrime(int curPrime);
- public:
- int m_nDataCount;
- int m_nTableSize;
- container m_Table;
- static const unsigned int m_primes[50];
- };
- //素数表
- template< class T, class container>
- const unsigned int hash_table<T, container>::m_primes[50] = {
- 53, 97, 193, 389, 769, 1453, 3079, 6151, 1289, 24593, 49157, 98317,
- 196613, 393241, 786433, 1572869, 3145739, 6291469, 12582917,
- 25165843, 50331653, 100663319, 201326611, -1
- };
- template< class T, class container>
- int inline hash_table<T, container>::HashFun(T &n)
- {
- return (n ^ 0xdeadbeef) % m_nTableSize;
- }
- template< class T, class container>
- hash_table<T, container>::hash_table()
- {
- m_nDataCount = 0;
- m_nTableSize = m_primes[0];
- m_Table.resize(m_nTableSize);
- }
- template< class T, class container>
- hash_table<T, container>::hash_table(const int ntablesize)
- {
- m_nDataCount = 0;
- m_nTableSize = ntablesize;
- m_Table.resize(m_nTableSize);
- }
- template< class T, class container>
- hash_table<T, container>::~hash_table()
- {
- clear();
- }
- template< class T, class container>
- void hash_table<T, container>::clear()
- {
- for (int i = 0; i < m_nTableSize; i++)
- m_Table[i].clear();
- m_nDataCount = 0;
- }
- template< class T, class container>
- bool hash_table<T, container>::insert(T &n)
- {
- int key = HashFun(n);
- if (!m_Table[key].find(n))
- {
- m_nDataCount++;
- m_Table[key].push_front(n);
- if (m_nDataCount >= m_nTableSize)
- resize(findNextPrime(m_nTableSize));
- }
- return true;
- }
- template< class T, class container>
- bool hash_table<T, container>::erase(T &n)
- {
- int key = HashFun(n);
- if (m_Table[key].remove(n))
- {
- m_nDataCount--;
- return true;
- }
- else
- {
- return false;
- }
- }
- template< class T, class container>
- void hash_table<T, container>::insert(T *pFirst, T *pLast)
- {
- for (T *p = pFirst; p != pLast; p++)
- this->insert(*p);
- }
- template< class T, class container>
- void hash_table<T, container>::resize(int nNewTableSize)
- {
- if (nNewTableSize <= m_nTableSize)
- return;
- int nOldTableSize = m_nTableSize;
- m_nTableSize = nNewTableSize;
- container tempTable(m_nTableSize); //创建一个更大的表
- for (int i = 0; i < nOldTableSize; i++)//将原表中数据重新插入到新表中
- {
- Node<T> *cur = m_Table[i].m_head;
- while (cur != NULL)
- {
- int key = HashFun(cur->val);
- Node<T> *pNext = cur->next;
- cur->next = tempTable[key].m_head;
- tempTable[key].m_head = cur;
- cur = pNext;
- }
- m_Table[i].m_head = NULL;
- }
- m_Table.swap(tempTable);
- }
- template< class T, class container>
- int hash_table<T, container>::size()
- {
- return m_nDataCount;
- }
- template< class T, class container>
- bool hash_table<T, container>::find(T &n)
- {
- int key = HashFun(n);
- return m_Table[key].find(n);
- }
- //在素数表中找到比当前数大的最小数
- template< class T, class container>
- int hash_table<T, container>::findNextPrime(int curPrime)
- {
- unsigned int *pStart = (unsigned int *)m_primes;
- while (*pStart <= curPrime)
- ++pStart;
- return *pStart;
- }
下面再对set、hash_set、强化版hash_table的性能测试:
测试结果一(数据量500万):
测试结果二(数据量1千万):
测试结果三(数据量1千万):
可以看出,由于强化版hash_table的哈希表在增加表空间大小时会花费额外的一些时间,所以插入数据的用时与STL提供的hash_set用时相差不多了。但查找还是比hash_set要快的一些。
四.结语
从简化版到强化版的hash_table,我们不仅知道了hash_set底层数据结构——哈希表的运作机制,还知道了如何实现大小动态变化的哈希表。达到了本文让读者了解hash_set快速高效的原因。当然本文所给hash_table距真正的hash_set还有不小的距离,有兴趣的读者可以进一步改进。
此外,本文所示范的哈希表也与最近流行的NoSql数据库颇有渊源, NoSql数据库也是通过Key-Value方式来访问数据的(访问数据的方式上非常类似哈希表),其查找效率与传统的数据库相比也正如本文中hast_set与set的比较。正因为NoSql数据库在基础数据结构上的天然优势,所以它完全可以支持海量数据的查询修改且对操作性能要求很高场合如微博等。
转载请标明出处,原文地址:http://blog.csdn.net/morewindows/article/details/7330323
STL系列之十 全排列(百度迅雷笔试题)
全排列在笔试面试中很热门,因为它难度适中,既可以考察递归实现,又能进一步考察非递归的实现,便于区分出考生的水平。所以在百度和迅雷的校园招聘以及程序员和软件设计师的考试中都考到了,因此本文对全排列作下总结帮助大家更好的学习和理解。对本文有任何补充之处,欢迎大家指出。
首先来看看题目是如何要求的(百度迅雷校招笔试题)。
用C++写一个函数, 如 Foo(const char *str), 打印出 str 的全排列,
如 abc 的全排列: abc, acb, bca, dac, cab, cba
一.全排列的递归实现
为方便起见,用123来示例下。123的全排列有123、132、213、231、312、321这六种。首先考虑213和321这二个数是如何得出的。显然这二个都是123中的1与后面两数交换得到的。然后可以将123的第二个数和每三个数交换得到132。同理可以根据213和321来得231和312。因此可以知道——全排列就是从第一个数字起每个数分别与它后面的数字交换。找到这个规律后,递归的代码就很容易写出来了:
- //全排列的递归实现
- #include <stdio.h>
- #include <string.h>
- void Swap(char *a, char *b)
- {
- char t = *a;
- *a = *b;
- *b = t;
- }
- //k表示当前选取到第几个数,m表示共有多少数.
- void AllRange(char *pszStr, int k, int m)
- {
- if (k == m)
- {
- static int s_i = 1;
- printf(" 第%3d个排列\t%s\n", s_i++, pszStr);
- }
- else
- {
- for (int i = k; i <= m; i++) //第i个数分别与它后面的数字交换就能得到新的排列
- {
- Swap(pszStr + k, pszStr + i);
- AllRange(pszStr, k + 1, m);
- Swap(pszStr + k, pszStr + i);
- }
- }
- }
- void Foo(char *pszStr)
- {
- AllRange(pszStr, 0, strlen(pszStr) - 1);
- }
- int main()
- {
- printf(" 全排列的递归实现\n");
- printf(" --by MoreWindows( http://blog.csdn.net/MoreWindows )--\n\n");
- char szTextStr[] = "123";
- printf("%s的全排列如下:\n", szTextStr);
- Foo(szTextStr);
- return 0;
- }
运行结果如下:
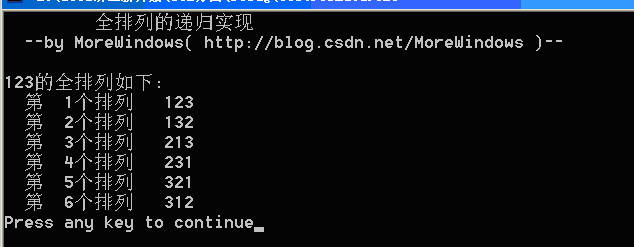
注意这样的方法没有考虑到重复数字,如122将会输出:
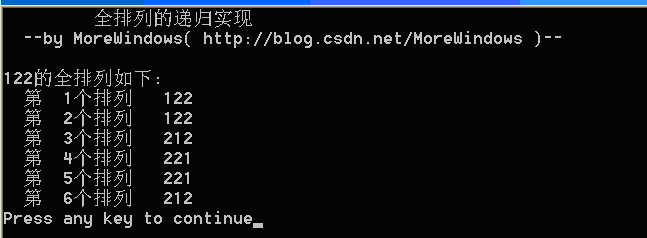
这种输出绝对不符合要求,因此现在要想办法来去掉重复的数列。
二.去掉重复的全排列的递归实现
由于全排列就是从第一个数字起每个数分别与它后面的数字交换。我们先尝试加个这样的判断——如果一个数与后面的数字相同那么这二个数就不交换了。如122,第一个数与后面交换得212、221。然后122中第二数就不用与第三个数交换了,但对212,它第二个数与第三个数是不相同的,交换之后得到221。与由122中第一个数与第三个数交换所得的221重复了。所以这个方法不行。
换种思维,对122,第一个数1与第二个数2交换得到212,然后考虑第一个数1与第三个数2交换,此时由于第三个数等于第二个数,所以第一个数不再与第三个数交换。再考虑212,它的第二个数与第三个数交换可以得到解决221。此时全排列生成完毕。
这样我们也得到了在全排列中去掉重复的规则——去重的全排列就是从第一个数字起每个数分别与它后面非重复出现的数字交换。下面给出完整代码:
- //去重全排列的递归实现
- #include <stdio.h>
- #include <string.h>
- void Swap(char *a, char *b)
- {
- char t = *a;
- *a = *b;
- *b = t;
- }
- //在pszStr数组中,[nBegin,nEnd)中是否有数字与下标为nEnd的数字相等
- bool IsSwap(char *pszStr, int nBegin, int nEnd)
- {
- for (int i = nBegin; i < nEnd; i++)
- if (pszStr[i] == pszStr[nEnd])
- return false;
- return true;
- }
- //k表示当前选取到第几个数,m表示共有多少数.
- void AllRange(char *pszStr, int k, int m)
- {
- if (k == m)
- {
- static int s_i = 1;
- printf(" 第%3d个排列\t%s\n", s_i++, pszStr);
- }
- else
- {
- for (int i = k; i <= m; i++) //第i个数分别与它后面的数字交换就能得到新的排列
- {
- if (IsSwap(pszStr, k, i))
- {
- Swap(pszStr + k, pszStr + i);
- AllRange(pszStr, k + 1, m);
- Swap(pszStr + k, pszStr + i);
- }
- }
- }
- }
- void Foo(char *pszStr)
- {
- AllRange(pszStr, 0, strlen(pszStr) - 1);
- }
- int main()
- {
- printf(" 去重全排列的递归实现\n");
- printf(" --by MoreWindows( http://blog.csdn.net/MoreWindows )--\n\n");
- char szTextStr[] = "122";
- printf("%s的全排列如下:\n", szTextStr);
- Foo(szTextStr);
- return 0;
- }
运行结果如下:
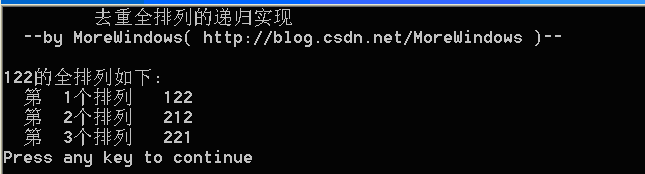
OK,到现在我们已经能熟练写出递归的方法了,并且考虑了字符串中的重复数据可能引发的重复数列问题。那么如何使用非递归的方法来得到全排列了?
三.全排列的非递归实现
要考虑全排列的非递归实现,先来考虑如何计算字符串的下一个排列。如"1234"的下一个排列就是"1243"。只要对字符串反复求出下一个排列,全排列的也就迎刃而解了。
如何计算字符串的下一个排列了?来考虑"926520"这个字符串,我们从后向前找第一双相邻的递增数字,"20"、"52"都是非递增的,"26 "即满足要求,称前一个数字2为替换数,替换数的下标称为替换点,再从后面找一个比替换数大的最小数(这个数必然存在),0、2都不行,5可以,将5和2交换得到"956220",然后再将替换点后的字符串"6220"颠倒即得到"950226"。
对于像"4321"这种已经是最“大”的排列,采用STL中的处理方法,将字符串整个颠倒得到最“小”的排列"1234"并返回false。
这样,只要一个循环再加上计算字符串下一个排列的函数就可以轻松的实现非递归的全排列算法。按上面思路并参考STL中的实现源码,不难写成一份质量较高的代码。值得注意的是在循环前要对字符串排序下,可以自己写快速排序的代码(请参阅《白话经典算法之六 快速排序 快速搞定》),也可以直接使用VC库中的快速排序函数(请参阅《使用VC库函数中的快速排序函数》)。下面列出完整代码:
- //全排列的非递归实现
- #include <stdio.h>
- #include <stdlib.h>
- #include <string.h>
- void Swap(char *a, char *b)
- {
- char t = *a;
- *a = *b;
- *b = t;
- }
- //反转区间
- void Reverse(char *a, char *b)
- {
- while (a < b)
- Swap(a++, b--);
- }
- //下一个排列
- bool Next_permutation(char a[])
- {
- char *pEnd = a + strlen(a);
- if (a == pEnd)
- return false;
- char *p, *q, *pFind;
- pEnd--;
- p = pEnd;
- while (p != a)
- {
- q = p;
- --p;
- if (*p < *q) //找降序的相邻2数,前一个数即替换数
- {
- //从后向前找比替换点大的第一个数
- pFind = pEnd;
- while (*pFind <= *p)
- --pFind;
- //替换
- Swap(pFind, p);
- //替换点后的数全部反转
- Reverse(q, pEnd);
- return true;
- }
- }
- Reverse(p, pEnd);//如果没有下一个排列,全部反转后返回true
- return false;
- }
- int QsortCmp(const void *pa, const void *pb)
- {
- return *(char*)pa - *(char*)pb;
- }
- int main()
- {
- printf(" 全排列的非递归实现\n");
- printf(" --by MoreWindows( http://blog.csdn.net/MoreWindows )--\n\n");
- char szTextStr[] = "abc";
- printf("%s的全排列如下:\n", szTextStr);
- //加上排序
- qsort(szTextStr, strlen(szTextStr), sizeof(szTextStr[0]), QsortCmp);
- int i = 1;
- do{
- printf("第%3d个排列\t%s\n", i++, szTextStr);
- }while (Next_permutation(szTextStr));
- return 0;
- }
测试一下,结果如下所示:
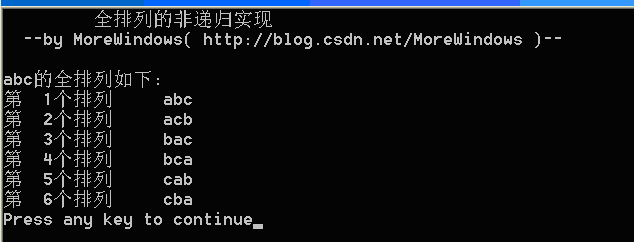
将字符串改成"cba"会输出:
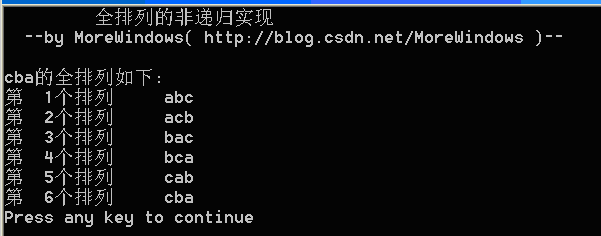
至此我们已经运用了递归与非递归的方法解决了全排列问题,总结一下就是:
1.全排列就是从第一个数字起每个数分别与它后面的数字交换。
2.去重的全排列就是从第一个数字起每个数分别与它后面非重复出现的数字交换。
3.全排列的非递归就是由后向前找替换数和替换点,然后由后向前找第一个比替换数大的数与替换数交换,最后颠倒替换点后的所有数据。
转载请标明出处,原文地址:http://blog.csdn.net/morewindows/article/details/7370155
如果觉得本文对您有帮助,请点击‘顶’支持一下,您的支持是我写作最大的动力,谢谢。
- STL系列:十个系列
- STL系列
- STL系列------算法---------inner_product
- STL系列 deque
- STL系列:vector容器
- STL算法系列
- STL系列 探索hash_set
- <STL系列>vector
- <STL系列>array
- STL算法---reverse系列
- STL算法---remove系列
- STL中的uninitialize系列
- <STL系列> 配置器
- STL系列之stack
- STL系列之queue
- hdoj1027【STL系列。。。?】
- 【Effective STL系列】
- Java系列-JAVA语言十个概念
- 设计模式 ( 十九 ) 模板方法模式Template method(类行为型)
- 事件处理003(外部类)
- 我的arm_linux移植笔记
- 8052计数器(定时器0和计数器1)
- jquery如何设置控件位置
- STL系列:十个系列
- java导入/导出excel
- cab包的codebase与version
- 08-我的解决ORA-12514没有监听的问题
- QDialogButtonBox
- winform中简单登录界面设计
- gcc 静态库和动态库
- TIBCO RVCM(Certified Messaging )
- ARM11、OK6410_Linux、系统移植 和 驱动加载