HTML5 Canvas编写五彩连珠(2):画图
来源:互联网 发布:免费提词器软件 编辑:程序博客网 时间:2024/05/29 14:27
好吧,新的一天来了,我才开始动笔,真够懒得:)昨天说了今天我们要画一个球,在canvas上。好吧,这是游戏的入门的第一步,只是昨天没写完,所以。。。
<!DOCTYPE html><html xmlns="http://www.w3.org/1999/xhtml"><head> <title></title></head><body> <canvas id="canvas" height="400" width="600" style="background: #fff;"></canvas> <script type="text/javascript"> var canvas = document.getElementById("canvas"); var ctx = canvas.getContext("2d"); ctx.beginPath(); ctx.arc(110, 110, 40, 0, Math.PI * 2); ctx.strokeStyle = "red"; ctx.fillStyle = "yellow"; ctx.fill(); ctx.stroke(); </script></body></html> 上面的代码是在VS11 beta上写的,实在是太舒服了,vs是非常强大的编辑器。上面的代码中我们绘制了一个大大的圆,并且着色了,红边和黄心。
看下 arc (弧度)方法,昨天的文章里有他的链接地址,我在这里粘贴下。
The arc(x, y, radius, startAngle, endAngle, anticlockwise) method draws an arc.
arc(x,y,弧度,开始角度点,结束角度点, 顺时针),角度点你可能不是很清楚如何表示,这里是用Math.PI 圆周率来表示 6.28是周长。 想画圆的一部分也就是一段弧线,可以取开始的角度点和结束的角度点。
那么下一步就是要把圆能够画到我们棋盘上。其实,这个很简单,只要我们把x,y和radius的值调整下就会绘制出来。我把昨天代码写的更“专业”了一点。所以,今天的代码会在新的代码基础上增加了。先看下改动过的代码。
var canvas = document.getElementById("canvas"); var ctx = canvas.getContext("2d"); var g = { cellCount: 9, lineCount: 5, }; var map = { startX: 20.5, startY: 60.5, cellWidth: 30, getEndX: function () { return g.cellCount * this.cellWidth + this.startX; }, getEndY: function () { return g.cellCount * this.cellWidth + this.startY; }, draw: function () { ctx.beginPath(); ctx.moveTo(this.startX, this.startY); for (var i = 0; i <= g.cellCount; i++) { var p1 = i * this.cellWidth + this.startX; ctx.moveTo(p1, this.startY); ctx.lineTo(p1, this.getEndY()); var p2 = i * this.cellWidth + this.startY; ctx.moveTo(this.startX, p2); ctx.lineTo(this.getEndX(), p2); } ctx.strokeStyle = "#456"; ctx.stroke(); }, }; map.draw();是吧,更专业了吧,这样就不会定义一坨的function,到时候没出找,而是定义在一个对象里,这种封装也能避免命名冲突。而且,棋盘起始的位置我也做了调整,只要修改起始的x y值,棋盘就会在这个点开始画。 那,现在我们要在第五行,第六列画一个黄色的球,该怎么画呢?只需要给map增加一个方法,再调用这个方法就行啦
drawBubble: function (x, y) { var px = this.startX + this.cellWidth * x - this.cellWidth / 2; var py = this.startY + this.cellWidth * y - this.cellWidth / 2; ctx.beginPath(); ctx.arc(px, py, 12, 0, Math.PI * 2); ctx.strokeStyle = "white"; ctx.fillStyle = "yellow"; ctx.fill(); ctx.stroke(); },画出来刷新下,居然是第六行,第五列,我们搞错了吗?代码没有,只是我们误认为x是行y是列 按顺序叫顺口了,其实是反过来的:)
泡泡既然能画出来,也要能清除才是,不然没法玩,所以再增加一个清除泡泡的方法。
clearBubble: function (x, y) { var px = this.startX + this.cellWidth * x - this.cellWidth + 0.5; var py = this.startY + this.cellWidth * y - this.cellWidth + 0.5; ctx.beginPath(); ctx.clearRect(px, py, this.cellWidth - 1, this.cellWidth - 1); ctx.stroke(); } ok,是不是很霸气? o(∩_∩)o 哈哈,不过在获取泡泡的位置时是不是很纠结,为什么画泡泡是 width/2 而擦除要加0.5?
画圆是从中心点开始画,所以要去掉半径,而擦数不能擦掉我们的棋盘线,所以要偏移0.5 。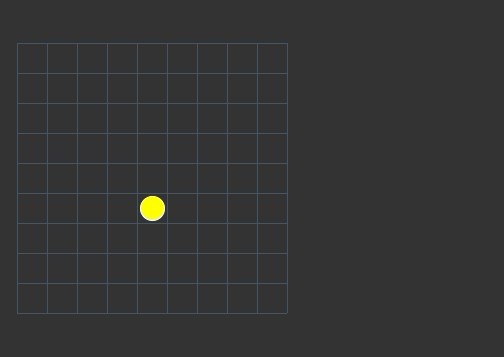
- HTML5 Canvas编写五彩连珠(2):画图
- HTML5 Canvas编写五彩连珠(1):预览
- HTML5 Canvas编写五彩连珠(3):设计
- HTML5 Canvas编写五彩连珠(4):动画
- HTML5 Canvas编写五彩连珠(5):寻路
- HTML5 Canvas编写五彩连珠(6):试玩
- 开源 cocos2d-html5版 五彩连珠.
- 开源 cocos2dx 五彩连珠.
- 求五彩连珠java代码
- html5<canvas>画图
- html5-canvas画图
- Html5 Canvas画图
- html5 Canvas画图
- html5 canvas画图
- HTML5 canvas画图
- HTML5 canvas画图
- HTML5 canvas画图
- html5<canvas>画图
- UAT Plight: Fail To Refresh Database
- CppUnit初识
- 微软触摸屏新突破,响应速度提升100倍
- 计算机中的服务是什么意思?
- CppUnit测试框架使用笔记一
- HTML5 Canvas编写五彩连珠(2):画图
- Struts2类型转换的说明及案例分析
- 操作Excel出现“外部表不是预期的格式”错误
- java中的反射机制在android中的应用
- Java中利用simpleFramework解析xml
- Java多线程:线程调度Join
- php中如何使用KindEditor编辑器
- lua作为配置文件的读取方法
- 矩阵乘法的并行化改造